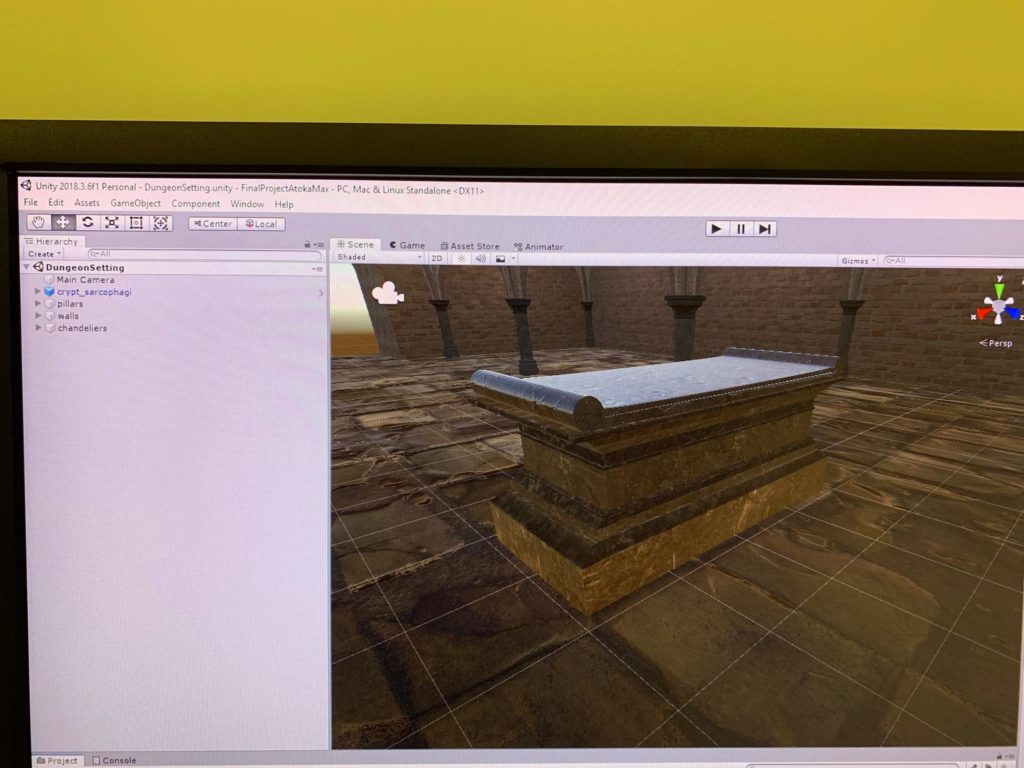
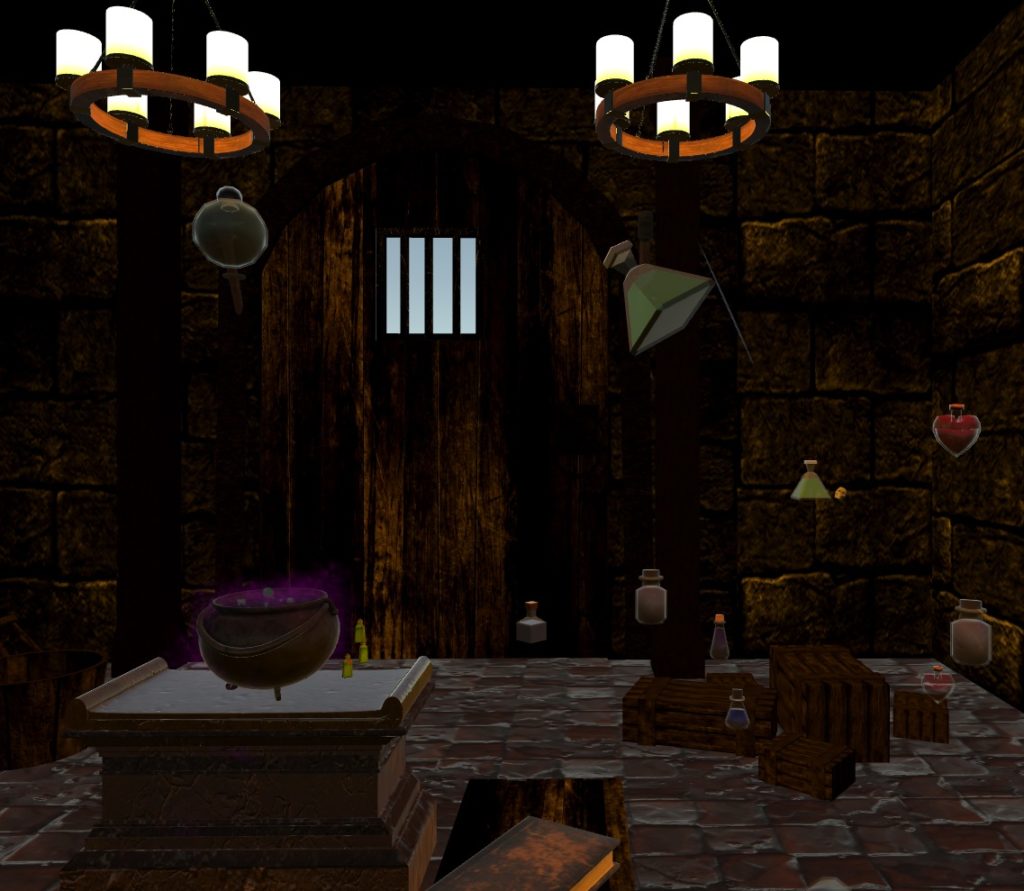
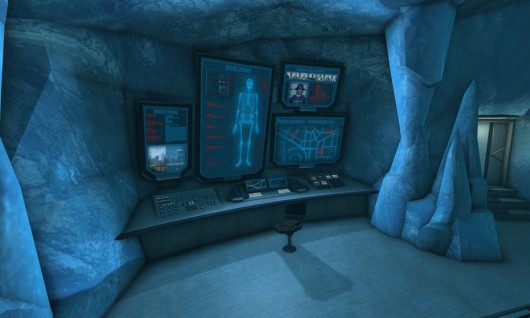
Atoka has been working on the environment leaving me to work with the scripts. The setup was that our project takes place in a dungeon crypt which looks something like this:
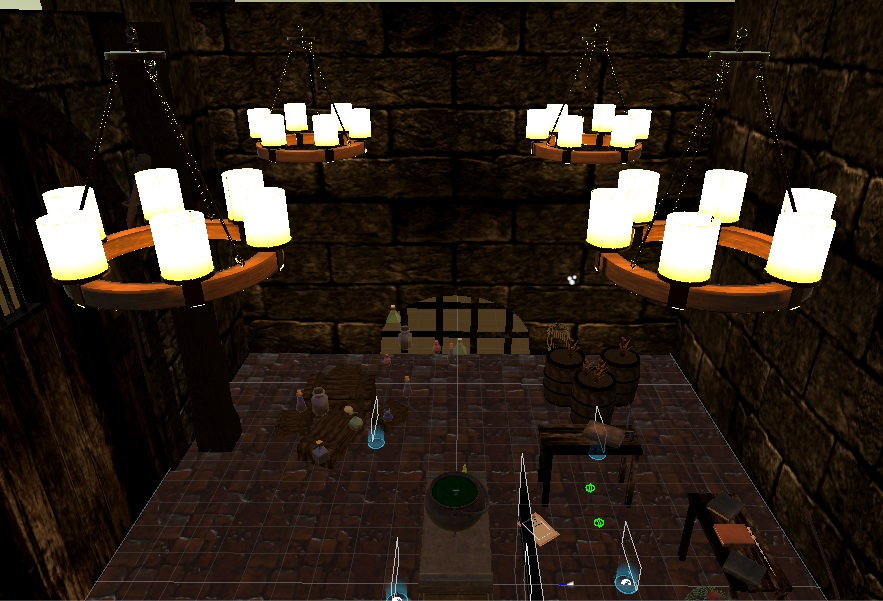
After dealing with the light settings and applying a more darker skybox (to make the crypt darker) I have encountered a small problem when I started testing the environment in the VR headset. Due to the fact that we have quite a couple of lights (18 light sources), the computer can’t handle it and simply crashes (blue screen). Our professor suggested us to use lightmapped textures to replace the light sources.
Development blog #2 5/5/2019
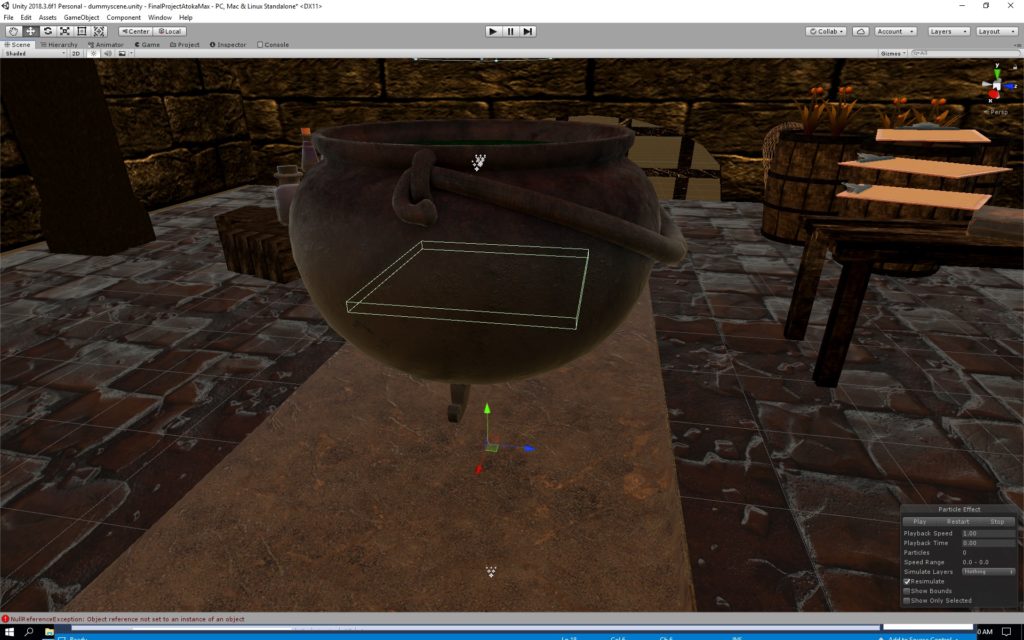
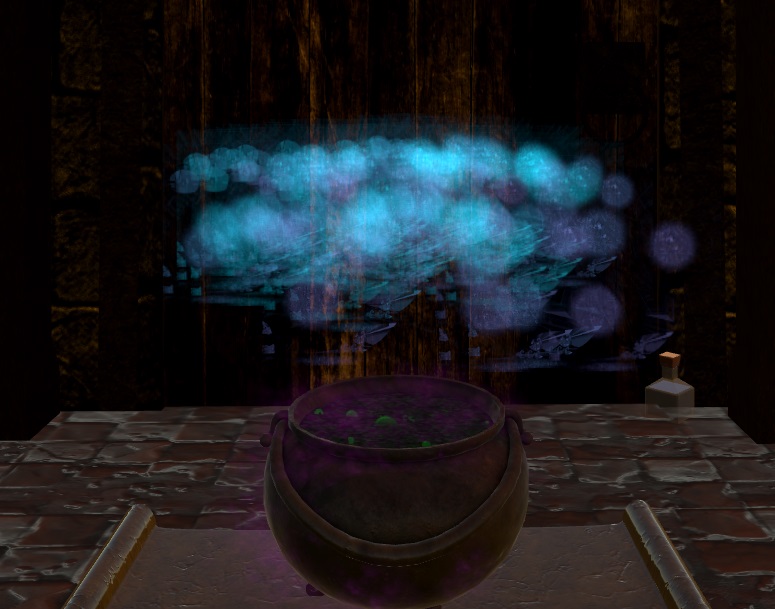
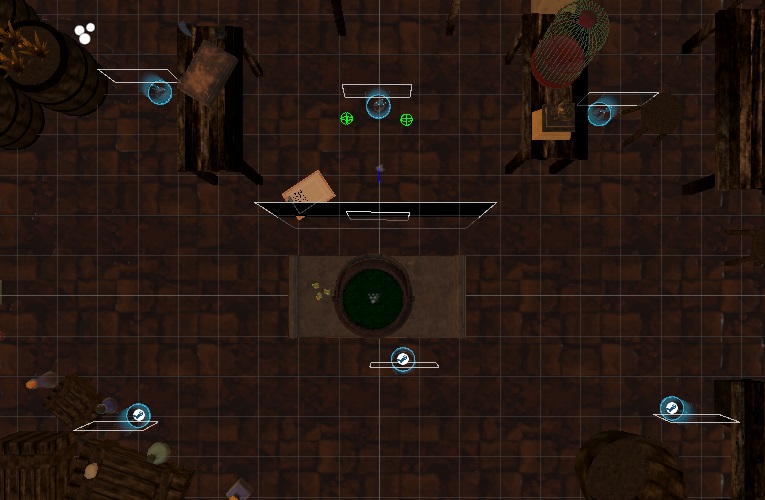
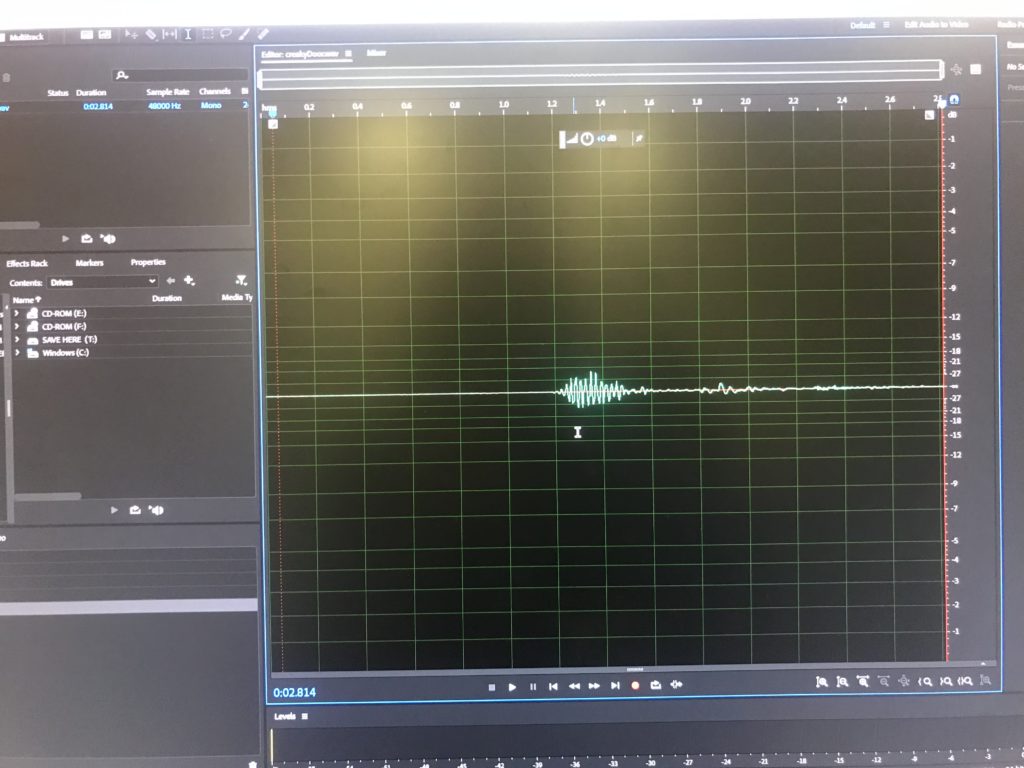
We have implemented most of the interactions including the cauldron and the feedback system of the cauldron. The cauldron has an invisible collider at its bottom. Anything that collides with it, gets destroyed and plays the particle system as can be seen in the picture below. User testing was also done to get feedback based on the user perspective rather than the creator perspective. Based on the user feedback we have added some teleportation points and and turned the gravity off since it was very easy. And now when the objects are released. I have started working on the scripts, started to create the script that will store the data in the cauldron, but failed miserably :/. Atoka in the meanwhile was finishing of the environment and doing the voice over (special thanks to Sebastian Caro and Ahmed Meshref) Also we have completed the lightmap using light emission textures
The final scripts left to be done until the game is finished. In the past week we have completed the final scripts such as : -winning list generation -printing that list on the clipboard -restarting the game -game over/winning screen -playing sounds whenever they are supposed to
Just some finishing moves and user testing and we got this:
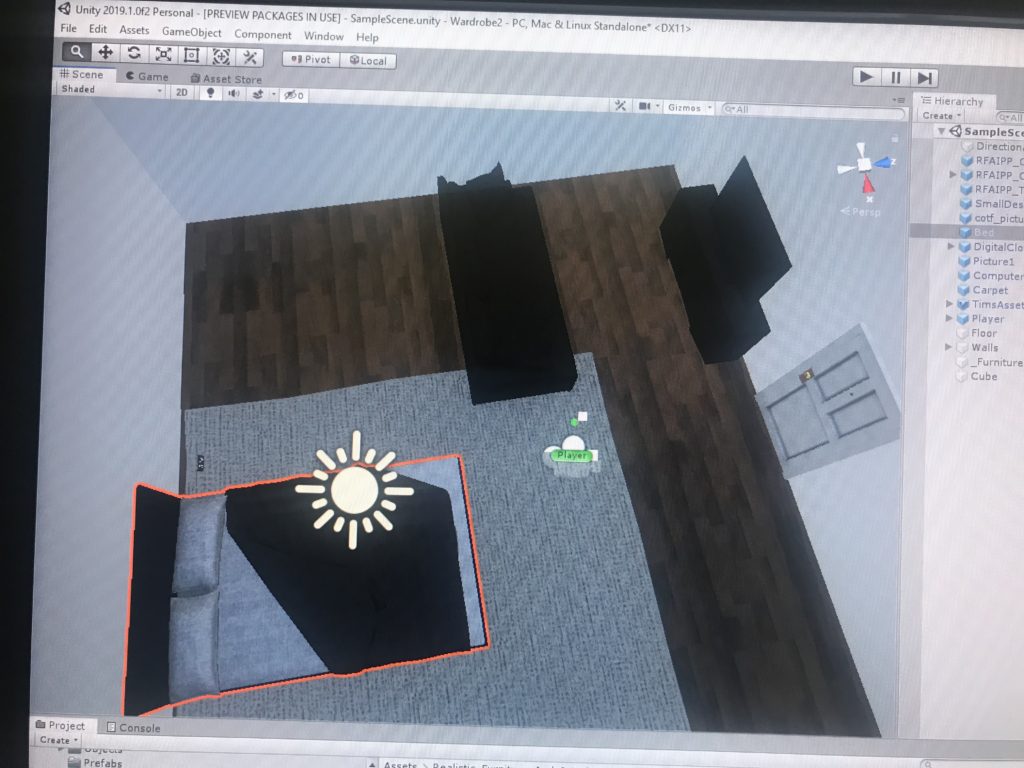
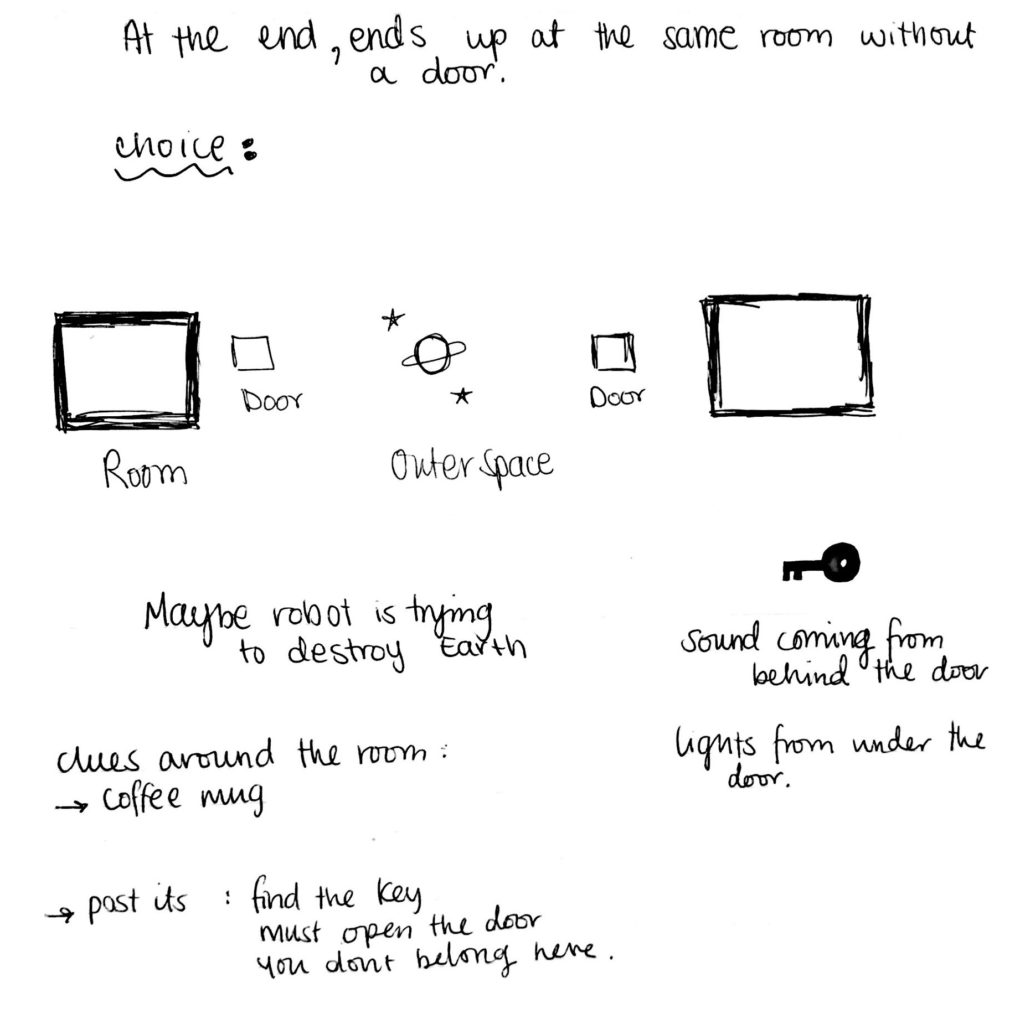
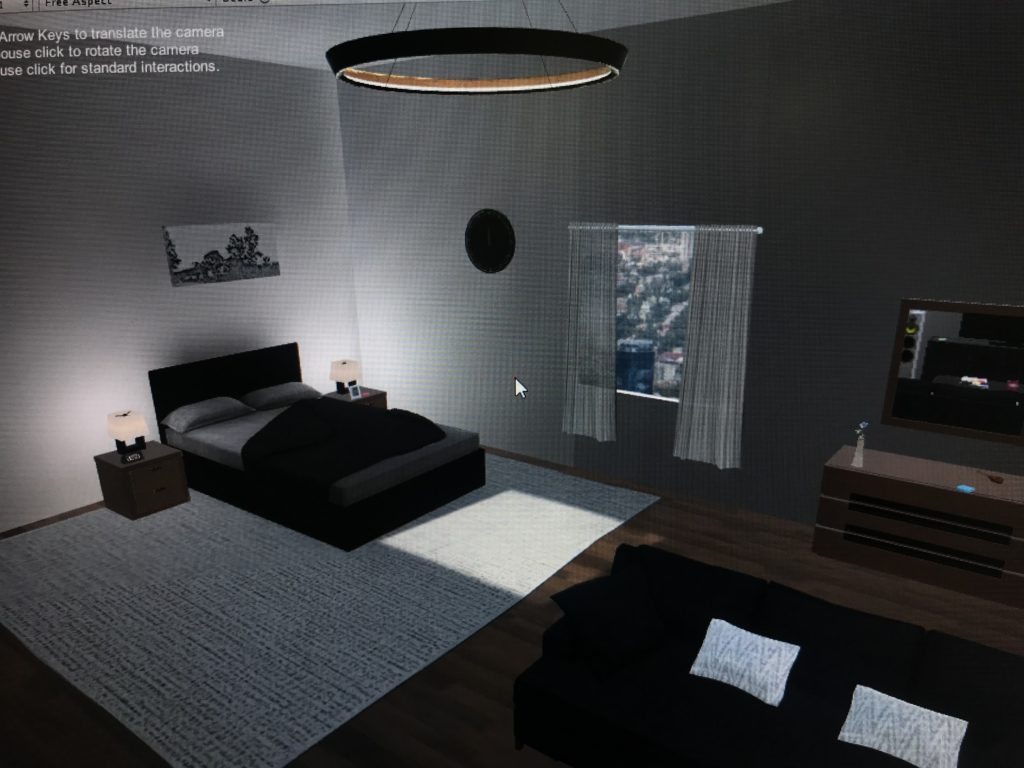
Player is located a simple and plain room with a door
is there anything the player can interact with in the room? A mug on the side table, a pillow?
Hints in the room to what the closet holds? Poster on the wall about different worlds, closed doors
what will instigate the user to open the door
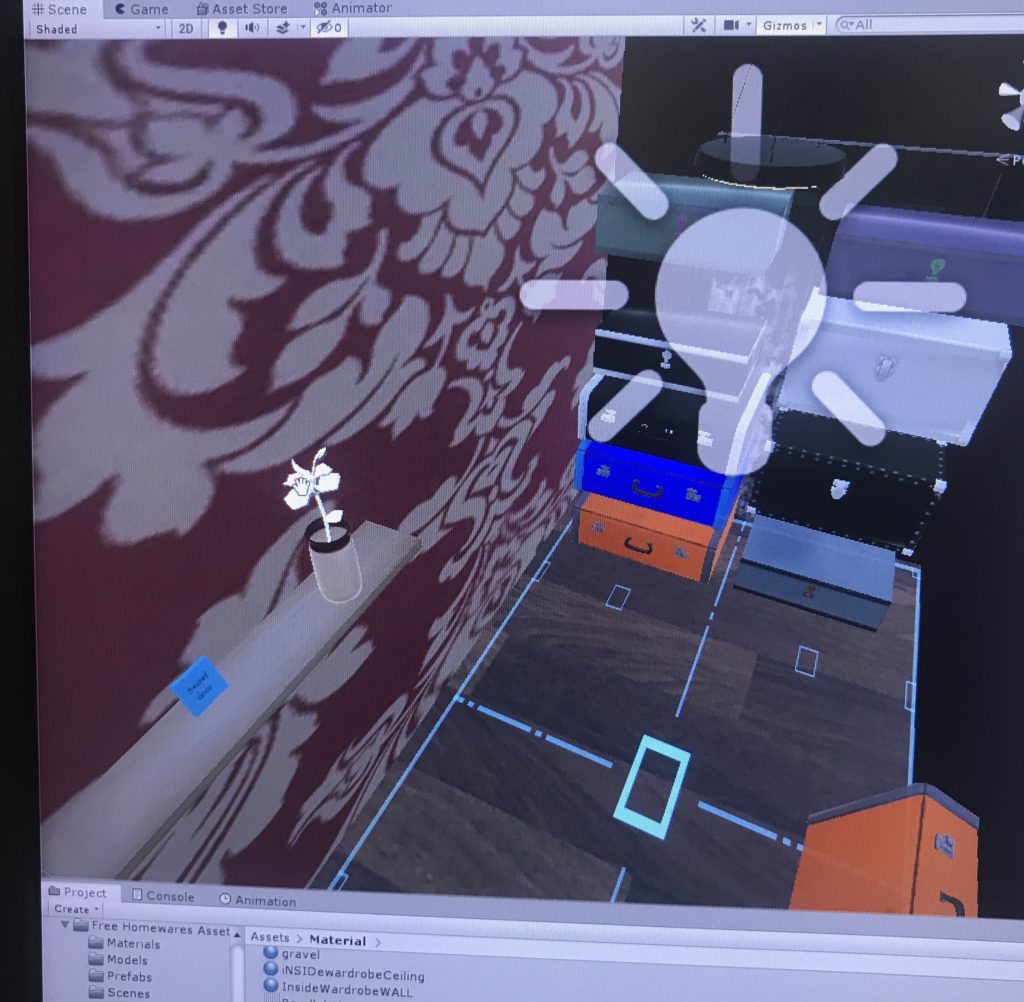
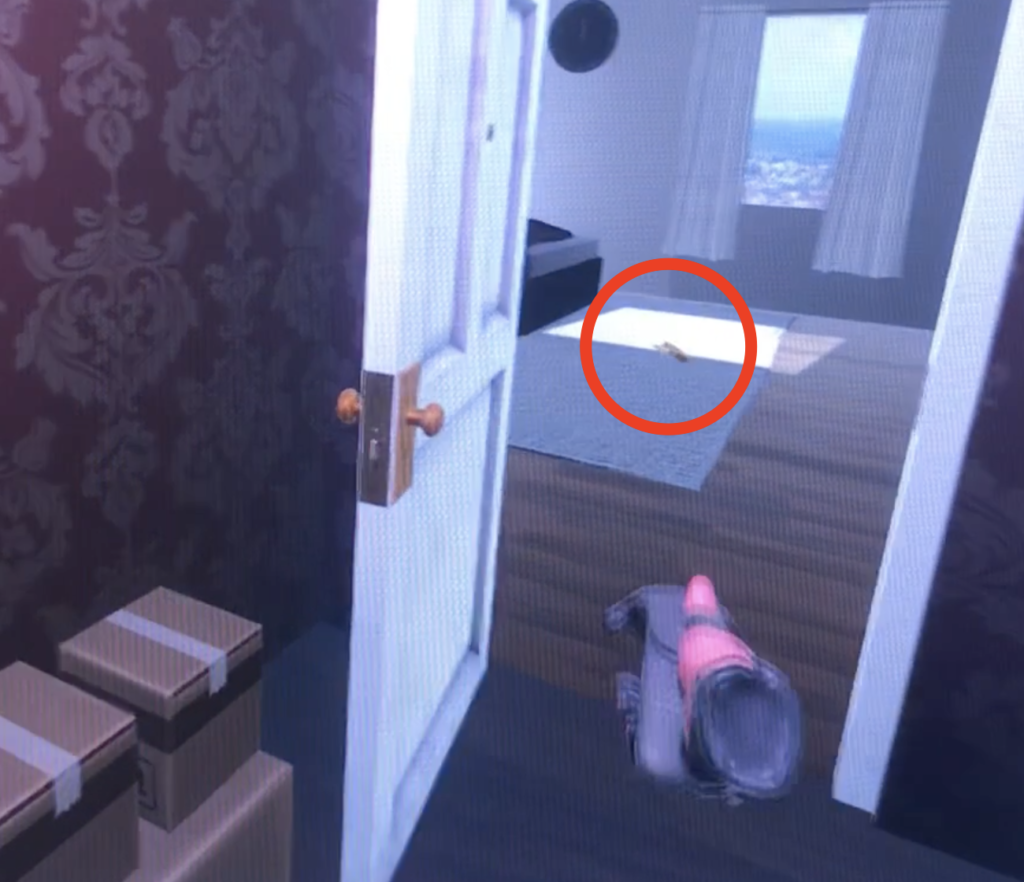
Player opens the closet door and finds an ordinary closet
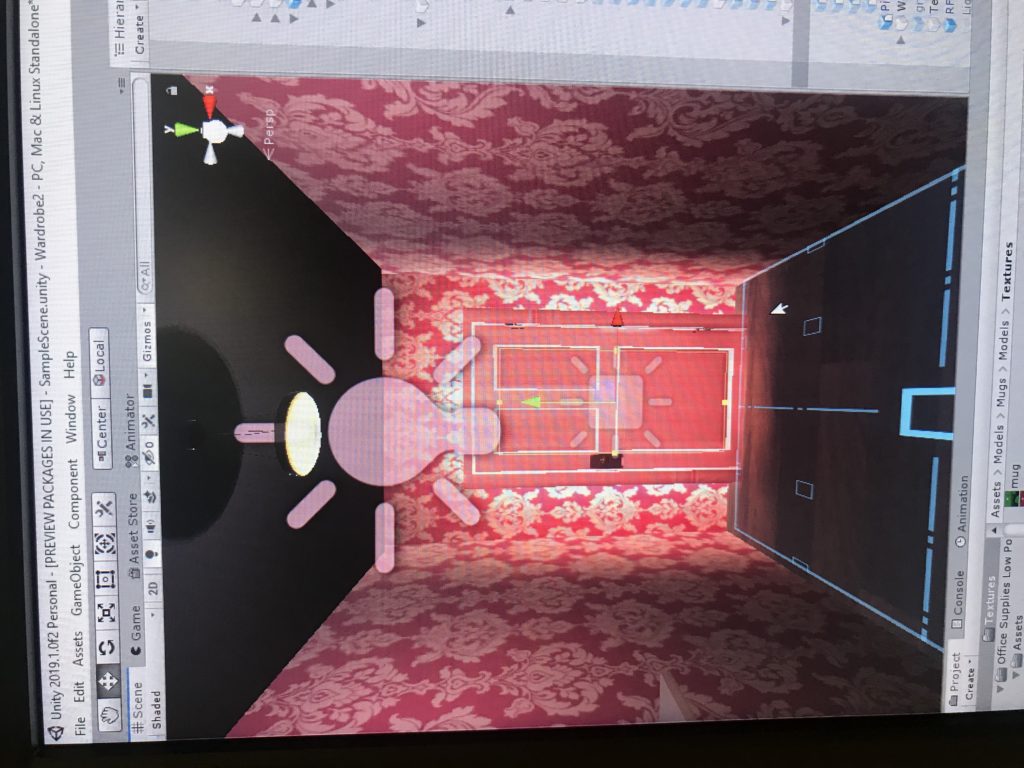
whats inside the closet? boxes, clothes, a light bulb hanging above?
Player enters the closet and closes the door behind them. Its dark at first but
how would the player know to close the door while their inside
After a few seconds of darkness, things start to appear, glowing and floating around them. The door is still visible to them, in the same place. Eerie music starts to play in the background
What interactions are they able to do inside
how would I limit their movement
switching scenes and knowing when the door is closed to initiate the other world to begin
if player opens the door again, they are back where they started in the closet, in the room
how would I switch back to the original environment without it being too abruptly
maybe if the user is facing the door the effects stop, if they are facing any other side it begins
Actions in VR
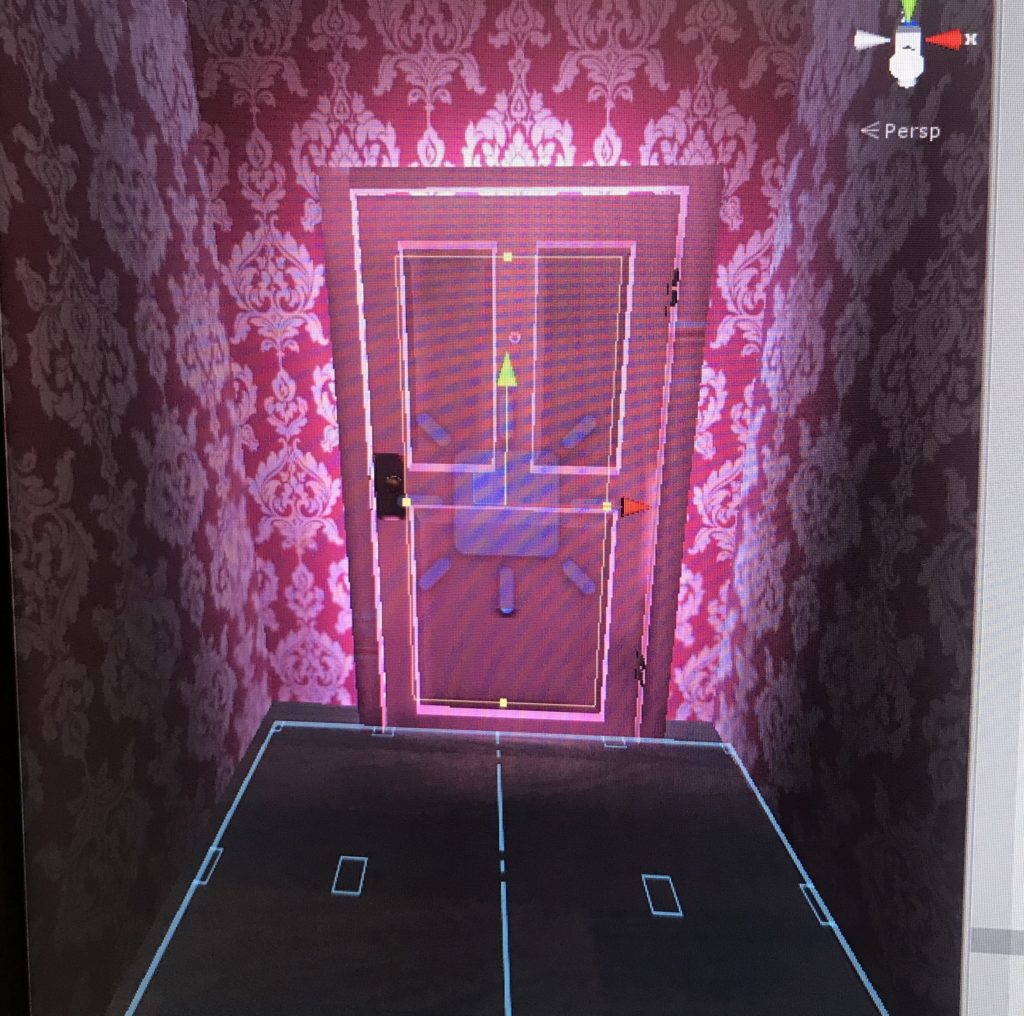
interacting with the door;
how would you grab it
is there tilt
how to close
can you push it
switching scene 1;
detecting if the door is closed then playing scene
switching the scene
inside normal wardrobe;
carrying box
pushing box
the other world;
floating objects
glowing effect
able to push around those objects/grab/throw
switching scene 2;
knowing when the player is facing the door or close to it
calming the effects of this other world, fading to black
open the door and switching back to the room/closet scene
Inspiration
https://www.youtube.com/watch?v=GRyR71oHOb8&t=59s
Instructional Videos
Notes
April 17
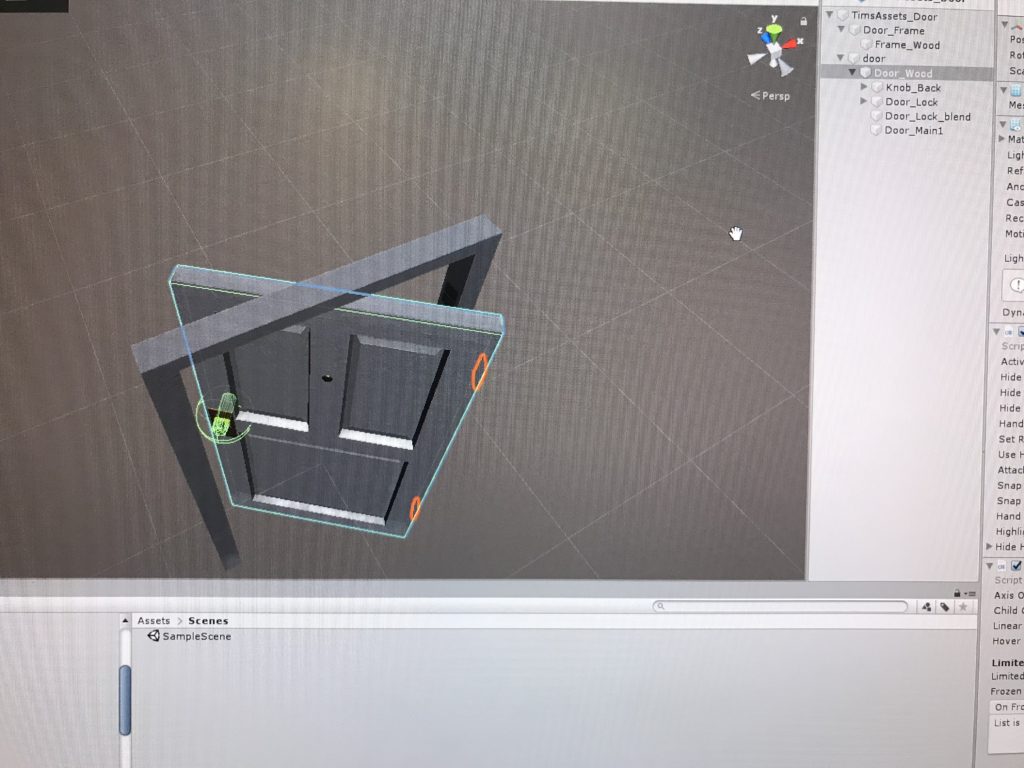
Door Struggles
Creating a door that is interactive and immersive is the first thing I looked at, I want to make a door when you can physically turn the knob then push the door. I feel like having such a move will add more onto the users experience.
had to move the location where the door will rotate or it will end up like this
added a circular drive to the knob and a collider to make it interactive and “turnable”
as I followed the instructions of a youtube video on how to make this possible, at the end the door would work but as it opens it would open vertically. messed around with the numbers but each one would give me another way the door can rotate but never the actual right way.
Trying to figure out the rotation on a simple cube instead of the door prefab, but it still was an animation clip..
seeing how much time I have spent invested in making a door work, I figured it would be best to just stick with the animation and focus on the other things in the environment.
April 22
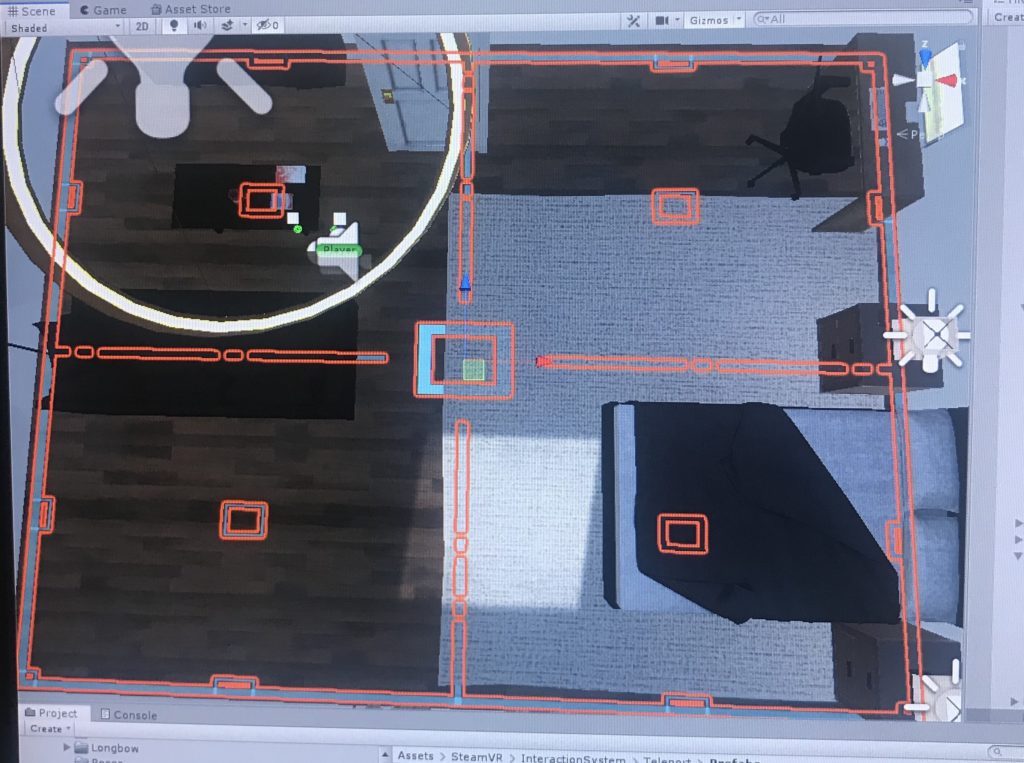
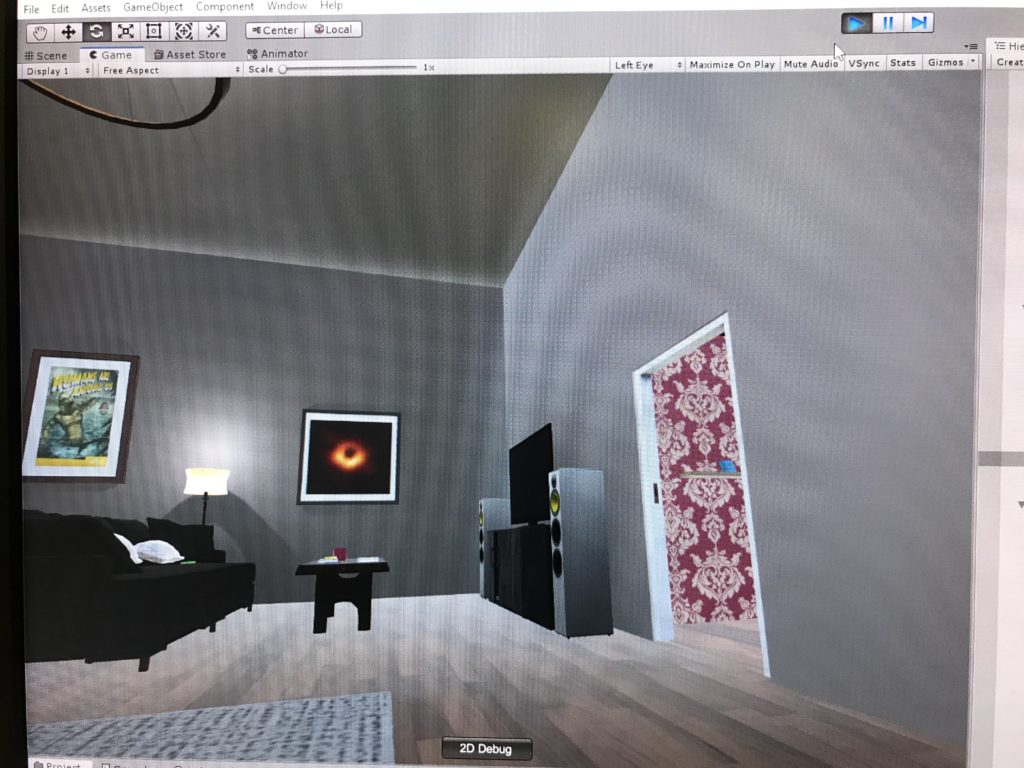
The VR Headset keeps crashing and not connecting, so I decided on beginning to design the room instead. I want to make it modern and simple. Thinking adding a TV as well. Ill see if ill be able to add a video interface for the TV as a newsfeed playing.
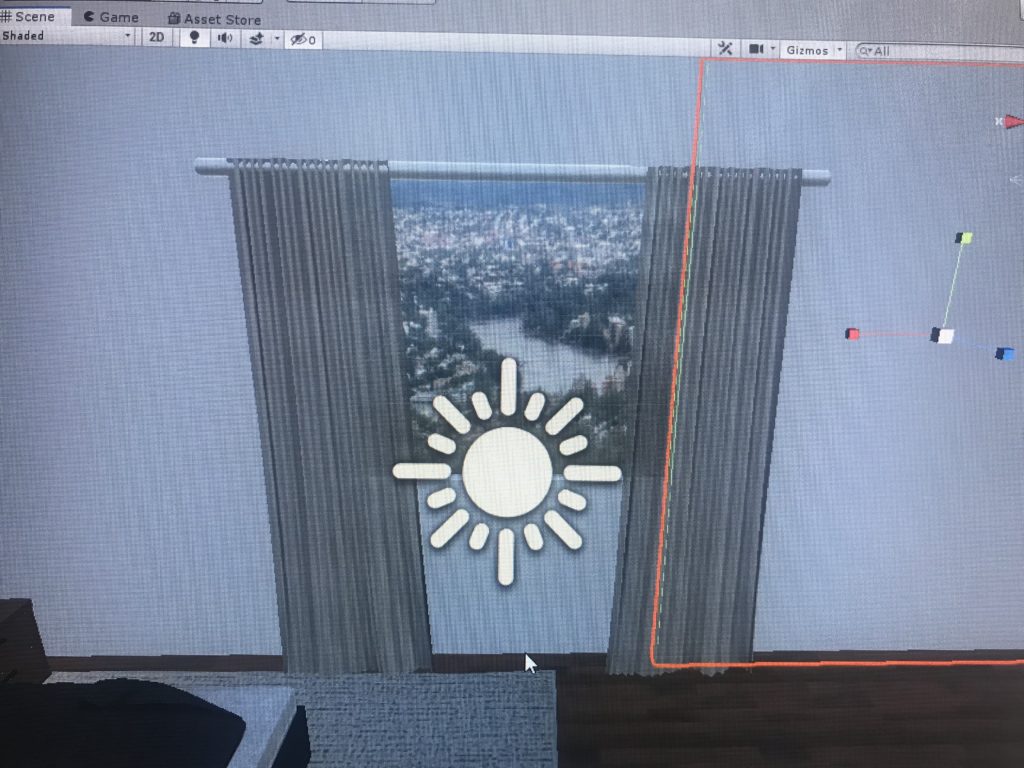
I felt like adding a window was a very important part of the room, not only did it give the user perspective of their surroundings but it made the room feel less trapped and gave in natural light in the room as well
still brainstorming of what could be behind the door; the main idea I’ve got so far is having the door act as a secret entryway to a superhero secret hideout/dungeon
from Incredibles
I already included some clues alluding to a superhero persona. I feel like having something that ties these two environments together is important for a complete story that is well rounded. By changing certain objects materials I was able to accomplish putting my own touch and messages on items around the room
April 29
Tried adding light probes but it kept glitching the scene and walls &
added an audio file for the ticking of the clock for some audio in the room
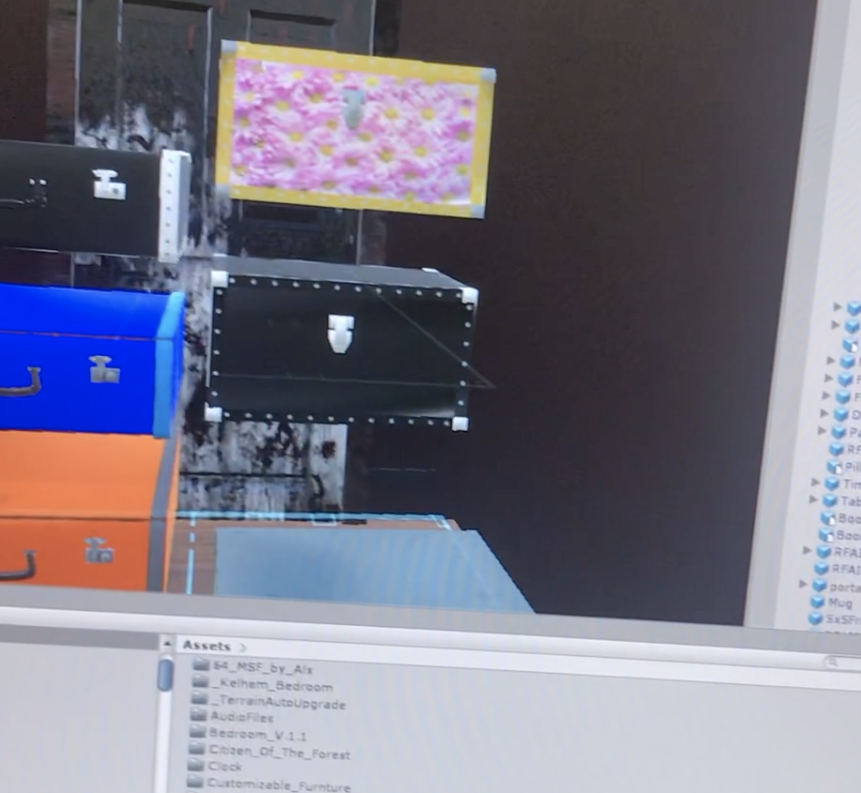
added suitcases to the wardrobe and designed some of them as well for more variety
Added a teleportation platform across the room
April 30
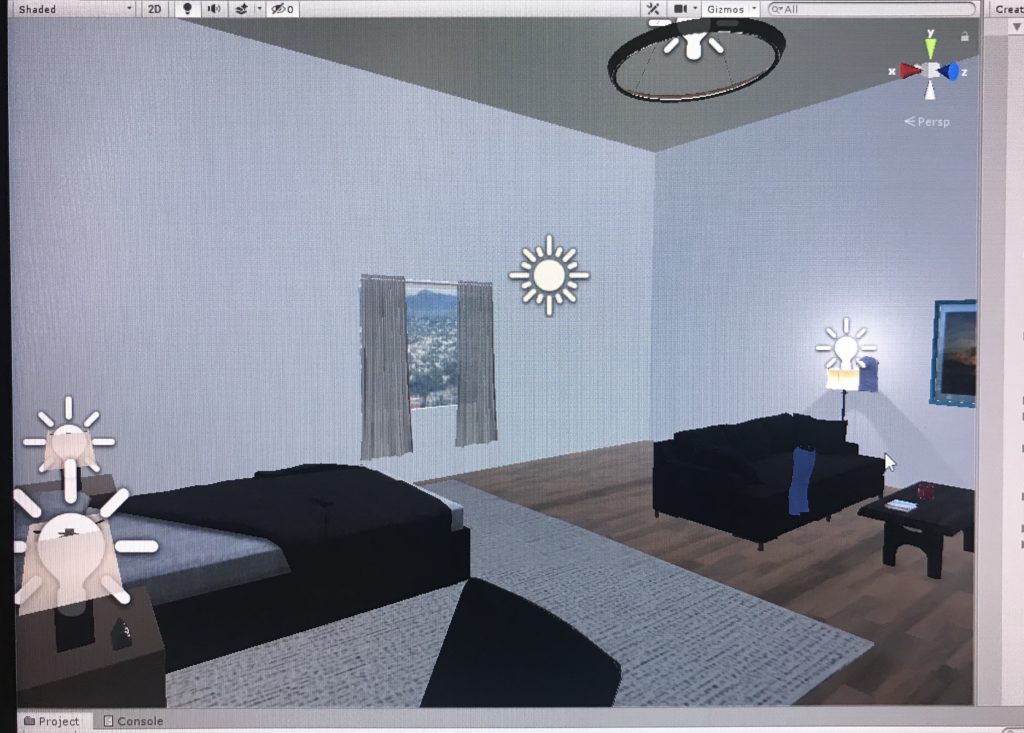
Wardrobe Update with a few intractable suitcases The bedroom so far
What could I have the player do in the second environment/room if I go along with the superhero narrative.
shooting range?
buttons that activate something
boxing bag
a library
futuristic screen, map
Two people play tested my project today, they gave me some feedback about the feel of the room and the sizing. As well as the wardrobe being too stuffy?
Began working on the hidden lair part, I wanted to include stairs that lead down, but
creating stairs with big enough steps for teleportation makes it seem weird and unrealistic
complicating my project too much.
May 7
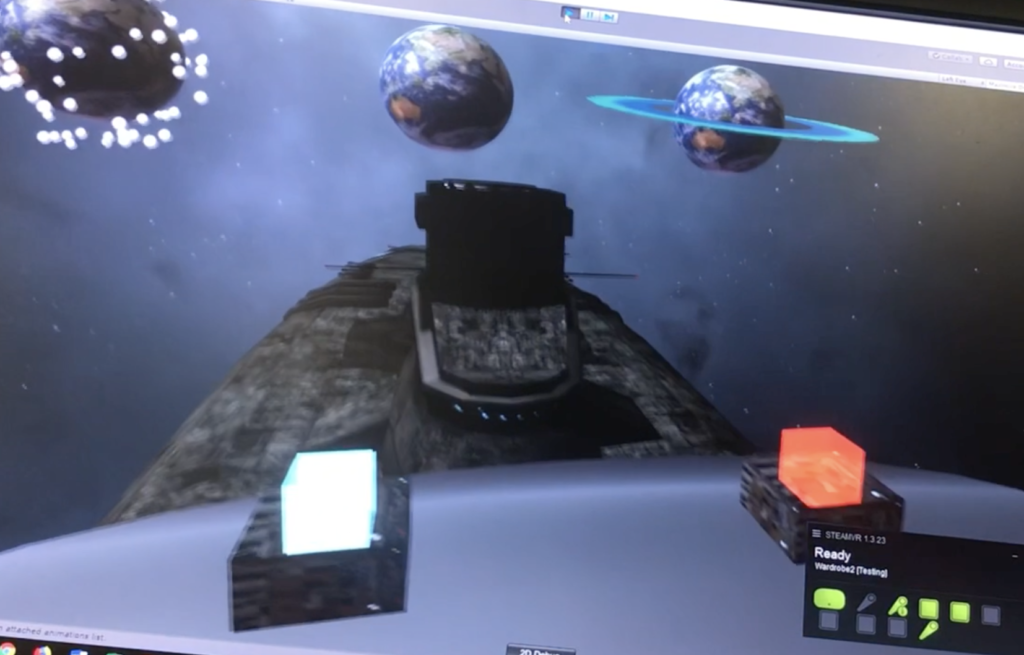
Switched some things up so now “You’re an alien & you go to an alternate universe” is the direction I will take now
Think about how will the player move from scene 1 to scene 2
you find a wardrobe with a hidden door/hole? do you press something and be transported? is there a portal you walk into? how will it work
the player will look around the room for clues, explore.. does the user need to pick up something with them and place it somewhere
like a ticket to outer space?
New Storyboard
you wake up in a room with amnesia of who (what) you are, and you start to look around the room for clues
you find a ___________ , but you don’t think it has much importance
you head towards the door and find yourself in a closet or storage room that is quite cluttered with suitcases
behind all these items, you notice another door? or a small crawling space? with a hole for ________ to be placed in, and you remember your saw it in the room
if ____________ is placed in the hole, you get transported to outer space. where you belong
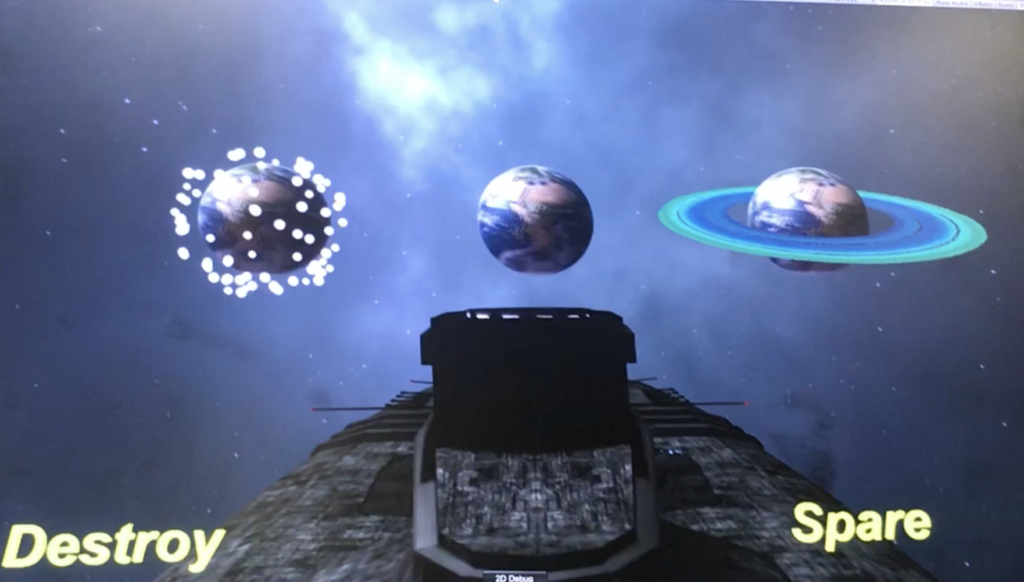
Giving the user a choice in the second scene; be good & Save humanity/Earth, be evil & destroy it. Should I label these options or should it just be a surprise, having them choose unknowingly, but they won’t understand if I do that so..
Some notes of more brainstorming, I decided on using a key as the way to transport to the second scene
things to focus on for now;
fix closet area
key to open door
fix outer space environment
add more audio
doors are too small? you are too tall? check that
animate door 1 to open
UI screen
animate drawers to open?
The outer space scene with these particles is quite a scene
May 8
fixing the wallpaper in the wardrobe area, must change the tiling of the material to fit
focus on:
fixing the lighting in both worlds, make the items static and add light maps
fixing the players location and figuring out how to keep the alien hands in scene 2
why does the key fly? .. should I keep it that way?
Lighting much better now
you can see the key is stuck in mid air now
Playtesting:
users with no VR experience find it hard to move around
I noticed most people will explore the room first before heading to the door
even if they don’t they must find the key to reach the other side
player wouldn’t notice a door behind the suitcases. are there too many? should I add a light being the door
May 10
Adding audio clips;
sound coming from behind door #2 to draw the user there?
a radio in the room?
outer space scene, will the robot speak?
May 11
adding an audio for the door when it opens
have an option in scene 2. What could happen in outer space, what could the user do? destroy the earth (the earth that you were on in scene 1, the room)
will a meteor hit it?
May 12
edit UI screen in the beginning
clock movement
fix audio
choose; can they open drawers or not (too many actions in scene 1, not enough in scene 2. focus )
animate robot, him being static looks weird
make the button that opens door 1 move and more obvious to spot
put a hint in the wardrobe on a post it for the user to move the suitcases
add more things in the room about parallel worlds
add a way to restart scene
add labels to the buttons in scene 2
what is the robot doing? whats his purpose if he has any
the rotation of the earth is due to animation, change it to a script to make it smoother
the particles that appear when the earth explodes, using the script GameObject.SetActive() and they have an explosion attached to them making them fly
earth exploding
without labels
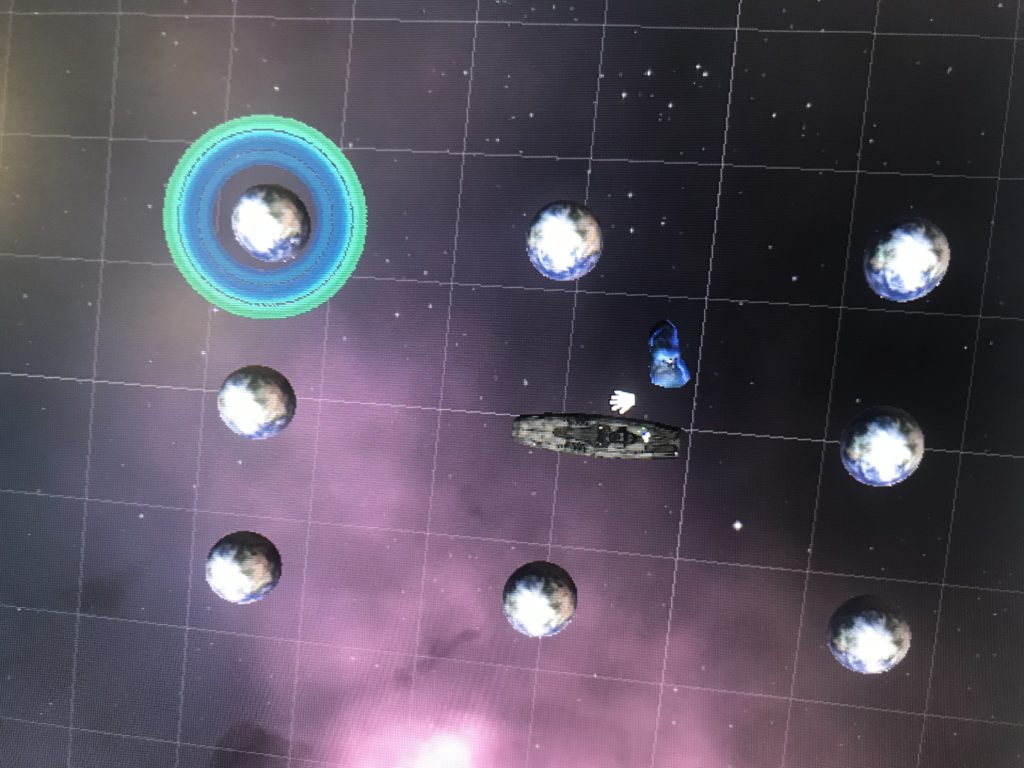
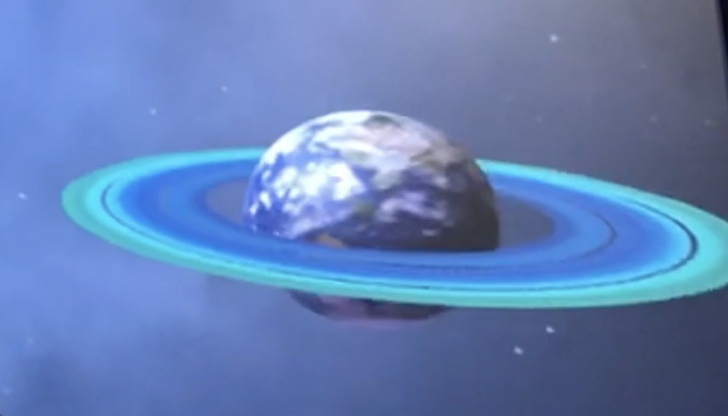
adding multiple earths bring more to the story, making it a parallel universe/world. and some of the earths have special features, for example rings, or asteroids, a glow. when I chose to put multiple earths, the previous effect of snowflake particles flying was too much and decided against it
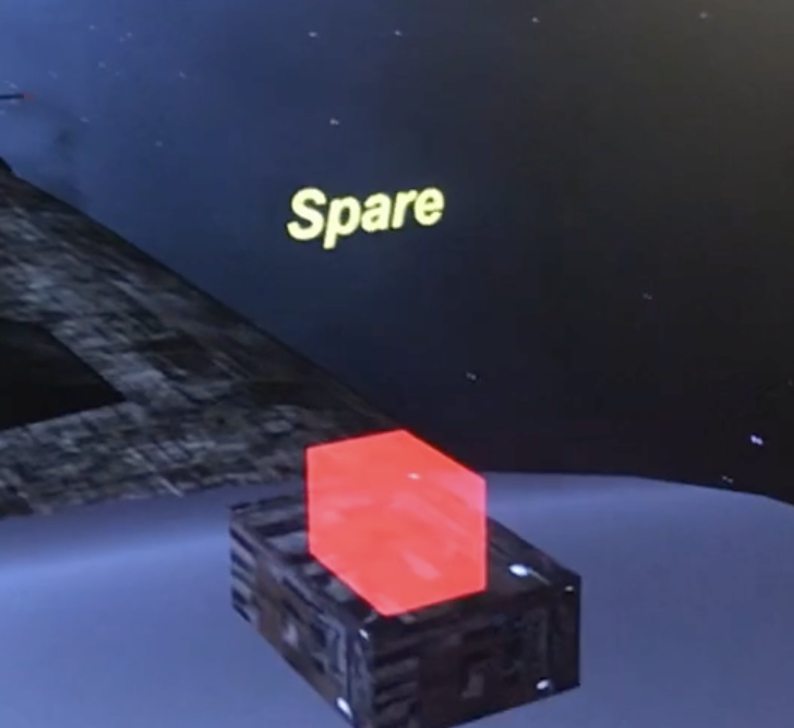
the button for destroy leads up to the earth exploding, easy. But sparing the earth.. what would happen? Nothing? what about a user playing the game for the first time, such a button would basically do nothing to them. they wouldn’t understand the context. I need visual/auditory cues that you have in fact Spared the earth.
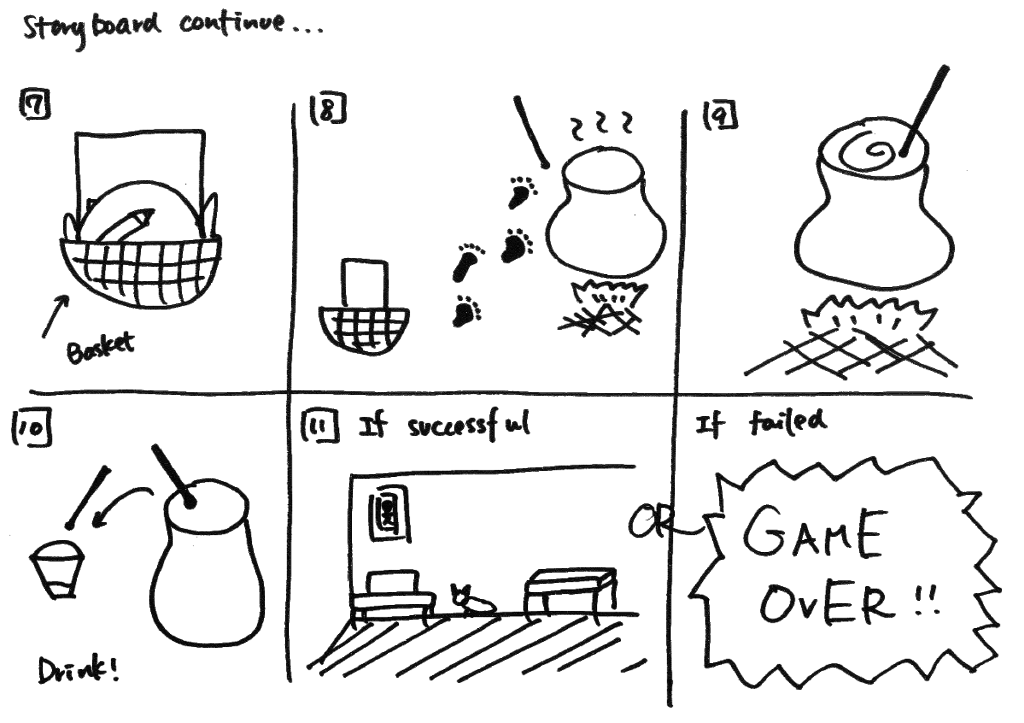
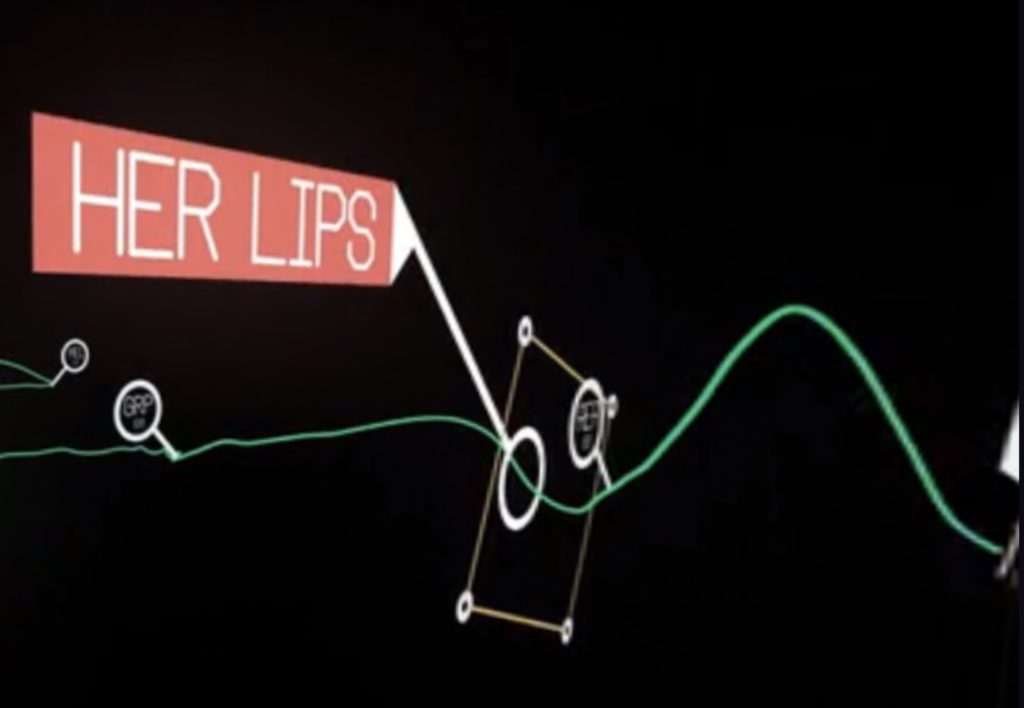
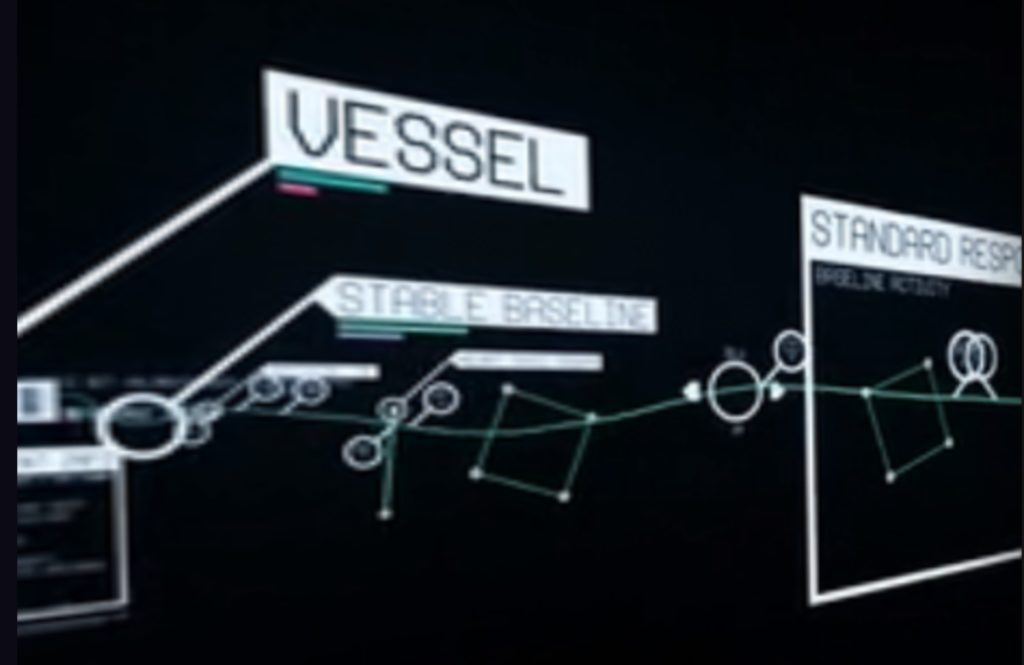
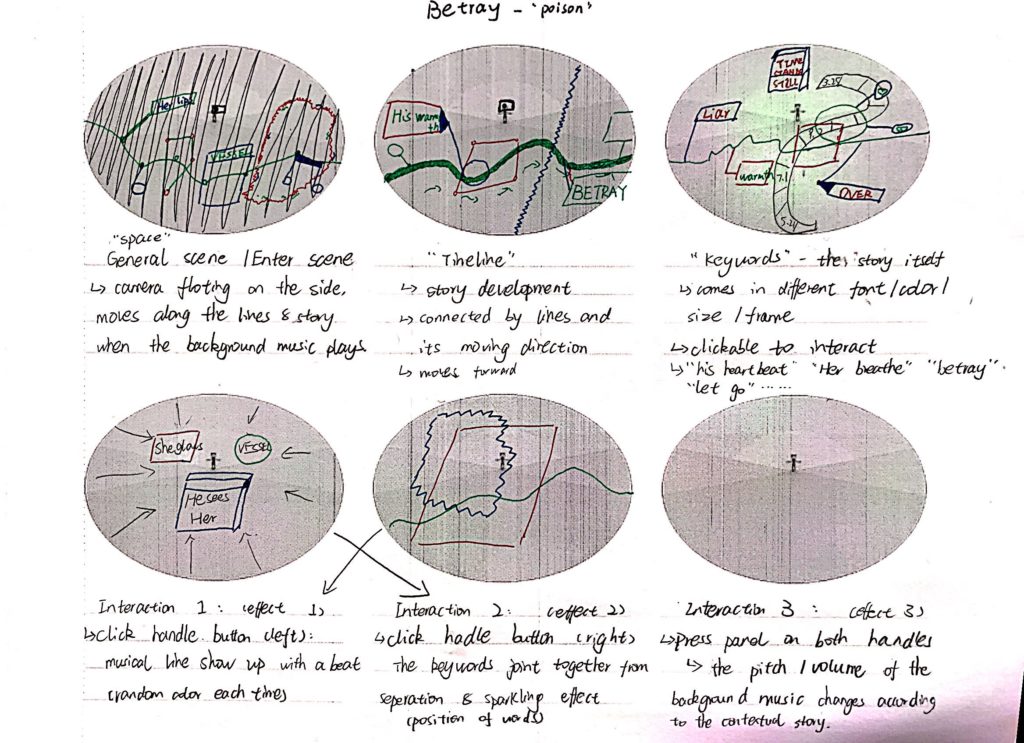
We paved our project idea into a love story using the theme “close the door” according to the feedback we got from folks and professor that the previous project idea doesn’t involve sufficient meaning for the user that a user might not feel engaged enough into the story just by watching it.
When the game starts, the user will be put in to a lover’s memory with a box in front of his/her (user can choose male/female version to hear different interpretation/stories behind the same paired objects), and the user will pair some memory pieces and put them into the box to complete the story. Once they pair is correct a story piece will be told in the voice message, otherwise the objects will be bumped out of the box and the user need to pair the correct ones again.
the story line we discusses is as following(the order doesn’t matter in this case):
Male Version:
Movie Ticket & Popcorn Box: I finally got the courage to invite her out for movie. Touched her hand when we tried to reach the popcorn at the same time
Paired Toothbrush & Cup: The first night she slept over, she brought her toothbrush with her. The next morning, she changed my toothbrush into a paired one
Dog Food & Dog Cage: She always wanted a pet dog. I brought home a cute puppy one day, and I couldn’t forget how excited she was: her dream finally came true.
Iron & Suit: First day of work after my promotion. She ironed my suit for me. Looking forward to our future.
Ring & Ring Case: I saved all my money for this ring, prepared for a month for this. Today is finally the day.
Passport & flight ticket: Leaving the country tomorrow. I guess I will have to put this memory in the box and leave it behind…
Female Version:
Movie Ticket & Popcorn Box: He finally asked me to hang out. I’ve been waiting for this for a month. He’s so shy but so cute.
Paired Toothbrush & Cup: I was like a kid after I stayed at his place. I paired our toothbrush up.
Dog Food & Dog Cage: Suddenly one day, he brought home a cute puppy. I was so surprised! I always wanted a pet. I guess now we are a family of three.
Iron & Suit: I want to make his first day after promotion special, so I got up early to iron his suit. Looking forward to the bright future of ours
Ring & Ring Case: I said yes.
Passport & flight ticket: His work left us no choice but to lock all these memories up, forever.
April 18th:
Renewal of storyline and objects because some objects are unavailable in asset store:
**The story will be understood regardless of the order – every single piece of a story is independent from one another however once the user finish all the story piece he/she will get the idea of what’s going on – there’s different level of love memories as well as the part the indicates the break up, however there’s no specific reason given why the owner of the memory break up, it leaves the space for user to imagine what happened, different people will have different interpretation of the reason based on their own understanding of the given objects and the story behind them.
Male Version:
Paired Toothbrush & Cup: Paired toothbrush is the first step to show we are a family, says her.
Candles & Plates: I finally got the courage to invite her out for a dinner. Candle light on her cheeks is the cutest thing ever.
Dog Food & Dog Cage: I brought home a new family member that day, and I couldn’t forget how excited she was: her dream finally came true.
Iron & Iron Board: First day of work after my promotion. She ironed my suit in the morning. Looking forward to our bright future.
Pen & Notebook: She used to keep all of our memories in this notebook … but it’s meaningless now.
Vast with rose: Roses die. So are our promises….Eventually it turns out to be a wedding without her…
Female Version:
Paired Toothbrush : Pairing our toothbrush makes us look like a family more…
Dog Food & Dog Cage: That day he brought home a cute puppy. I was so surprised! I always wanted a pet. I guess now we are a family of three.
Iron & Iron Board: I want to make his first day after promotion special, so I got up early to iron his suit. Looking forward to our bright future …
Candles and Plate: Can’t ask for anything better than a candlelight dinner for the first date.
Pen & Notebook: It’s been a while since he left me… i used to keep a diary everyday when we were together …. How stupid i was.
Vast with rose: Roses die. So are our promises…. Eventually it turns out to be a wedding without him…
finding objects that match the story line
Ending: Initial idea was to do an “close the box” animation when all the objects are paired and destroyed to cater the chosen theme “close the door” by indicating that the owner of the memory space “I” close the door of the bittersweet love memory and leave the memories behind in the box to keep moving on. However, I worked on the scripts of animation but ended up finding that our box is not animatable, because the lips of the box comes together with the box body and can’t be animated separately. Therefore we came up with an alternative ending of the story – in stead of close the box, the box will be destroyed and the moment it disappear, it will be accompanied with the particle effect to show the sense of “vanishing” and an ending explanation in 2D words will be shown to suggest the end of the game as well to explain to the player what happened, by saying “Thank you for helping me recall those memories… Now let me just leave my love story in this box behind and move on….”
April 23th: Environment Design
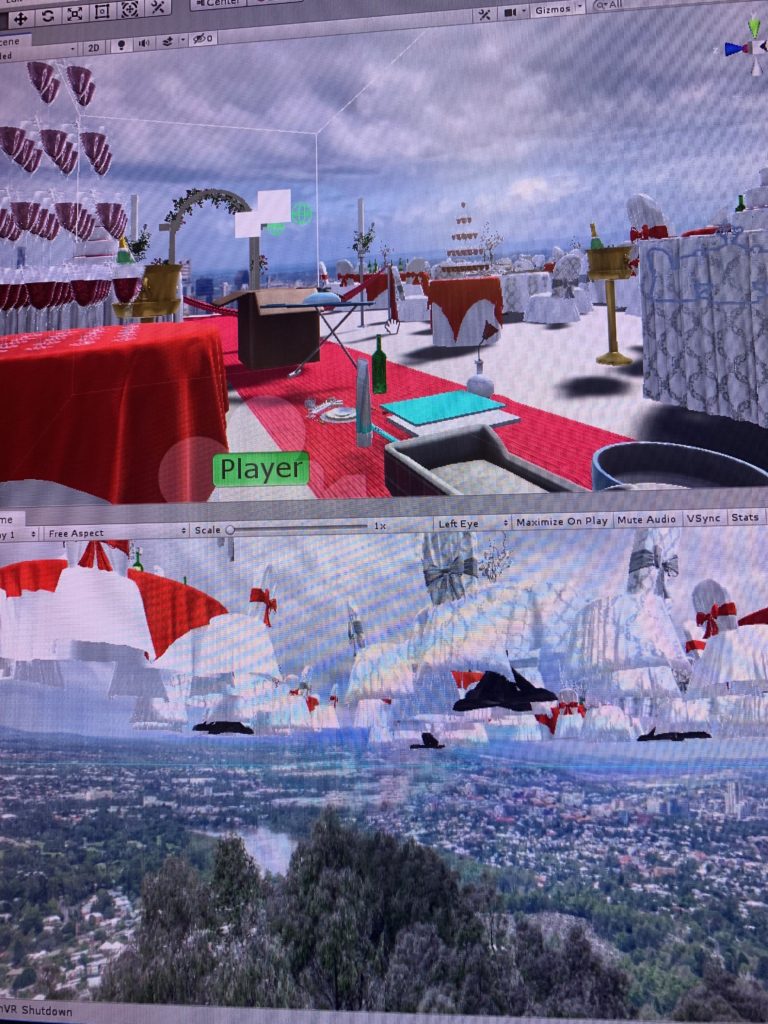
Because our story is a bittersweet love story with a sad ending, I decided to use the wedding scene to indicate the background of the story – it’s about love, however, at the same time, this is the wedding where only “me” (the user) is attending and there’s no one else around, the odd and emptiness of the wedding scene creates the contract and indicate that even though this is a love story but it doesn’t seem to have a happy ending. The realistic wedding design with the non-realistic background (floating above the city) conveys the message that this is not the real world, it is something fictional and doesn’t match our real life experience. Hopefully user will get the idea that this is in someone’s memory world.
April 25th: Voiceover recording and editing – record the narrative of the story in both male and female voice.
May 5th: Background music and Floating effect
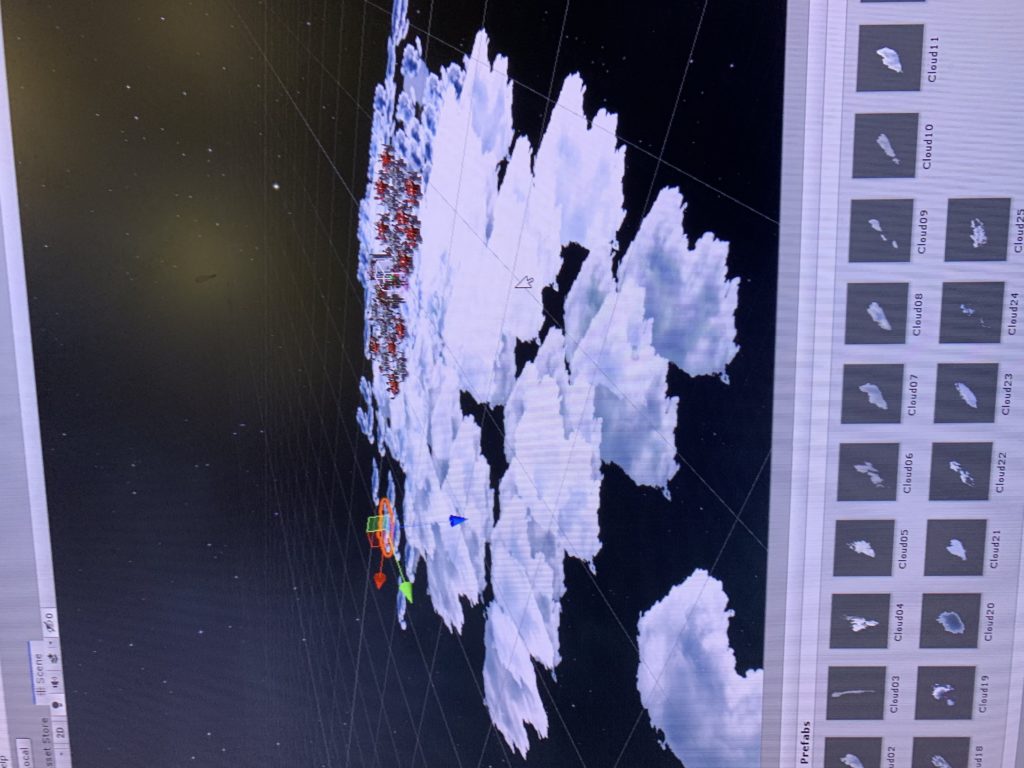
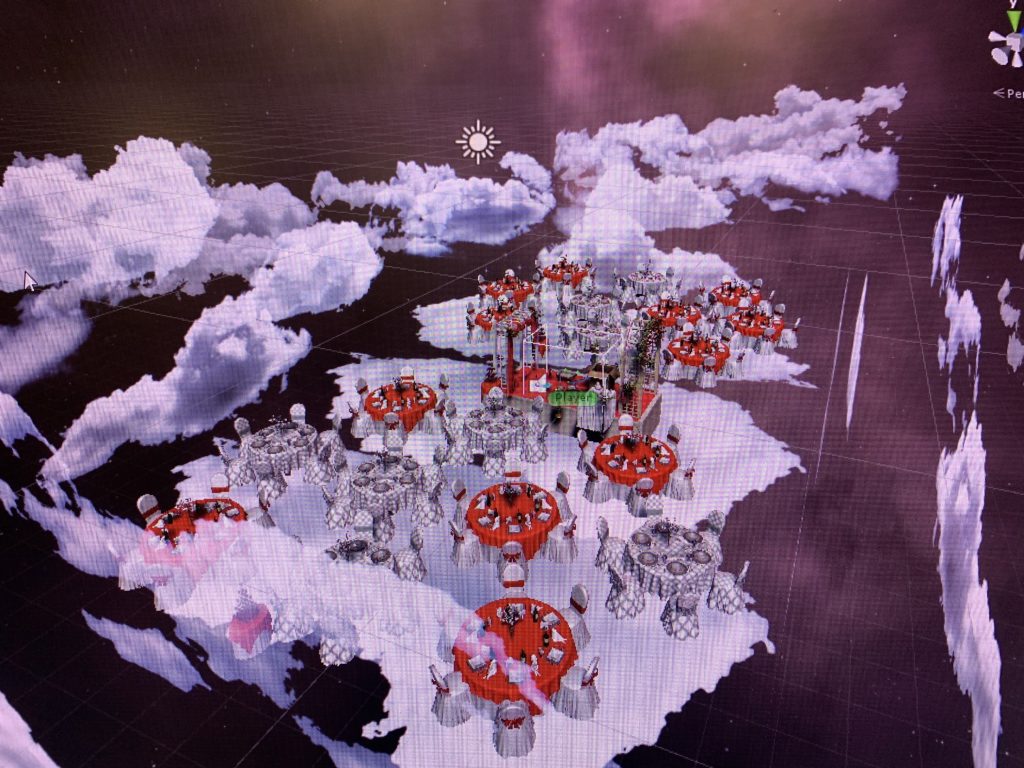
Added the wedding march to the background music to create the atmosphere of a “wedding”. The floating effect is added to the clouds to make the scene more “dreamy” and use it to indicate this is a fantasy memory world. In the beginning I wanted to create the effect that the clouds are moving at different speed so it looks like they clouds are floating around you, however, considering that it might cause too much movement in the background and therefore distract the user, I set the moving speed of all the clouds are the same, which result in the effect that it looks as if the platform that the user is standing on is floating instead of the clouds around them – since it’s relative motion. But this unexpected effect is so cool and achieved the goal to create the illusion of dream so I decided just to keep it that way.
May 6th: User test and adjustment according to feedbacks
Add a collide box outside the player area to bounce back the objects that are thrown away by the users. / The city view background is kinda distracting user’s attention because it has too many details, the scene is too realistic and not dreamy/imaginative enough to indicate this is a fictional “memory space”- changed the scene into a universe space surrounded by clouds.
May 10th:Enviroment Design 3
May 12th: Design of the user interface :
May 12th: Coding and design for ending:
1.problem to solve : when the narrative audio plays, the background music volume down.
solution: attach other 6audio sources to the same game object (the player ),detect when other audios isPlaying, the background volume = 0.1f;
issue: one gameobject cant’t be attached more than 2 audio sources.
another solution: get audio sources from other game objects and detect if it’s isPalying.
2.problem to solve: close the box animation
issue: when all the game objects are destroyed in the scene, trigger the animation.
use of GameObject.Find(“”)
3.User test feedback: the floating clouds movement is too intense that it makes user feel dizzy; solution: 1.narrow the range of height movement and the range of moving speed. 2. scale up the red carpet where the user is standing on, so it will feel less scary and dizzy.
Ending: Initial idea was to do an “close the box” animation when all the objects are paired and destroyed to cater the chosen theme “close the door” by indicating that the owner of the memory space “I” close the door of the bittersweet love memory and leave the memories behind in the box to keep moving on. However, I worked on the scripts of animation but ended up finding that our box is not animatable, because the lips of the box comes together with the box body and can’t be animated separately. Therefore we came up with an alternative ending of the story – in stead of close the box, the box will be destroyed and the moment it disappear, it will be accompanied with the particle effect to show the sense of “vanishing” and an ending explanation in 2D words will be shown to suggest the end of the game as well to explain to the player what happened, by saying “Thank you for helping me recall those memories… Now let me just leave my love story in this box behind and move on….”
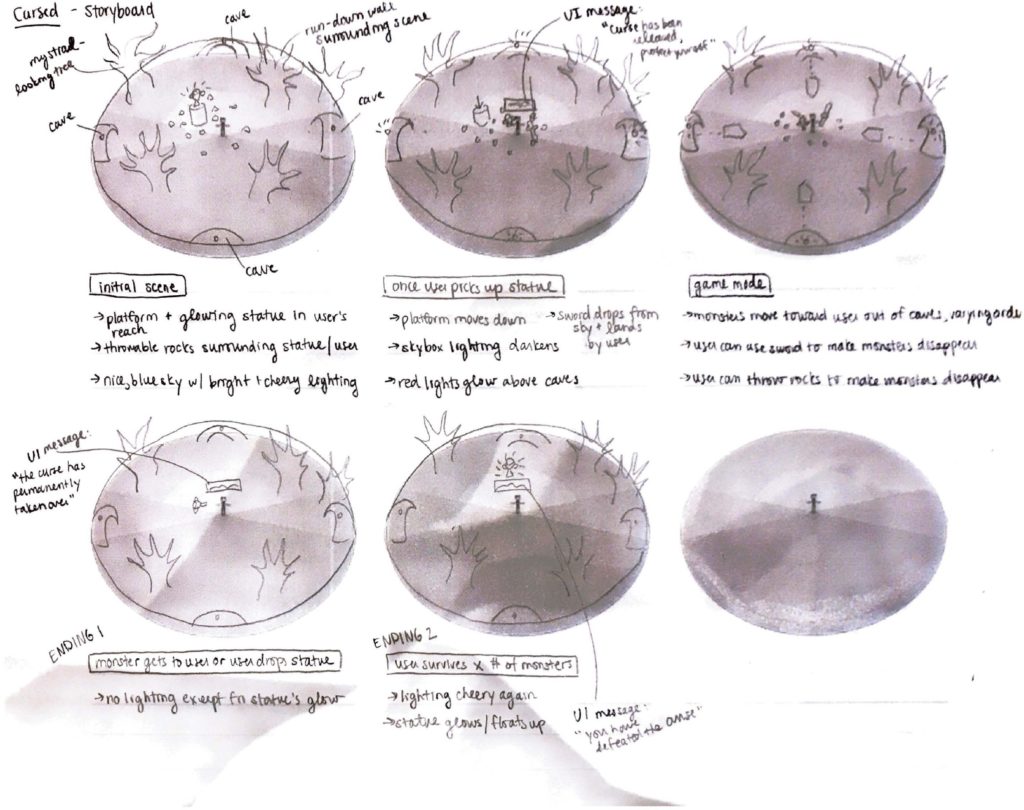
Concept brainstorming/storyboard – see Nico’s post
April 14
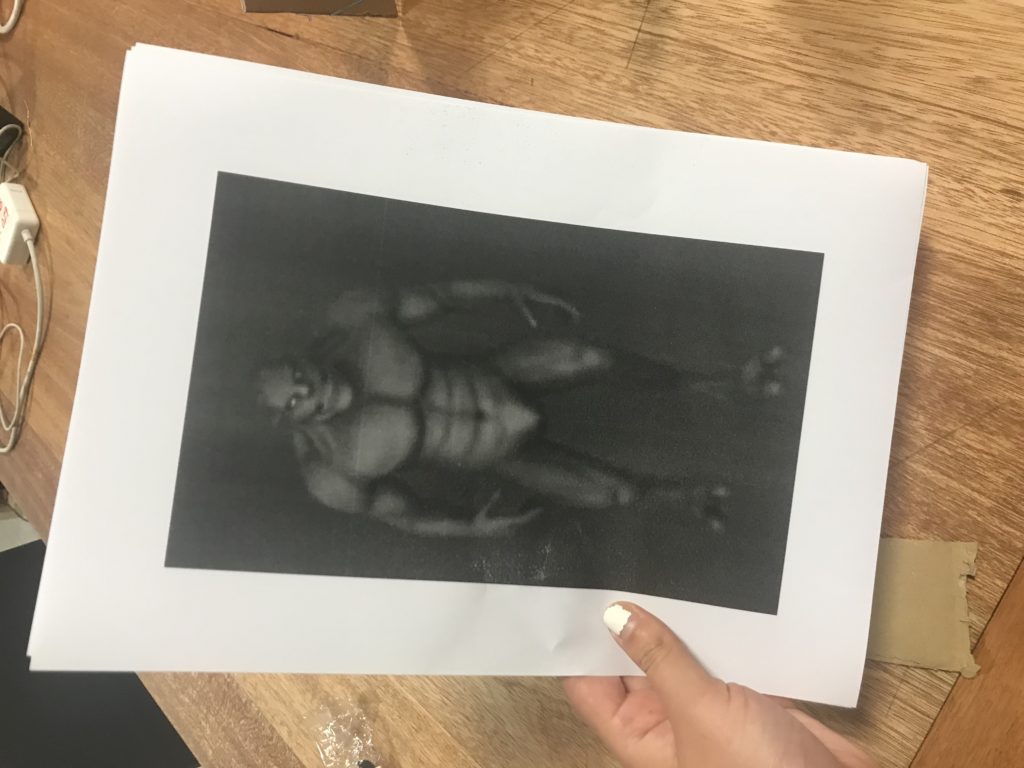
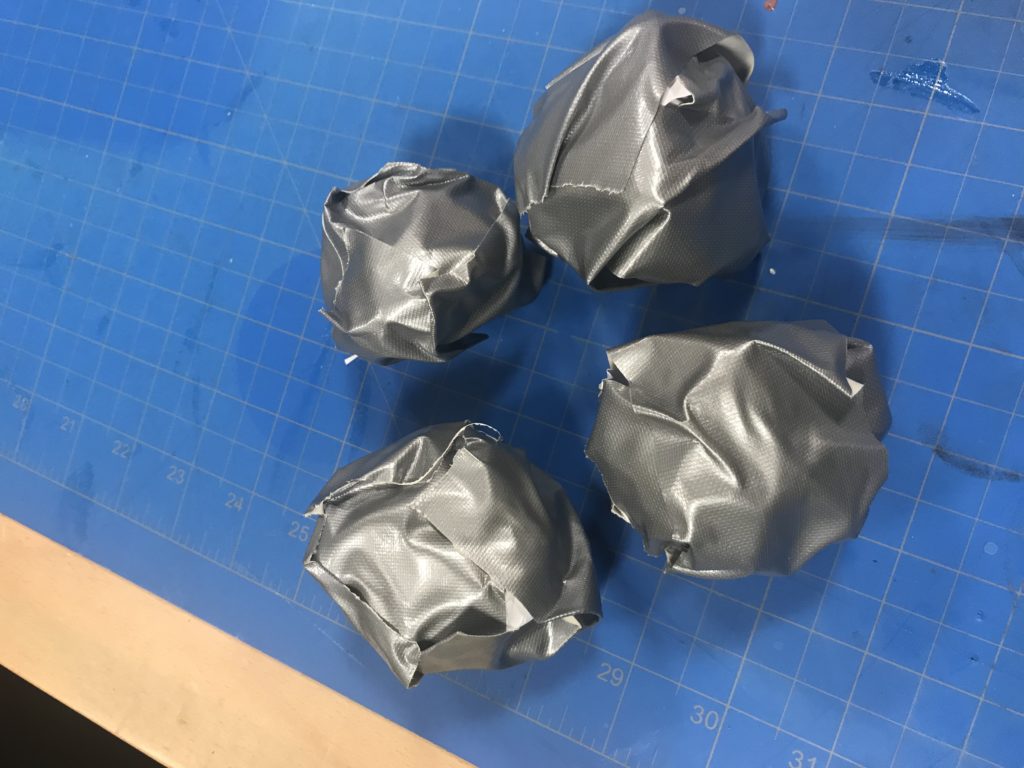
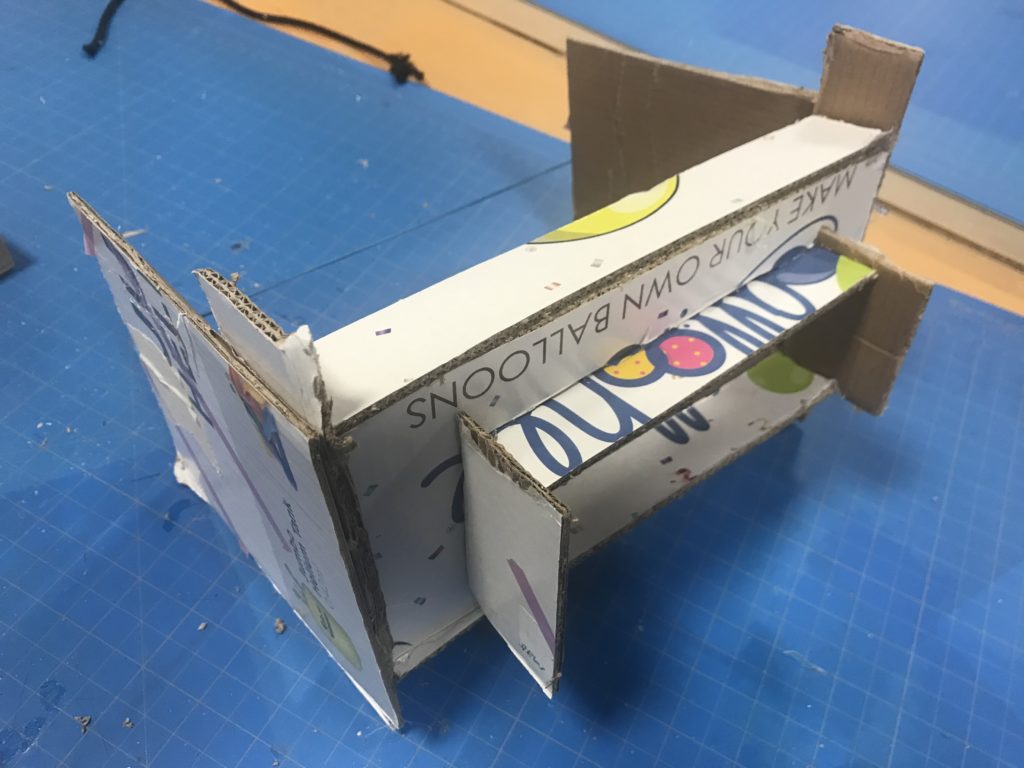
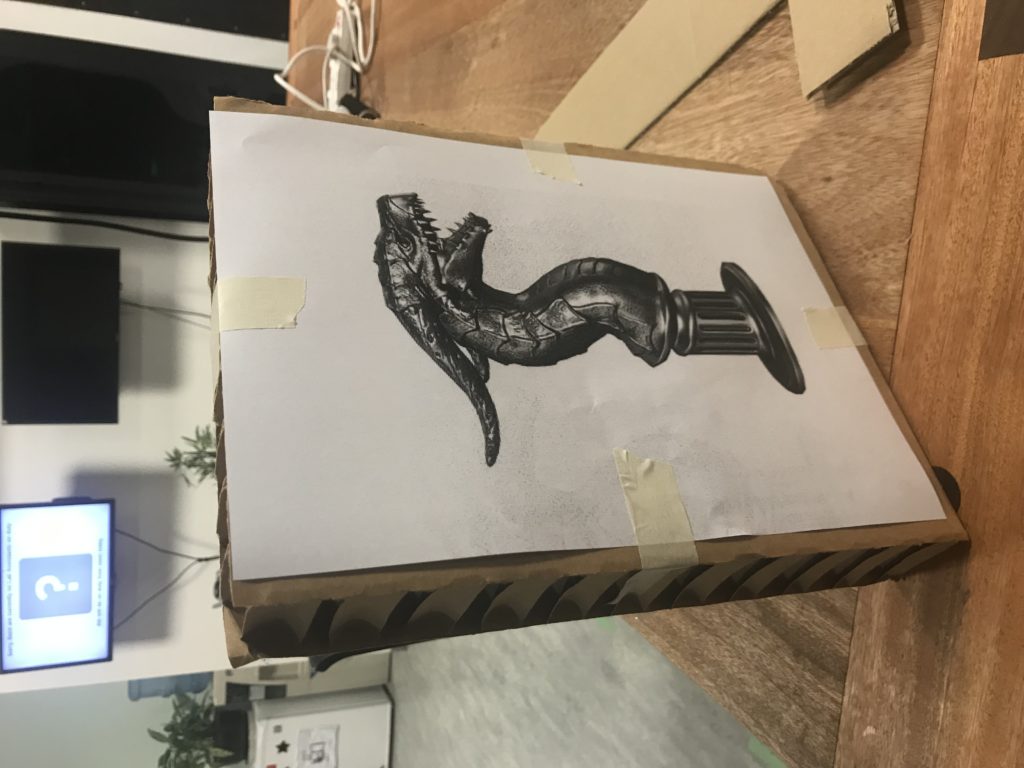
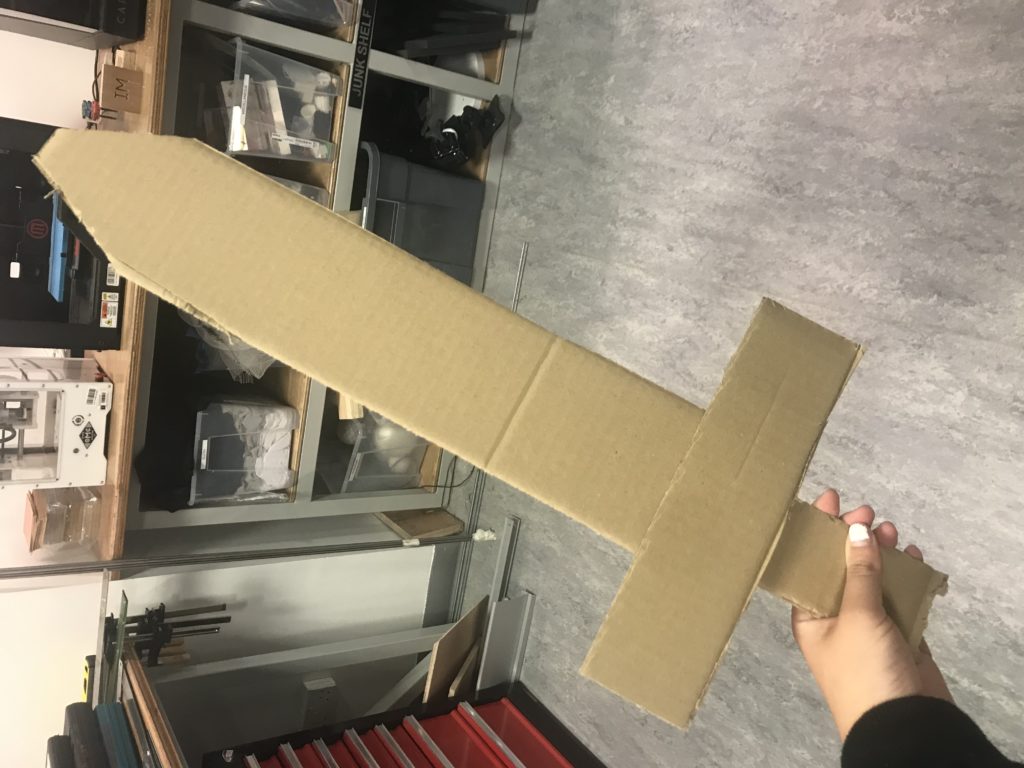
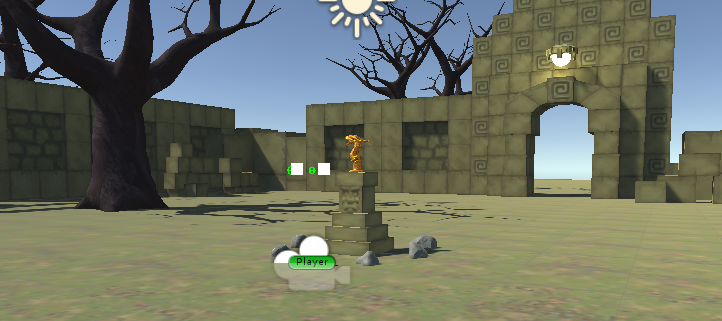
Today we tested out a paper version of our game on our friend Emma. We had several objects made out of paper cardboard: a headset to limit the field of view, a sword, several stones, the statue, and some monsters.
The monsters and statues were pictures of the actual assets we are using.
We set up the room so that the statue was resting on a chair, which will be a platform in the game. The stones were scattered on the floor by the chair.
To start, we had Emma put on the cardboard headset. When she picked up the statue, I wheeled away the chair (the platform will sink down in the game), and Nico announced that the curse has been released, and Emma must now protect herself. Nico then dropped the cardboard sword from above her head. To represent the monsters, Nico and I held up the printouts of the monsters and ran towards Emma one at a time. Here’s how our first test went:
For that first test, we didn’t give Emma any prior instructions, although she had heard about our concept before from casual conversation. However, we did another test where we gave her the instruction to try using the stones. Here’s how that test went:
In this test, she ended up dropping the statue, which means she lost the game.
Here’s what we learned from these tests:
In the first test, Emma didn’t notice the stones on the ground or knew that she could use them.
In the second test, when Emma wanted to use the stones, she dropped the statue so that she could have stones in one hand and a sword in the other. However, the game doesn’t allow this to happen.
The statue stood out enough for Emma to want to pick it up
Emma suggested that we should tell people that they have to hold onto the statue, like the voice could say something like “protect the statue” rather than just “protect yourself.” The reason she kept holding onto the statue in the first test was just because she wasn’t really thinking about it.
When asked if she thought it would be better if the stones weren’t there at all, she said the stones could be useful and she would rather have the option to use the stones in addition to the sword.
April 15
Feedback from Sarah Rothberg’s visit:
Why does the user want the statue? Why does the statue cause a curse?
Maybe there can be more things the user can interact with in the environment so that there is more build-up before the user picks up the statue. This would also build more of a narrative, because then it would be like “oh no, I messed with the wrong thing” when the user does pick up the statue.
Consider the difficulty of the game in relation to the user. Who is the user and how do we want them to feel?
Think about what kind of sounds to implement
April 16
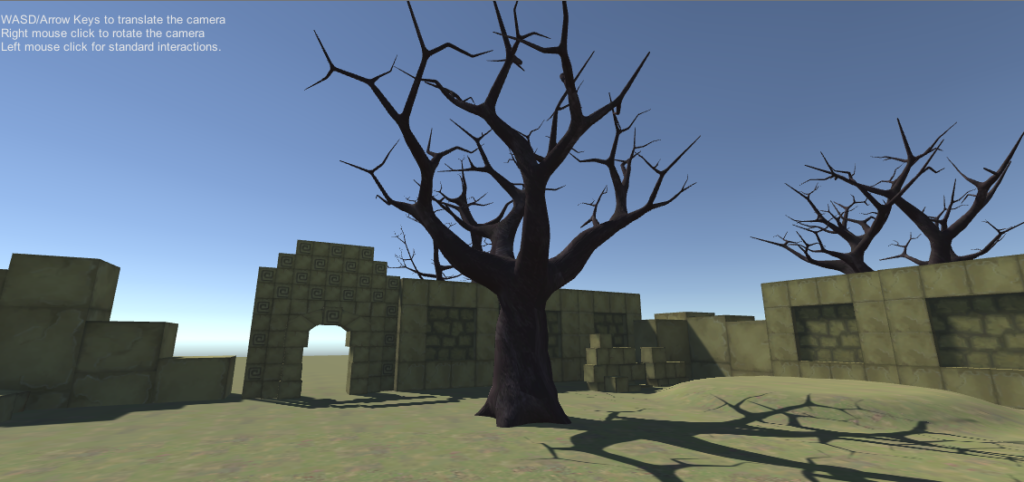
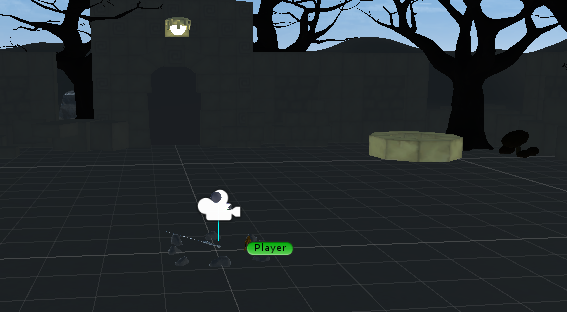
Today I began to build up the environment:
Created a terrain. I made it much much smaller this time…lesson learned from Zenboo. Added a grass texture to this as well as a few raised and smoothed sections so that the ground wasn’t super flat.
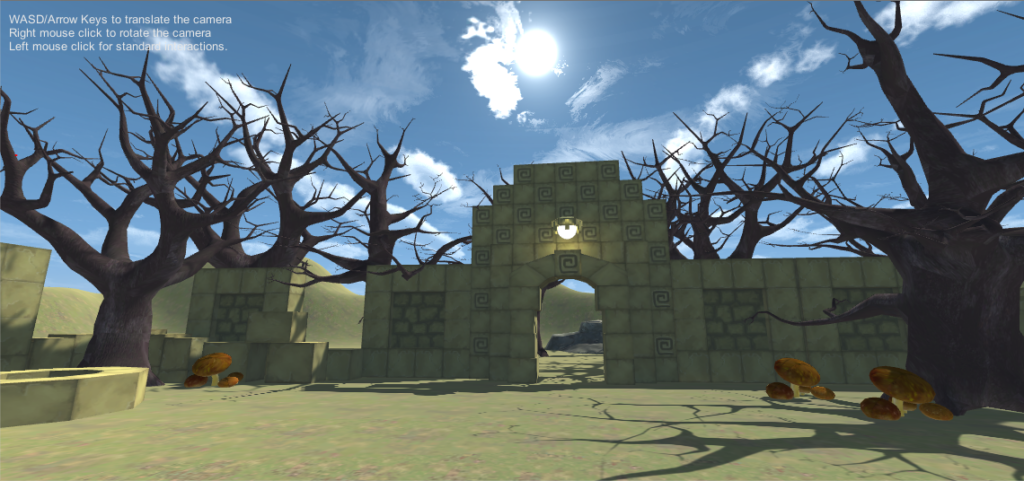
Added in walls and ruins from Cartoon Temple Building Kit. The ruins could possibly add more to the narrative…could cause the user to wonder what this place used to be, potentially adding onto a more “cursed” feeling. Decided to make the ruins like four walls surrounding the player so that when the monsters come out it kind of feels like an arena of sorts…adds on to the feeling that the user is supposed to fight the monsters.
Added in trees from the Fantasy Forest pack. Have to have trees. 🙂
Progress pic:
April 17
Class playtesting feedback:
Simran went first – she first looked around a bit before picking up the statue and throwing it. She eventually picked up the stones and threw them, though she mentioned that the stones look like you’re not supposed to move them because of their placement
Perhaps the rocks can shake or tremble to signify that the user can pick them up
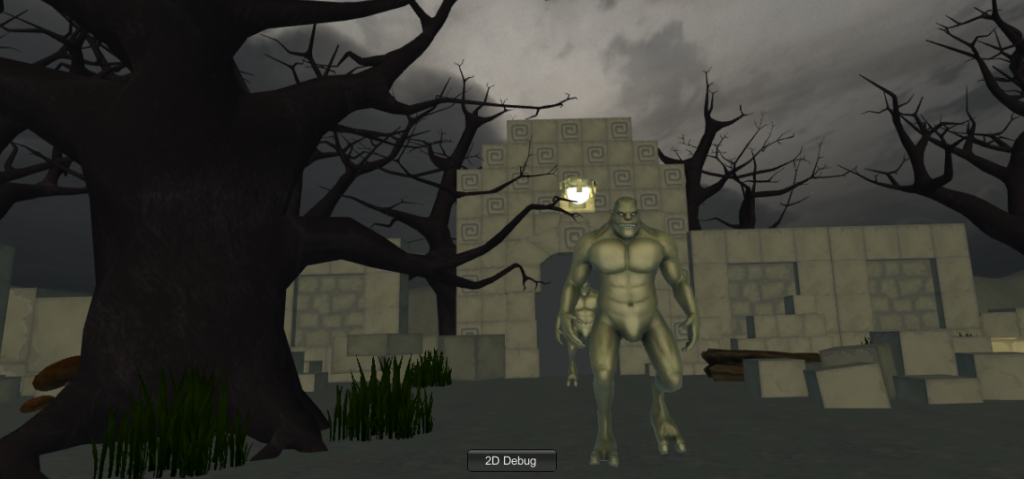
Mai went second – she said the monsters were pretty scary, but they look kind of like Shrek.
The monsters might be coming out too fast – would be nice if it was slow at first and then became faster and faster
Would be cool if lightning struck when the statue was picked up
Maybe fire or some sort of goblets could be put up to prevent users from moving away from the center (although you can’t move around that much anyway with the space we are in)
Either change the size of the rocks or change the gravity so that they feel heavier…kind of strange that the rocks are huge but easy to pick up. Also makes it seem like the user isn’t supposed to pick them up, because they are so large
Maybe limit the amount of rocks there are so that you are forced to use the sword
April 27
Today I worked on:
Putting more trees outside of the walls to make the forest more populated
Raising the terrain in the background to make everything less flat
Putting stones in the background to add variation
Putting more decorative objects within the walls: mushrooms, a rock, another stone structure
Adding lights to the rest of the doors
Finding a skybox for the initial scene (before statue is picked up)
Experimenting with a couple floating blocks, but I don’t think it looked that good. Also not sure if we would want these sorts of fantasy elements in the beginning scene, as it would disrupt the sort of “where am I but also this could be somewhere in the real world” initial feeling.
Progress pic:
May 1
Playtesting feedback:
Would be cool to have blood when the monsters get hit
The headset cable is annoying because it kind of twists around you when you’re playing – would be nice to have it hung up in final presentation
A creepy voice would be better than a loud booming voice for the voiceovers
May 5
Today I worked on gathering and creating all of the sound for the game. I first worked on the voiceover instructions:
First I recorded the audio, and tried to say the lines kind of creepily:
When the user picks up the statue: “The curse has been released…now you must protect the statue or risk releasing the curse forever.” This was taking into account feedback for instructing the user to take care of the statue, hopefully putting into their heads that they aren’t supposed to drop it.
When the user loses (either drops statue or monster gets to statue): “You have failed to protect the statue…the curse has taken over….”
User wins (kills x amount of monsters): “Congratulations…the curse has been contained, and peace will be restored.”
To add a more eerie effect and to also match the sound quality of the laughter, I added a slight echo to the recorded audio.
The next type of sounds I gathered were the background music sounds:
First, some sort of calm music was needed for both before the statue is picked up and for after the user wins and peace is restored. For this, I found forest sounds off of Youtube: https://www.youtube.com/watch?v=wKnS8VPxpHI&t=92s
Perhaps more importantly is the music that plays when you must kill the monsters. I tested out different music out while listening to the recorded soundtracks on top to see what sounded good, and settled on the intro song in this video about creepy video game music ( https://www.youtube.com/watch?v=-8FN29sHWq8), editing out the rest of the video sounds with Audacity.
And last but not certainly not least, the sound effects:
Monster death by stone: combined two sounds in Audacity:
I then added the scary background music and the first introduction audio when the user picks up the statue to our game. I tried adding in a couple other sounds but was having a little trouble getting the sounds to play, so I will have to spend more time figuring that out!
May 10
Today I worked on the sound effects, the lighting/skybox, the environment, and the blood particle system.
All of the sound effects have now been added into the game, except for a clang sound when the sword first drops to the ground. The way I placed it in the code it was playing but would make a very strange sound at first, like it was starting over and over again. I might also create another sound that instructs the user they can grab the sphere to restart the game if they lose, since one of the feedback we received during playtesting was that it wasn’t clear that the user could restart the game.
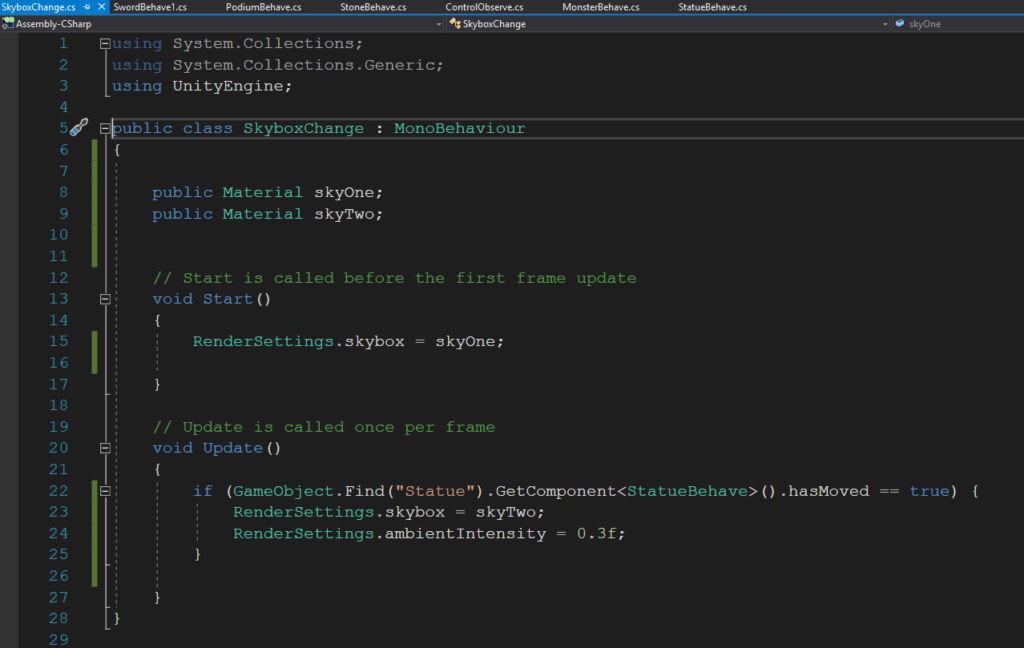
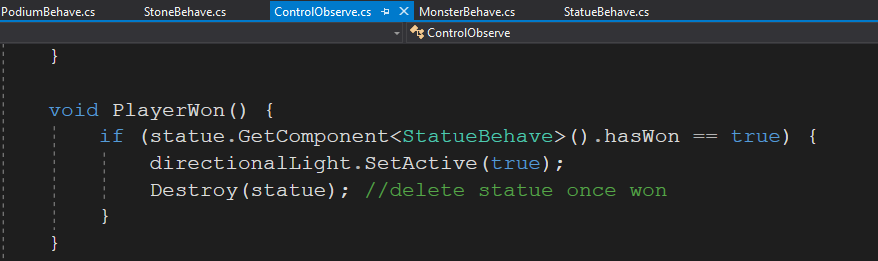
The idea for the lighting is that at first, it will be bright and sunny, but when the user picks up the statue it will become dark and creepy. The sky will return to being bright and sunny once the user wins. I thought it would be easiest to switch the skyboxes themselves between the sunny and creepy situations, and accomplished this through this code (at least partly – to change the skybox back to how it was before I put it in a different script, but with the same concept/logic as this):
However, the ambient intensity also had to be lowered because without this, the sky was dark but everything else was still light.
For the environment, I added more things like grass, logs, ruins, trees, and rocks to make everything look less barren and more like a forest. This was a lot easier to do now thanks to Nico who made a layer to place objects in so that they wouldn’t disrupt the monsters’ movements.
Lastly, I worked on making the blood particle system look slightly more realistic and subtle. I made the particles a darker shade of red, made the circles larger so it looked more like a “gush” rather than splatters, changed the shape from cone to box, turned off the loop, made the particle system play for a shorter period of time, and changed the particle’s texture.
Boulder following the player, have to constantly move
Skydiving
Starting in an abandoned location
Expanding on Protecting Egg/Item Idea
Instead of falling with gravity, objects run from in front of player
Instead of protecting item, protecting self
Indiana Jones sort of scenario
Player has stolen an item, now has to protect self and item
Evil doers are coming for the player
Survive a certain amount of time or monsters/evil doers
3 possible outcomes
Drop the item
Release the curse
Evil doer gets to the player
Releases the curse
Survive a certain amount of monsters
Item transforms
Final location, nice scene
Final Idea – Cursed (Protecting the Statue)
Initial scenery (first scene)
Large open sky area
Cave not so prominent
Nice lighting
Light green
Bright yellow
Sky blue
Outside
Large old tree
Old run down brick walls surrounding player
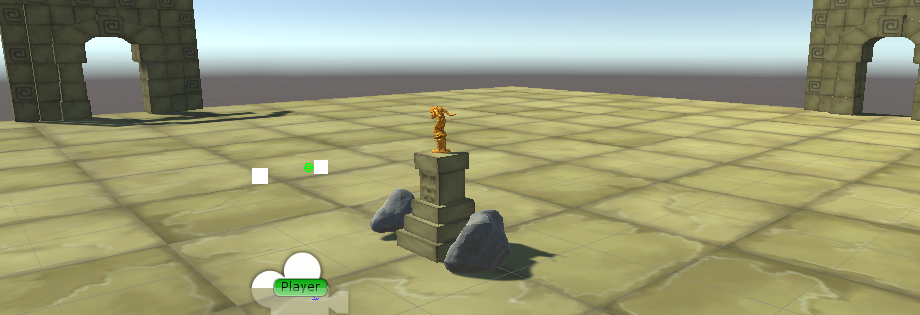
Mystical statue on a platform closeby to the player
Throwable rocks around the statue
Picking up the statue (second scene)
Lighting changes
Nice lighting changes to darker and more evil like
Red lights appear above 4 caves, each at a cardinal direction
Caves become prominent
Statue has a glow
Platform lowers
Sword falls from above (can be picked up)
UI message appears
The curse has been released
Tells player to protect themself (logic to use sword and stones)
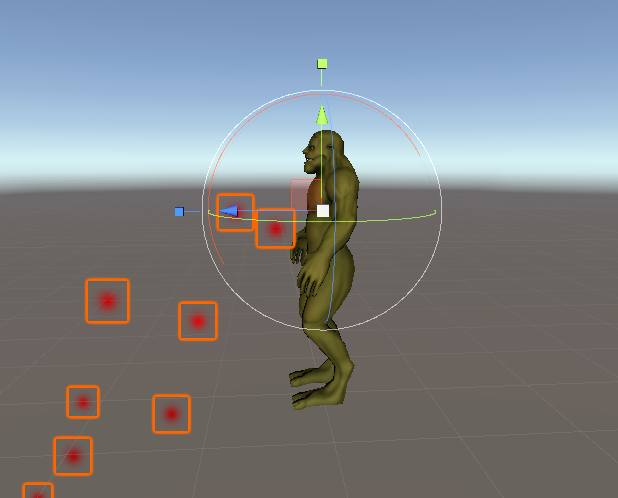
Monsters slowly start to appear
More start to appear faster
Localization of monsters is random
Appear behind cave and move towards the player
Monster hits player or player drops statue (losing scene)
UI message appears
The curse has permanently taken over
In order to restart
Grab another object
Maybe no restart
Automatically restart
Lighting al turns off except for the statue’s glow
Destroy X number of monsters (winning scene)
Statue is replaced with animated “god” or something
UI message appears
You have defeated the curse
You have destroyed all the monsters
Lighting becomes merry
Involved scripts
Changing lighting
Initiating sword
Throwable sword, rocks, statue
Lowering platform
Moving monsters
Collision detector for destroying monsters
Collision detector for monster touching statue
Sound effect
UI messages
Score in top left/right
Potential animation of monsters
Animation of final scene statue
Restarting game
Initiating monsters (randomly) (increase amount with time)
Moving of monsters towards statue
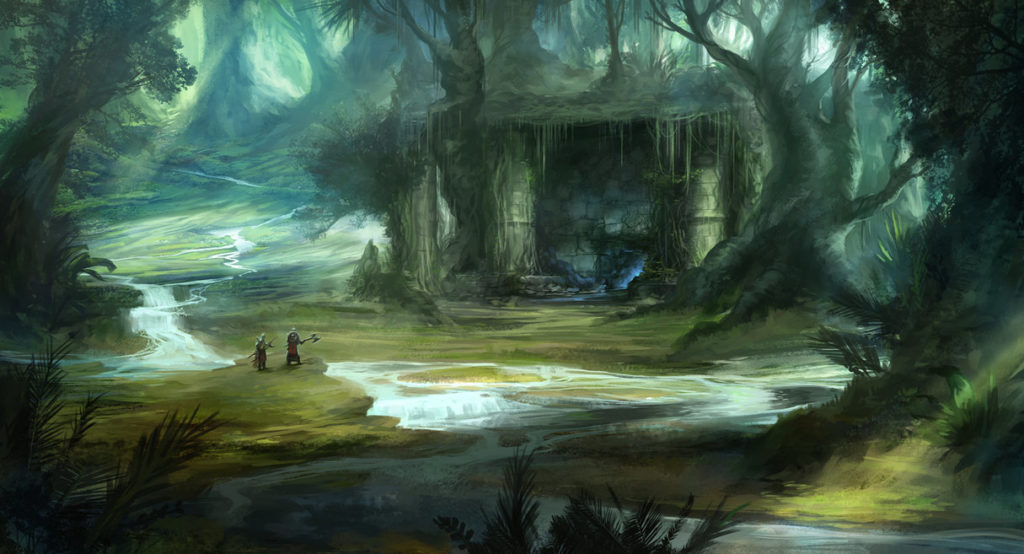
Possible Scenery Inspiration
April 13
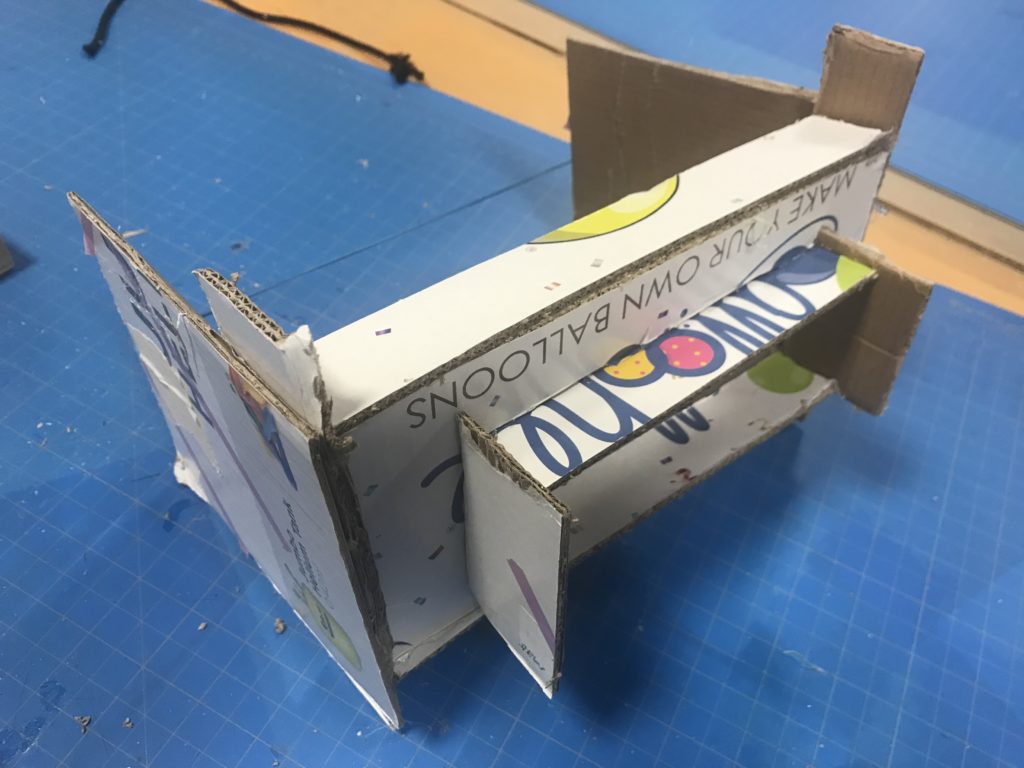
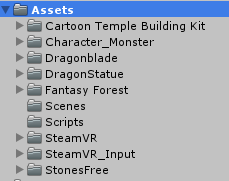
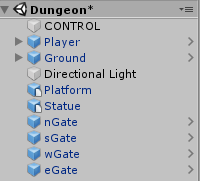
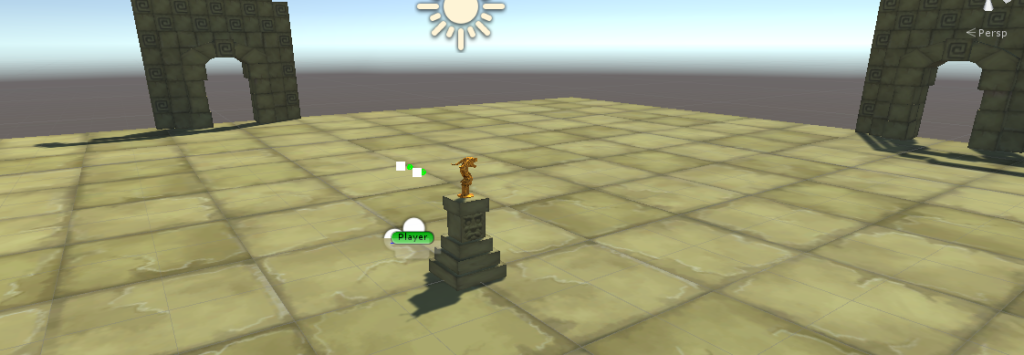
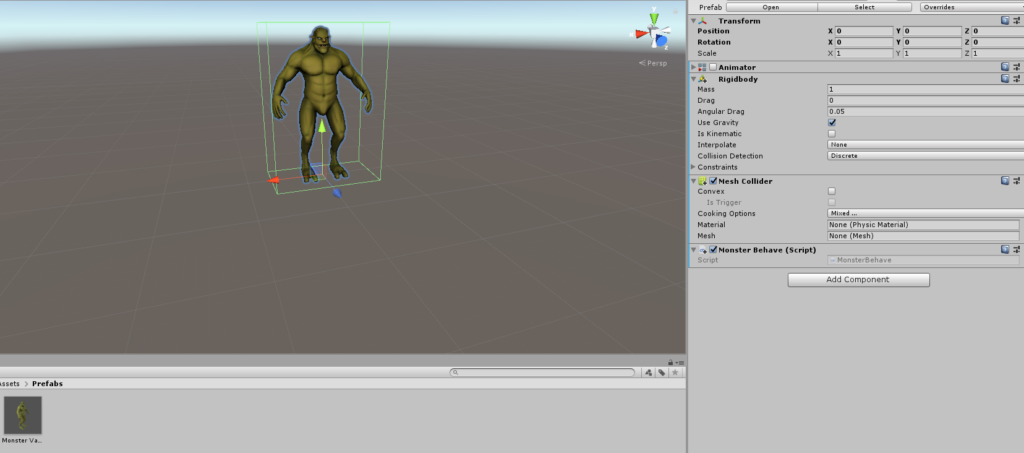
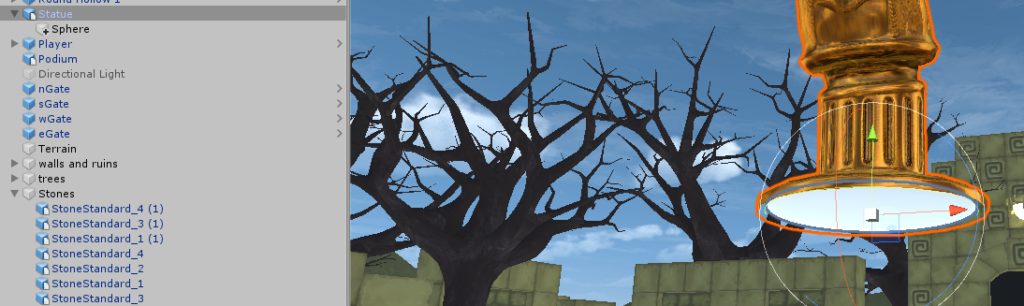
Today’s goal was just to set up the testing area and prepare the Unity file for the project. In order to do that I downloaded all the necessary assets for the project (fig.1). This included all the building blocks for the dungeon, the statue, the sword, the lights, and the stones. After obtaining all the assets, I went ahead and started placing some into the “Dungeon” scene (fig.2). I found a suitable platform for the for the dragon statue, floors that looked decent, and gates that matched. I tried to scale everything to an entertaining size and then tested it out. It is all looking pretty nice, I can see with lights, trees, accessories, and blocks added it, this scene will look a lot like a fully-fledged dungeon room (fig.3). The only issue is that the statue is a bit out of style (too shiny) but that might be useful in catching the player’s attention.
April 14
Today we paper player tested the concept of our games.
Cassie fabricated the basic items that were going to be involved in the game
and then we gathered a friend of ours to test out the scenario. The items
included: the head mounted display (fig.1), the monsters (fig.2), the statue
(fig.3), the rocks (fig.4), the sword (fig.5) and the lights, and the podium for
the statue.
From the testing (vid.1 & vid.2), we gained some insight into the changes and improvements we needed for our game. The important ones had to do with the voices and narrative structure. It was suggested that we clearing state the goal of the game with a phrase such as “protect the statue” instead of keeping the goal too ambiguous (but don’t go too detailed by saying exactly how). Also more monsters and large ones if possible would be desired. Lastly the idea of being able to place the statue down would make it easier to both throw stones and fend with the sword at the same time. The last idea might not be followed but it was good advice.
April 16
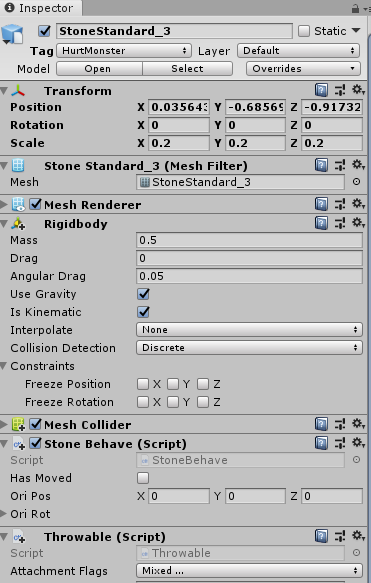
Today, a lot of work was put into the project in order to
develop a fundamental basis to continue work off of. Stones were added and
scripts were added for each of the object that will need a function (fig.1
& fig.2).
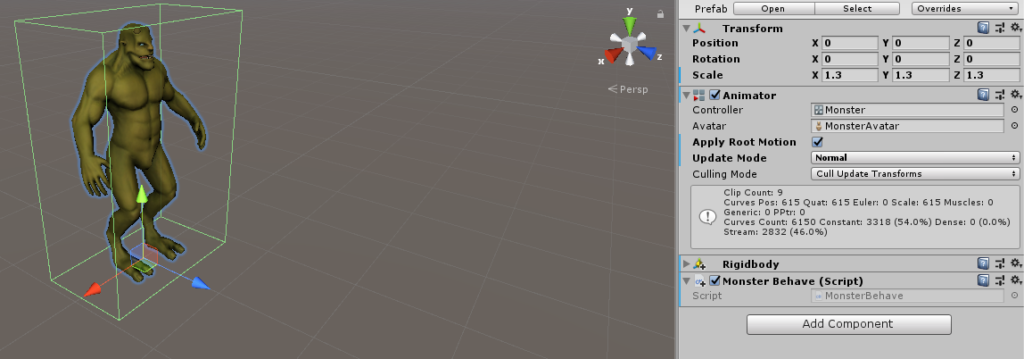
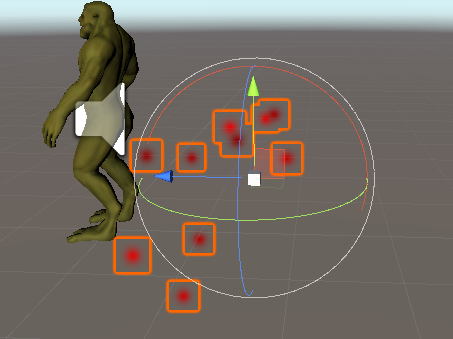
Next, a bunch of work was placed on the monster. The monster
came from an asset pack that also involved its animations. The animator was
removed just for now, just to keep everything simple for now. A rigid body was
added to the monster as well as the script (fig.3).
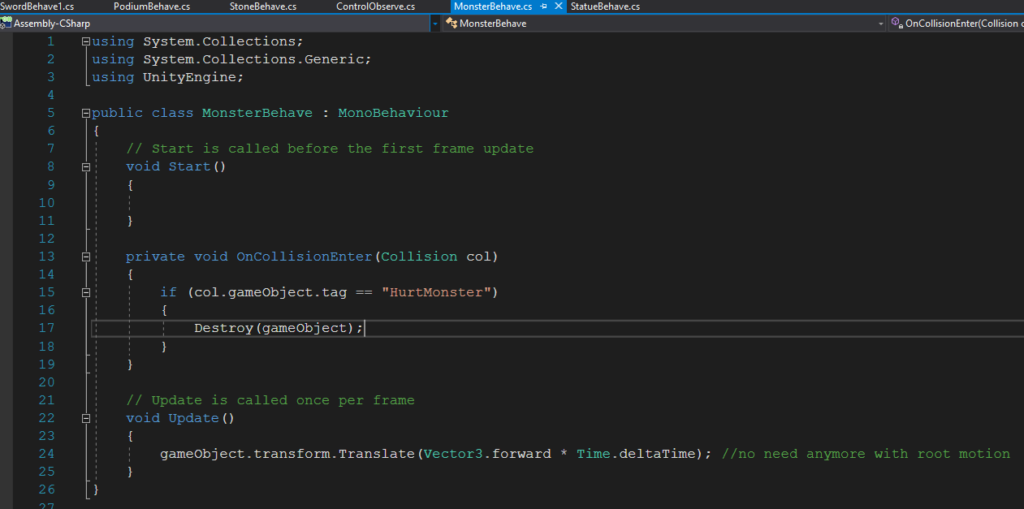
The monster script was quite simple, it caused the monster
to move forward one value every second as well as making it vulnerable to any object
that has the tag “HurtMonster” (fig.4). The next script that was worked on was
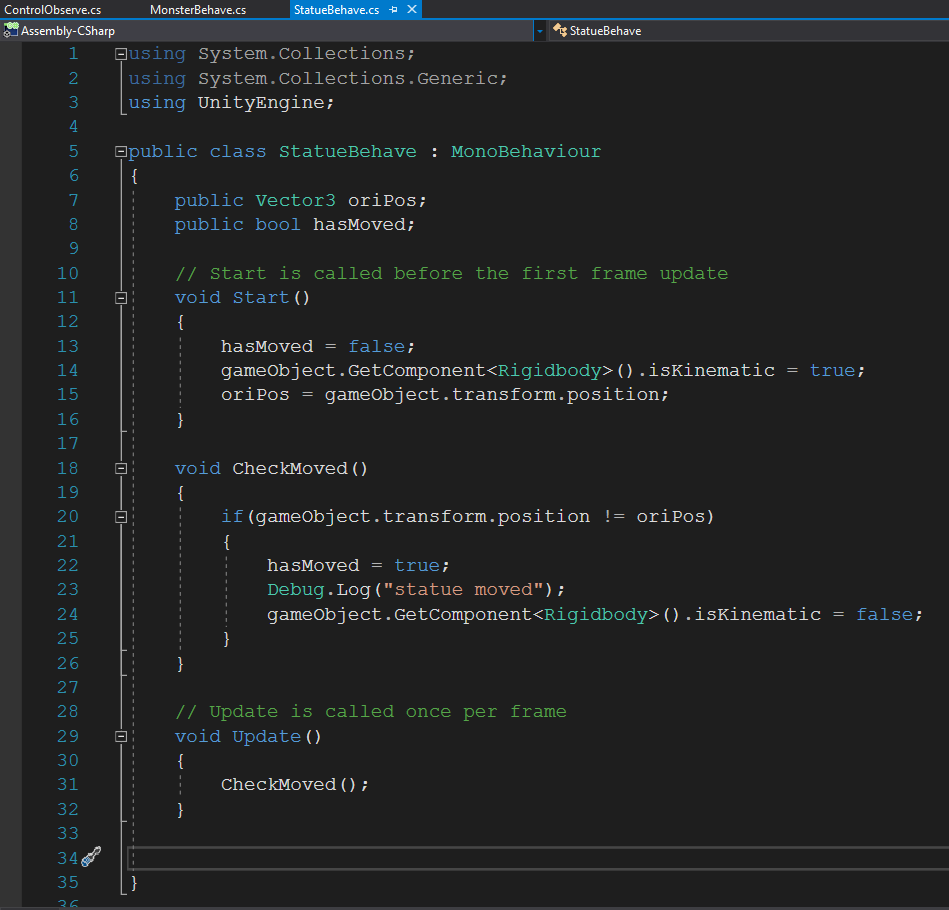
for the statue. This script simply kept the statue still and unaffected by
gravity until it was moved, at which point it would no longer be kinematic and
would also trigger the “hasMoved” Boolean to be true (fig.5). This was used by
the control script as an indicator to spawn monsters.
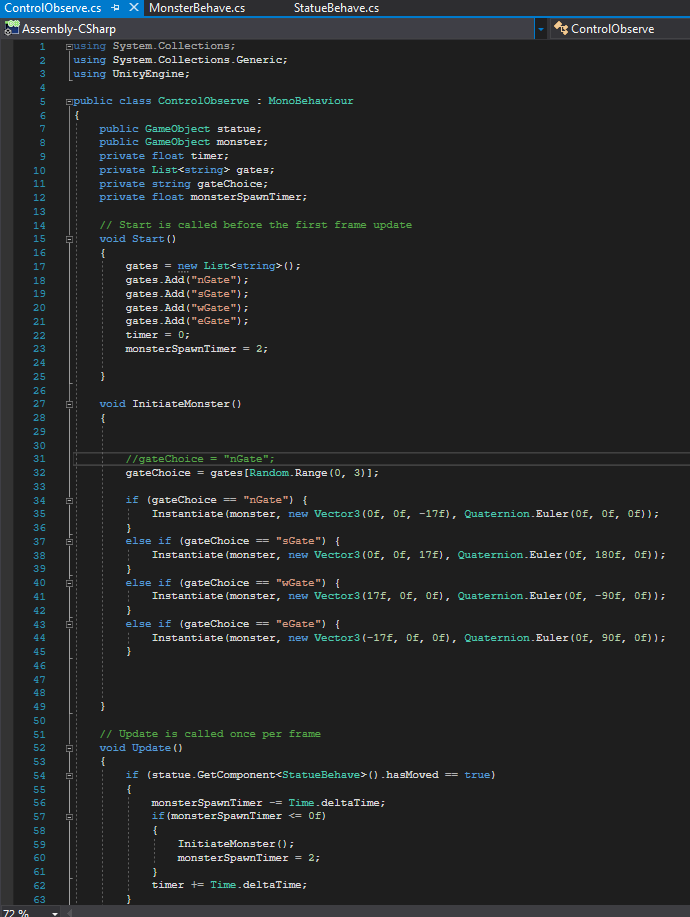
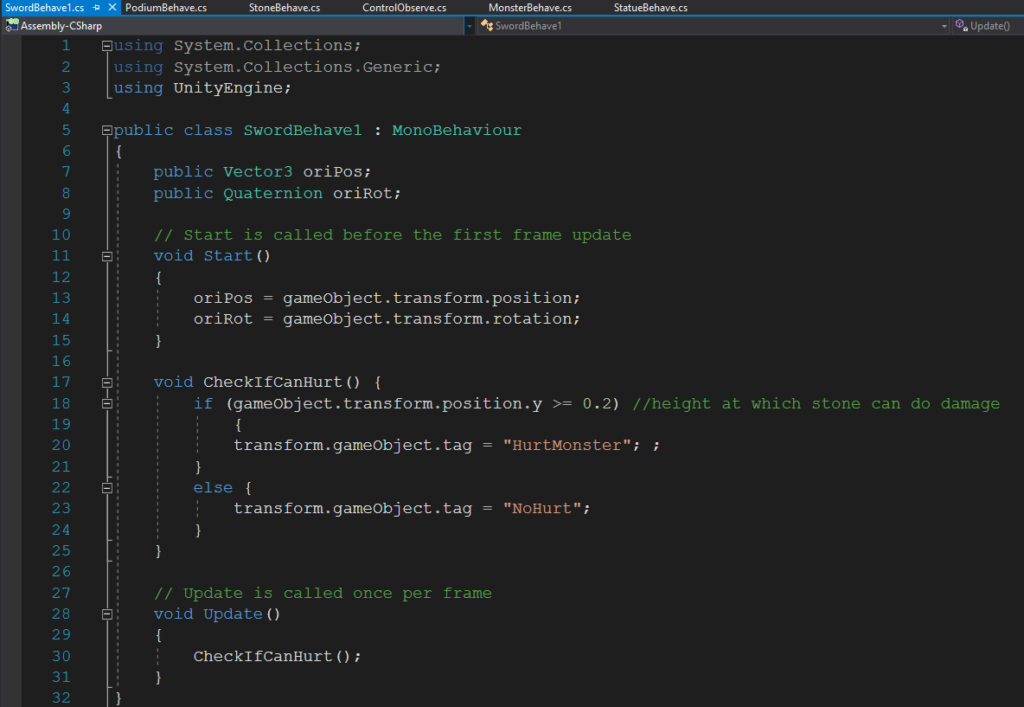
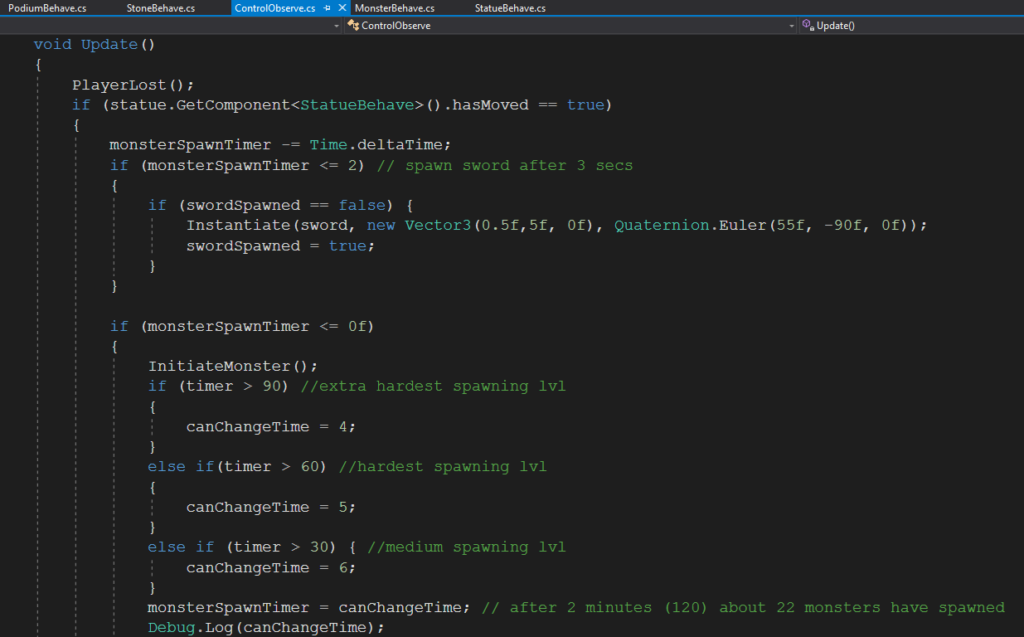
The control script had many parts to it as well (and will have even more with time) (fig.6). It requires the prefab for the monster that is going to be spawned as well as the connection to the statue. Once the statue has been moved, the script will start spawning monsters every 2 seconds. This parameter will eventually be changed to spawn monsters more often as the timer float increase more. The spawning of the monster is also random (placing randomly out of 4 possible gates). This was quite annoying to set up being it required the accurate position and rotation of the monsters to be correct (so that it would walk towards the center). Ideally another script would eventually be added in order to have monsters randomly appear from the diagonal directions as well (just to make it so that the player can’t just move out of the way of the monsters to protect themselves.
April 21
Today a lot of the project and its foundation were worked
on. Many scripts were written and many object placement and game testing took
place. I continued working on the control script, the statue script, and the
monster script but also added scripts for the sword, stones, and podium
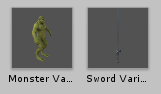
(fig.1). The two prefabs that were created, with the appropriate scales,
details, scripts, and components attached were the monster and sword (fig.2)
Four major additions were made to the environment. The 4
types of stones were placed around the podium in a circular manner and brought
down in scale from before. The terrain was flattened out a bit because it was interfering
with the monsters movements. A suitable light source was found and placed were
it will be visible and blend it with the gate. The gates and monsters were
scaled up in size to give a larger affect; this required some rearranging of
objects as well. (fig.3)
The prefab for the monster had a few features that were
worked on in detail. The animator was turned back on and the walking motion was
placed on loop (fig.4). I tried turning on root motion to use as more aesthetic
walking behavior but it didn’t move the monsters so the previous code to move
was retained. The rigid body also needed to be played with a bit in terms of
parameters being locked because the monster occasionally would bump off
something and start walking into the sky.
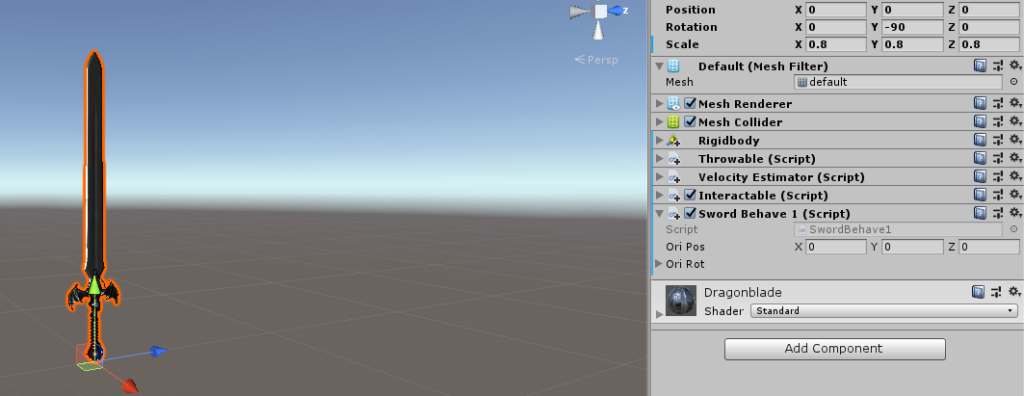
The sword prefab also had some features worked on. The original
sword was taken from an asset pack and edited down in terms of scale. It was also
made intractable and throwable using the SteamVR asset pack’s scripts. A
collider was added and made convex so that it could interact with other object
in the game. It was important to mess with some of the boxes in the throwable
script because the sword would fall out of your hand slowly as it was being
held due to gravity not being turned off. The same issue occurred with the stones,
this was an easy fix to apply to everything. (fig.5)
The monster script was kept simple. Since root motion didn’t
work the moving forward script had to be kept. A collision detector based on
tag names was also implemented. Now items could either have the “NoHurt” or the
“HurtMonster” tag that permitted the object to either destroy or damage the
monster it hit (fig.6). For now this would be used solely on stones and the
sword (at specific times when they were being used).
The sword script was created with several features. The original
position and rotation was recorded so that the sword could be respawned there
if the game were to restart. Also the alternating tags (between hurting and not
hurting the monster) was coded for. This was important so that the sword could
not hurt the monster when it was on the ground (fig.7).
The podium was finally given a script that permitted it to disappear
out of sight when necessary). The script recorded its original position and
rotation so that it knew how to move and also so that it could be brought back
if needed. The podium only moved down (at a reasonable speed one fourth of the
scale per second) if the statue was moved (fig.8). It would also not move
further than -1.5, just to keep it relatively close and not cause lag to the
game.
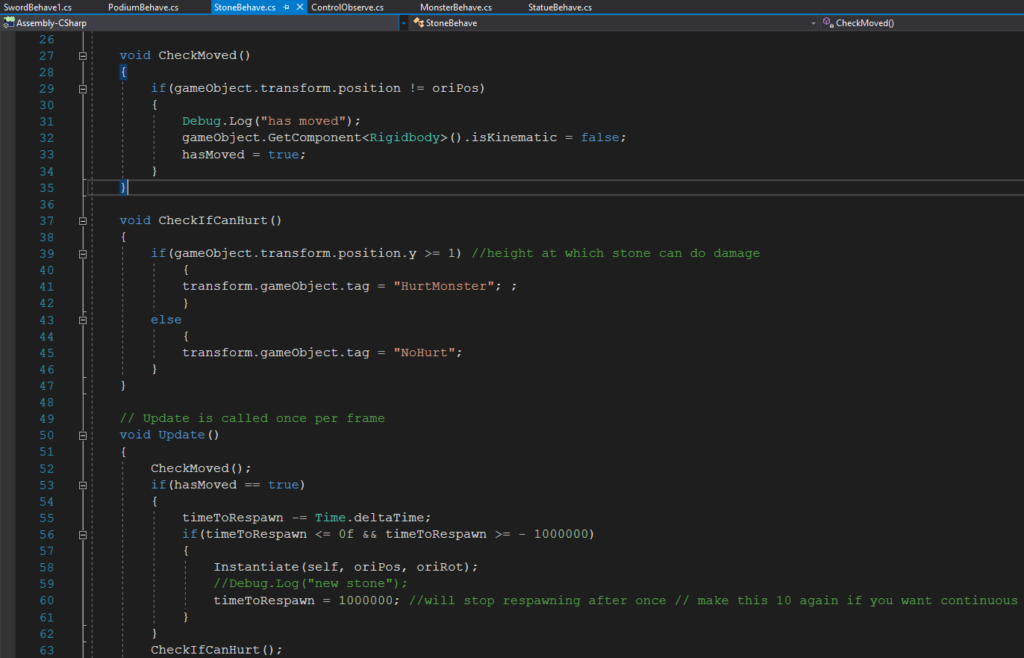
The script that was written for the stones required a good
deal of work and thought. First their original position and rotation was
recorded. The stones were also originally set as kinematic so that they didn’t
move. If the stones were moved, the kinematic was turned off and a timer would
start counting down to respawn a stone at the original location. The respawning
doe was written in such a way (that was kind of crude) that it would respawn a
new stone only once (this was necessary because otherwise stones would start
overlapping and cause the game to have serious lag and issues. The script also
check every update to see if the stone could hurt the monsters, the parameters
to allow such behavior could be easily altered (for now it had to be at a
certain height). Another parameter could be based off of the location, if it
was still close to its original location then the stone would not be able to
hurt the monsters (meaning it hasn’t been thrown far). There is currently a
glitch that I don’t know how to resolve: the first stone that is spawned doesn’t
gather any velocity from the hand when it is first thrown (so it doesn’t fly
forward but drops down) but once picked up it works normally (fig.9). The
stones that then spawn from that stone all behave normally. Also, every now and
then the stone loses gravity and just flies away once thrown or bounced on
something. These are glitches that could either be maintained to cause
difficulty to the player or worked on later on.
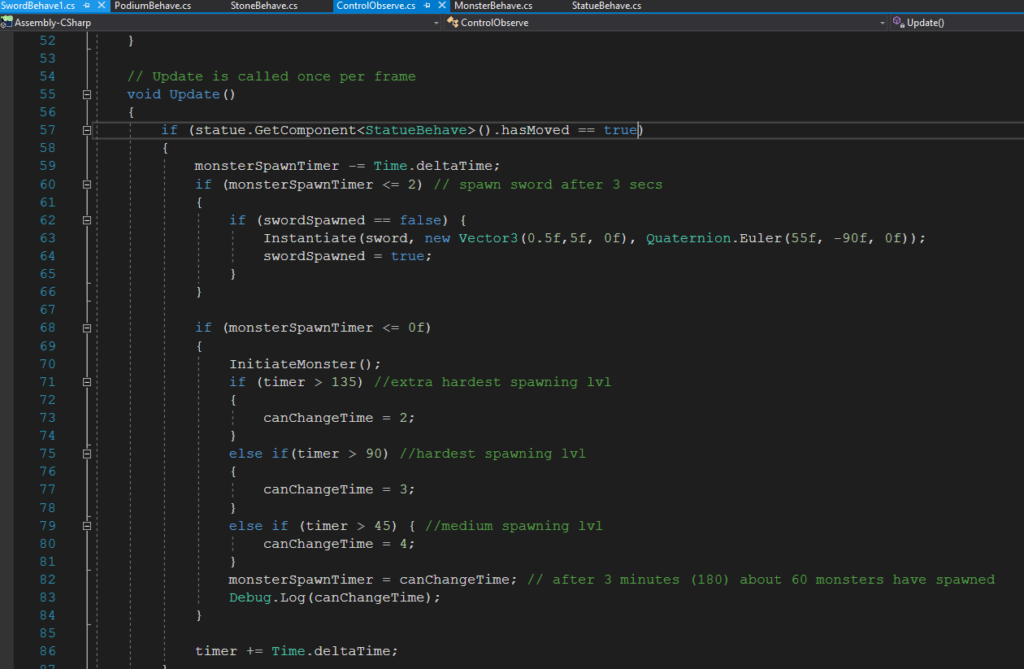
The last script that was worked on was the control. I just
added some code to this script to spawn monsters more logically and spawn the
sword. Once the statue has been moved, a sword will spawn from overhead (the
prefab) 3 seconds afterwards (after the podium has gone down) and fall down. This
relies on a Boolean variable to not spawn the sword repetitively. The script
will also start spawning monsters. It will start spawning monsters every 5
seconds (not shown) but then after half a minute it will spawn monsters every 4
seconds, this will continue increasing till after 135 seconds (about 2.5 minutes)
where it will spawn a monster every 2 seconds (fig.10). This mean that after 3
minutes about 60 monsters would have spawned. These times and frequency of
spawning can all be easily changed but for now these seem ideal. The spawn frequency
cannot go below 1 a second because that is how long it take for the monster to
move entirely forward (don’t want monsters spawning on each other).
Lastly in addition to the tags, the layers were played
around with a little bit. Two layers were created to make the game more
efficient in coding, a “seeking statue” layer for the monsters and an “avoiding
monsters” layer for the objects that should not interfere with the monsters movement
or behavior (fig.11).
Finally, some important code that has to be worked on: fixing any glitches that were discovered, changing the lighting once the statue is picked up, animating the death of the monster (this should also place them in the avoiding monster layer so it doesn’t interfere with other monsters), having a start or end screen, and implementing a winning and losing condition. Up to this point a lot of work has been put into the project and it looks like a bunch more will have to be put in (especially solving glitches), hopefully it works out!
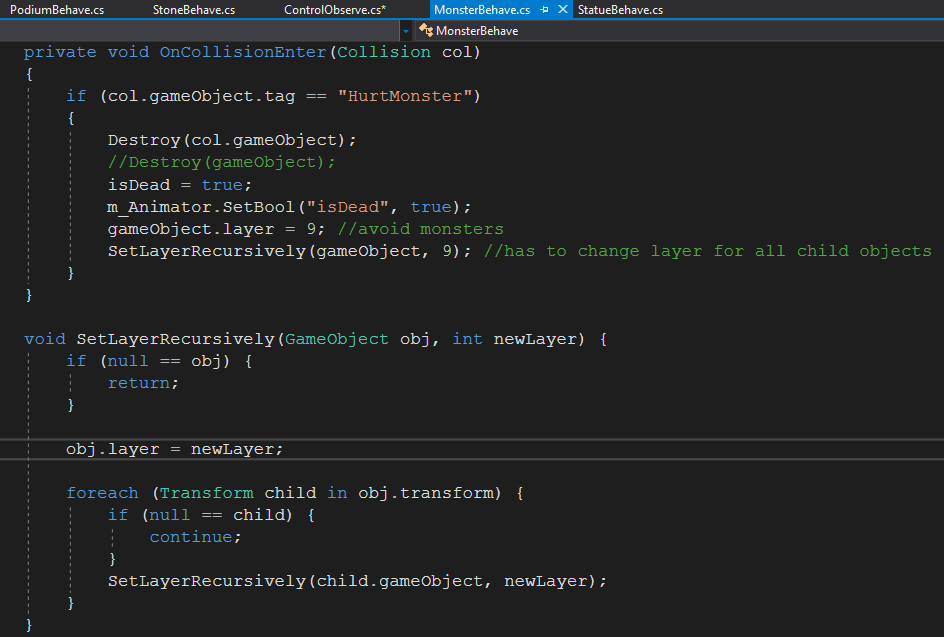
April 27
Today was another successful day of coding, a substantial
amount of progress was made. I started off by tackling the monster movement issue.
The very first thing I did was move everything around the monsters trajectory, including
the terrain, into a layer that wouldn’t interact with the monster (fig.1). Since
I did this, I had to make sure the monster wouldn’t fall through the ground, so
I fixed the y position (along with the x and z rotation to keep straight) of
the monsters rigid body. After getting the monster’s movement fluid and without
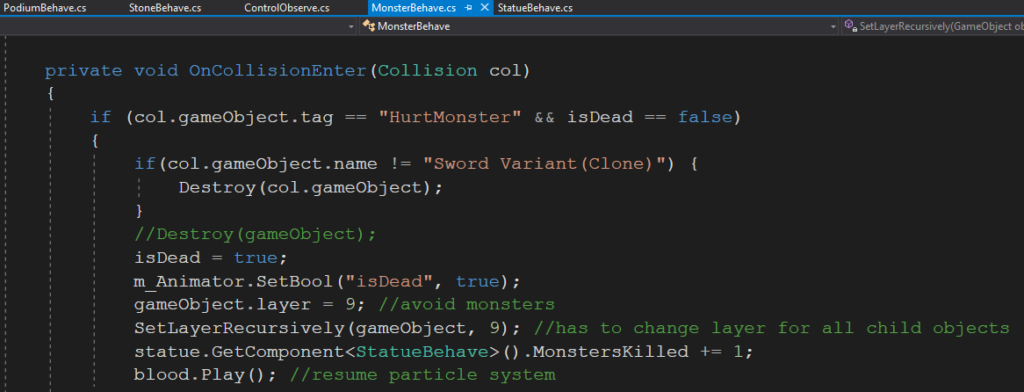
stopping, I wanted to animate the dead when hit by a rock. I did this in the
animator component of the monster’s prefab. I added a new action (called “Dead”)
to the current walk and made a Boolean parameter (called “isDead”) that had to
be turned on in order for it to occur. When the monster is hit by something
that has the “HurtMonster” tag, then the Boolean within the script for death
would turn on as would the Boolean in the animator (fig.2). The falling monster
would also be moved to the layer that doesn’t interact with other monsters (“Avoiding
Monsters”) as to not inhibit the movement and trajectory (fig.2). A really cool
effect of this is that the corpses stay present after their death. An issue I
came across was that the dead monster still interacted with other, to fix this
I inputted a script I found online that would change the layer for all the
children and grandchildren within the monster prefab, function called “SetLayerRecursively”,
which worked in the end (fig.2).
Since I noticed that the monsters would be blocked by the
stones that were newly spawned (thus not reaching the middle or the statue) I
added to the code to fix the issue. I made it so that newly spawned stones were
placed in the layer that didn’t interact with monsters (fig.3). I also lowered
the time for the stones to respawn since it seemed to take too long. If the
player threw the stone at a monster before a new one respawned then it wouldn’t
respawn, this was a way to punish the player for using stones at a close
distance.
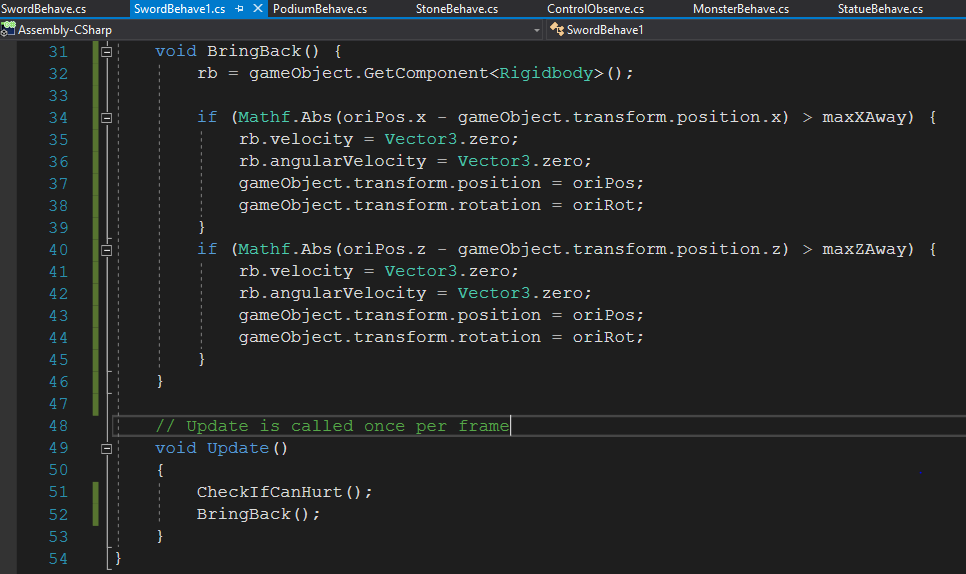
To add to the convenience of the game a bit I made a
function that brought the sword back to the original position if it was thrown
too far. Since the stones respawned I thought it was only fair that the sword
does too. I did this by using the math library and making it so that the
position of the sword, along with its rotation and velocity, were set to
original if thrown further than 2 in any x or z direction (fig.4).
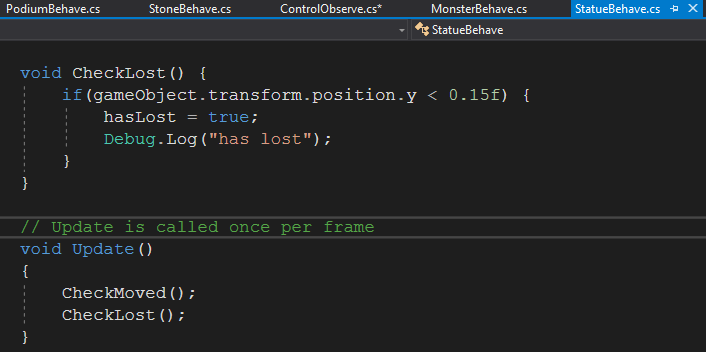
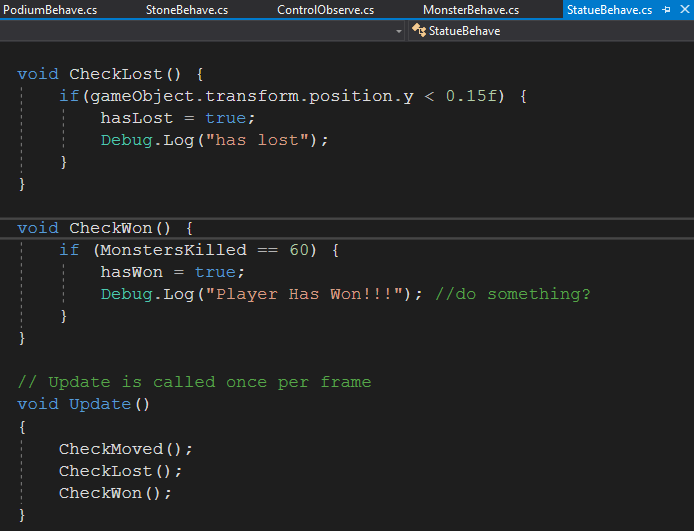
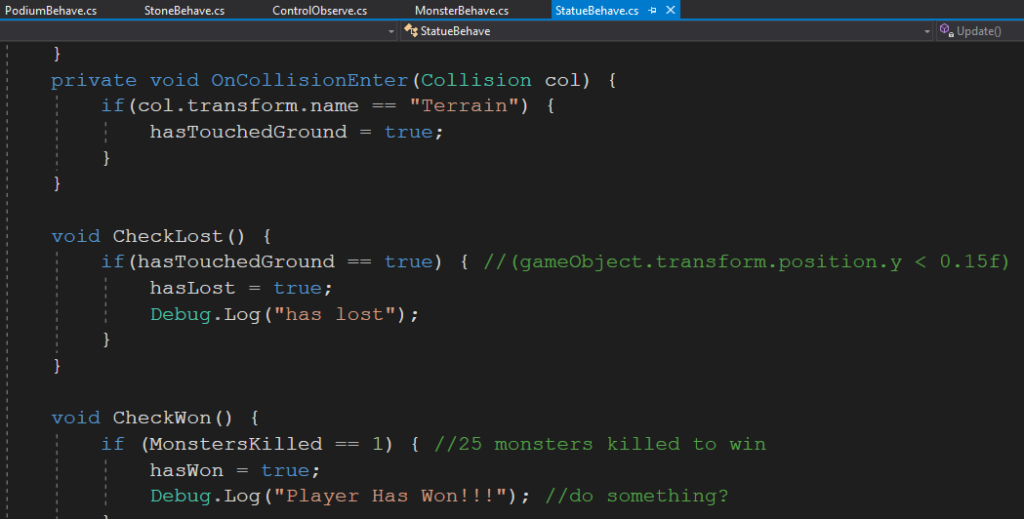
Finally I attached a losing behavior for the game to the
statue’s script. Currently, only if the statue fell below a certain level (on
the ground) would the player lose (fig.5). I gave room for the possibility of
cheating the system, you could make a platform of stones or place the statue on
a dead monster and you would not lose.
I made a change in scenery for the when the player
supposedly lost. With a lot of difficulty I found the main camera within the
player and found a way to alter the skybox so that it became black when the
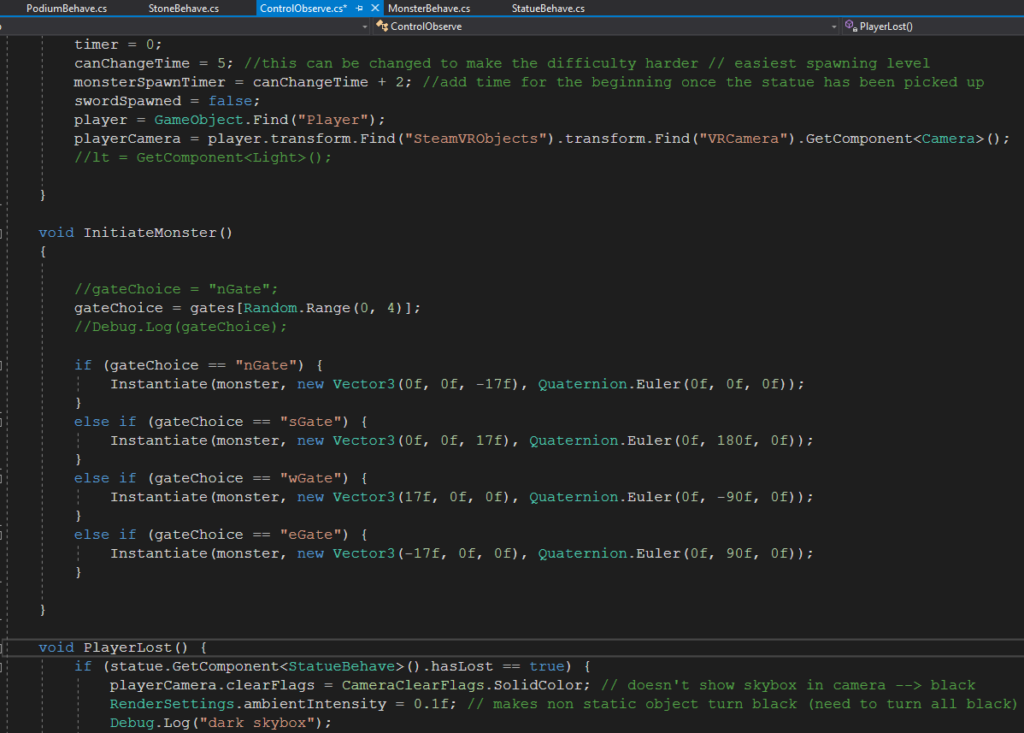
player lost. I found this through trial and error. Turns out that if you change
the “Clear Flags” of the main camera from “Skybox” to “Solid Color” then the
beautiful skybox would be turned to a single color quickly (fig.6). This gave
off a strong effect for when the player lost. I also made it so that the
ambient light intensity would be set to very low when the layer lost, which
turned a lot of the environment dark (fig.6). I found out that this would only
work on non-static objects. Ideally, I would find a way to turn everything
dark.
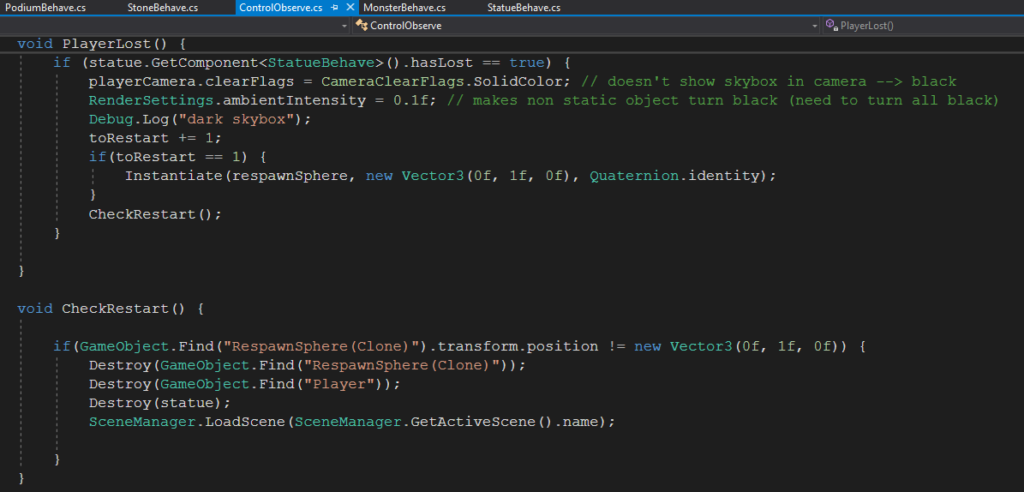
The control script is getting a bit hectic because I am slowly realizing how inefficient my coding is (stating things more times than they need to be and writing too many lines). It is a bit too late to fix this because it would take a lot of time to redo but it is a good learning experience. I think so far the game is looking good. The next few steps necessary for the coding is: adding more losing conditions, fixing the losing condition, making a winning condition, counting the number of monsters killed, and making a method to restart the game (perhaps with SceneManager.LoadScene(SceneManager.GetActiveScene().name).
April 30
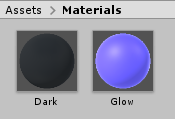
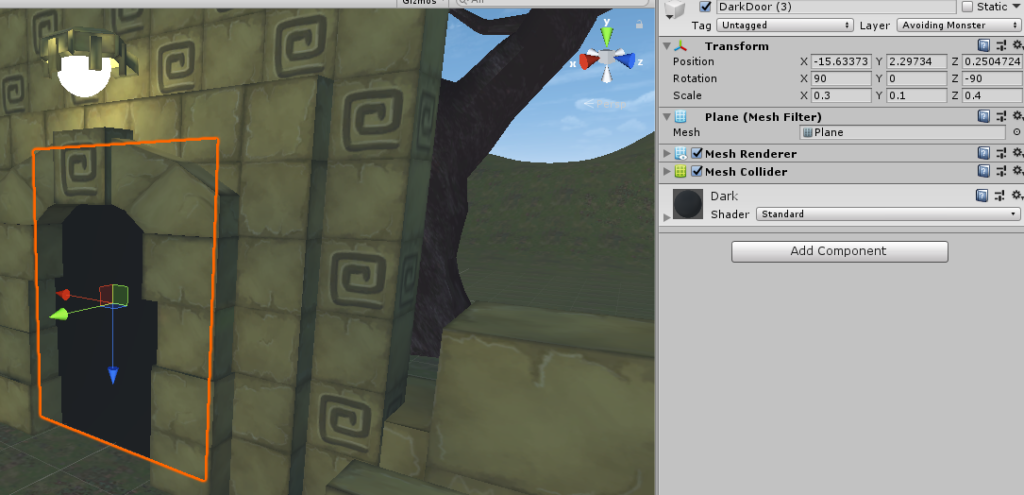
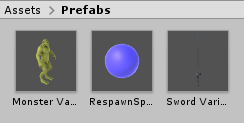
Having in mind what I wanted to do today, I created 2 new
materials and a new prefab that I was going to use (fig.1). I created a dark looking
material for the planes from which the monsters will emerge (fig.2, naturally set
in the “Avoiding Monsters” layer as not to interact with the monster) and a
glowing purple material for the respawn sphere that will let you restart the
game if desired (fig.3).
I then went ahead and made it so that the player could
indeed restart the game if they lost. I did this in a roundabout way, when the
player loses everything turns dark but a sphere will appear. This sphere (which
is glowing) can be interacted with. A voice will tell the player that they can
try again by grabbing the sphere. Grabbing the sphere will then reload the
scene (fig.4). When I first tried running this code I noticed that some objects
would be carried over into the reloaded scene. This caused issues because some
of the scripts would malfunction due to there being multiple objects with the
same name. Also, there would be too many statues, swords, and stones, which
made the game very different. I added a section to the code that deleted the
sword, player, and statue before reloading but I decided to keep the stones
(fig.4). I think this would be enjoyable because it would give the player a bit
more of a head start and would also allow them to strategize their placement of
stones ahead of time (simply gave a bit more character to the game). I noticed
that in the reloaded scene the stones and statues would have the issues of not
taking velocity from the hand after being thrown (the first time). I don’t know
how to fix this but I think it might be reasonable to keep it in the final
version of the game because it is a disadvantage that balances out with the
advantage the player obtains from restarting.
I also noticed that the monsters would continue to spawn and
walk towards the player once they had lost (or won) which seemed aesthetically displeasing.
There was also the issue of them (and the corpses) being reloaded to the next
scene after a restart. To fix this I made a very simple addition to the code
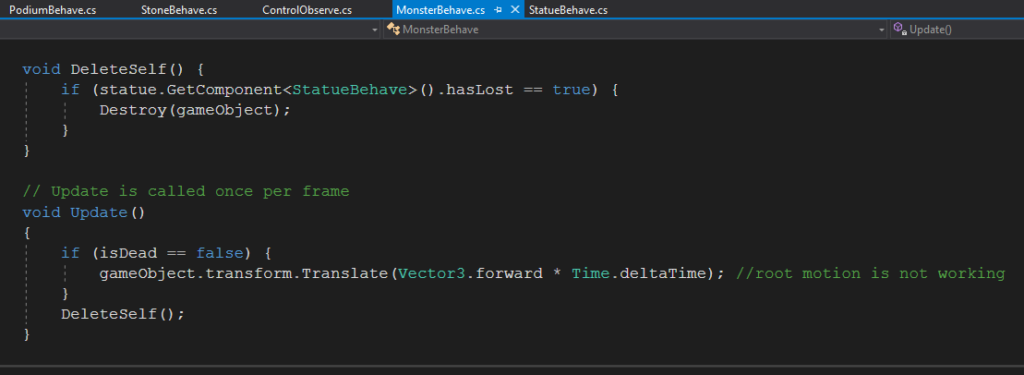
for the monsters. I simply made it so that when the player lost, the monsters
would delete themselves (fig.5).
Though I didn’t actually code for the winning scene I wrote the code that prepared for it (as well as the losing scene entry way). If the monster collided with the statue or the player (depending on the name of the objects) the player would lose (fig.6). I might have to change this later on so that it is only the statue because the monster can quite easily collided with the player (even when as a corpse). I also made it so that the player would gain one point every time a monster is killed and will win once they kill 60 monsters (fig.6 & fig.7). As I am writing this blog I noticed an error in the code that needs to be fixed; currently the sword will get destroyed once it interacts with the monsters because it has the “HurtMonster” tag. This needs to be made into an if condition. Also the current if condition needs to have the “or’ operator turned into an “and operator”; currently the player could win simply by hitting a corpse repetitively with the stone or sword.
I think the coding for the game is getting close to its end point. To finalize, I think I need to code the winning scene and fix some bugs with the reloading and the throwing. If necessary, I can also make it so that monsters spawn form the diagonals every now and then. I like how the game is looking so far.
May 5
I started off by fixing something that I thought was made
the game unnecessarily inconvenient. I made it so that the losing condition
only took into account when the statue touched a monster and not when the
player touched a monster (fig.1). I also placed the player in the “Avoid
Monsters” layer. This made it so that the monsters would walk through the
player to reach the statue.
Another aspect I wanted to fix was the difficulty level of
the game. From player testing I understood that the game was a bit too
difficult because monsters spawned too quickly. To fix this I decreased the
spawn rate. I started at every 7 seconds then 6, 5 and finally 4 (fig.2). This
meant that after 2 minutes close to 25 monsters would have spawn. This is the
amount of monsters to kill to win.
Next, I wanted to add a blood effect to the monsters. I made
a particle system that looked mildly like blood splatter and attached it to the
chest of the monsters (fig.3). I found the right parameters mostly through
trial and error. I then added code in the “death of monster” section so that it
would play the particle system when the monster died (fig.4). This meant that
the blood continued inevitably till the player won or lost. Also, the particle
system didn’t collide with anything which fixed a few bugs I had in the
previous project.
I fixed the losing condition from dropping the statue.
Originally it was based on the y position of the statue but do make the system
more accurate I based the touching on collisions. Now, if the statue collided
with an object named “Terrain” (the ground) then the player would lose (fig.5).
This also permitted me to add into the game a small Easter Egg which I do
later.
To balance the losing condition, I added a winning
condition. Now if the player did indeed kill 25 monsters then the previously
turned off directional light would be turned on (fig.6). This made the scene a
lot brighter and does indeed feel like success. I had to destroy the statue in
the winning scene or else the player would still lose when dropping it. I made
it so that there was no more replaying after winning; that is the end of the
game.
Finally I worked on the Easter Egg portion. I first made it so almost all of the objects were not static. This made it so that I didn’t have to deal with the baking of light maps and so that everything turned dark or bright with the change of light (fig.7). This is not a perfect method but since there are not too many objects in the game there won’t be much lag. There is one hollow shape that doesn’t turn black when the player loses (fig.7). If when the player is defending themselves, they can throw the statue in the hole and not lose. This makes it so that the player doesn’t have to worry about the statue when fighting. I am thinking of making it so the player automatically wins when they throw it in there.
So I think all the coding for the game is pretty much done. Now all that has to be done is the addition of sounds and a few touch ups.
May 10
I spent way too much time trying to fix the glitch where the
stones would not fly after being thrown (only after the scene reload). I found
out that it had nothing to do with my script though a lot of trial and error.
In the end I found it to be a problem with the throwable script. I just had to
prevent the script from turning the object kinetic when it was being picked up
(fig.1). This was done in the “Attachment Flags.”
I then went ahead and corrected the blood splatter particle
system. I found out that adding an animation to a character doesn’t move all
the objects within the prefab. I order to make it so blood came out at the
right place when the monster died I just placed the particle system where the
chest would be when they fell (fig.2).
Lastly I added a flat sphere (since there are no circles) to
the bottom of the statue (fig.3). Originally the statue was see through at the
bottom so this fixed that issues.
In retrospect, creating and implementing the interactions for this project was definitely a worthwhile experience. Learning to teach yourself a new software is definitely a realistic expectation of someone’s professional career and this project provided an excellent testing ground for such expectation. However, there where several unexpected mishaps that intervened with the project’s complete fruition as well as major moments of success and I will explain such in the following paragraphs.
SteamVR
SteamVR repertoire of scripts and prefabs allowed me to implement the grabbing of the glasses really easily. However, my initial approach to create the change of camera blurr was to modify the scripts that came with SteamVR. However, this scripts are overly complicated and not easily readable which resulted in me just messing up this interaction in my efforts of implementing additional functionalities to the game.
Another problem that occured whenever I was working on my project was that Steamvr stopped working unexpectedly. This was an unexpected bug that forced me to create an entirely new project file, export all files (expect the SteamVR plugin) from my original project to the new project file, and then install and import a new SteamVR plugin into my new project file.
New Scripts
Given the issue with Steam VR and its closed system that doesn’t allow for a modification of its scripts, I decided to create four new scenes with different colors(Atoka’s idea) and glasses. This resulted in a modification of our projects initial idea, as well as a different functionality. The user now has to look for the glasses, and once they find them, they will be transported into an entirely new scene with misplaced glasses located in an entirely new place. The user must now find the glasses in each scene, and then at the end, the will end up in a new scene with corrected vision. In order to change scenes,I used Unity Scene Manager library. I created four sceneswaps scripts and I attached one to each pair of glasses.
using System.Collections;
using System.Collections.Generic;
using UnityEngine;
using UnityEngine.SceneManagement;
public class sceneswap : MonoBehaviour
{
// Start is called before the first frame update
public bool changed;
public string[] scenes = { “Bathroom7Blue”, “scene1”, “Bathroom7Green”, “Bathroom7Red” };
Note: There are four scripts like the one above implemented in my project, each one for each pair of glasses that is linked to a particular scene.
At first, I wanted to modify the Interactable script so that the scene is swapped whenever the game object is attached to the hand. However, even though the change of scene was achieved through this approach, the flow of the code was interfered with which resulted in interfering with the Interactable Hover Events Script (the glasses wouldn’t stop glowing). The approach I implemented in the above mentioned script was to base the scene swap in the position of the glasses. Once the glasses were moved from their original position, the scene will change. I used the Game Objects Z value, but the x or y value would work as well.
Further Improvement
Even though both interactions were achieved, some things could been added in order to fully culminate tha narrative we wanted to achieve. Some sound could have been added by my partners. Also, maybe changing the camera blurr back to normal once the user goes to the last scene would have been excellent as well. All in all, I am really proud of the results of this project and what it came to be.
For our project, we plan on implementing two interactions that makes the user fully delve into our virtual reality world . The first one is the ability to grab the glasses. The second one is to make the camera view blurry. We plan on intertwining both experiences by changing the camera view as the user grabs the glasses. Given the explorative and exciting nature of the project, I volunteered to work on the interactions as I believe this will be an opportunity to learn more about c# scripting for Unity while my partners are interested more in the design of the scene.
March 13, 2018
Now that the scene is completed, it is my job to implement the interactions necessary for our project. As I started researching and exploring more about Unity, I concluded that there are two approaches that can be taken to achieve the interactions. The first one is to use the scripts that come with SteamVR’s “Interactions” scene and then build upon them. The second one is to write the scripts from scratch by following tutorials online. I decided that the former is more feasible than the later given the timeframe imposed on us. Therefore, I deleted the camera Object that comes with Unity and I pasted the Player prefab that comes with steamvR into our hierarchy given that SteamVR’s scripts are fully compatible with the SteamVR’s player prefab. I then grabbed the following scripts from Steam VR and included them into my glasses:
Velocity Estimator
Interactable
Interactable Hover Events
Throwable
Scripts borrowed from SteamVR
These scripts gave the glasses a lot of capabilities. First off, they light up whenever they are touched by the controllers. And after they are grabbed, the scripts allow the users to throw the glasses and they are affected by gravity which means that they fall accordingly and interact with floor once they land.
March 15, 2018
After talking with professor Sarah Fay Krom, I am now able to use the post-processing stack that comes with Unity. This will allow me to change the camera view and make it blurry. The post-processing stack generates a script that can then integrated into the camera. This script can be modified through an easy-to-use panel that appears in the hierarchy which allows you to change things like: depth of field, blur, motion blur, color grading, etc.
Post Processing Stack recommendations by Professor Krom
For project #2, our group decided to build an experience that tackles the problem of sustainability on campus. We wanted to base our scene on campus, and there are trash on the ground. In the real world, if someone passes by trash, and ignores it, there are no consequences. Besides, people all have the mind set that someone else will act on that. We wanted to raise people’s awareness of the NYUAD community by creating an alternate reality where if people walks by a piece of trash without picking it up, they will receive negative feedback indicating that they are not acting in a proper way.
Besides, because of the diversity of the community, there isn’t a shared standard for recycling which everyone agrees upon. Always having been such an ignorant person about the environment, I really get confused when I throw an empty Leban bottle: should I put it in general waste or plastics? The bottle is definitely recyclable, but only after I clean the bottle. Recycling can be extremely complicated: I still remember that I was extremely shocked when the RA told us that we should recycle the lid for Starbucks cups but throw the paper cup into general waste. By creating an educational environment which mimics what actually happens on campus, we hope to teach people how to recycle in an entertaining way. Through the repeated interaction within our scene, users might be able to perceive recycling as less burdensome as they get more familiar with it.
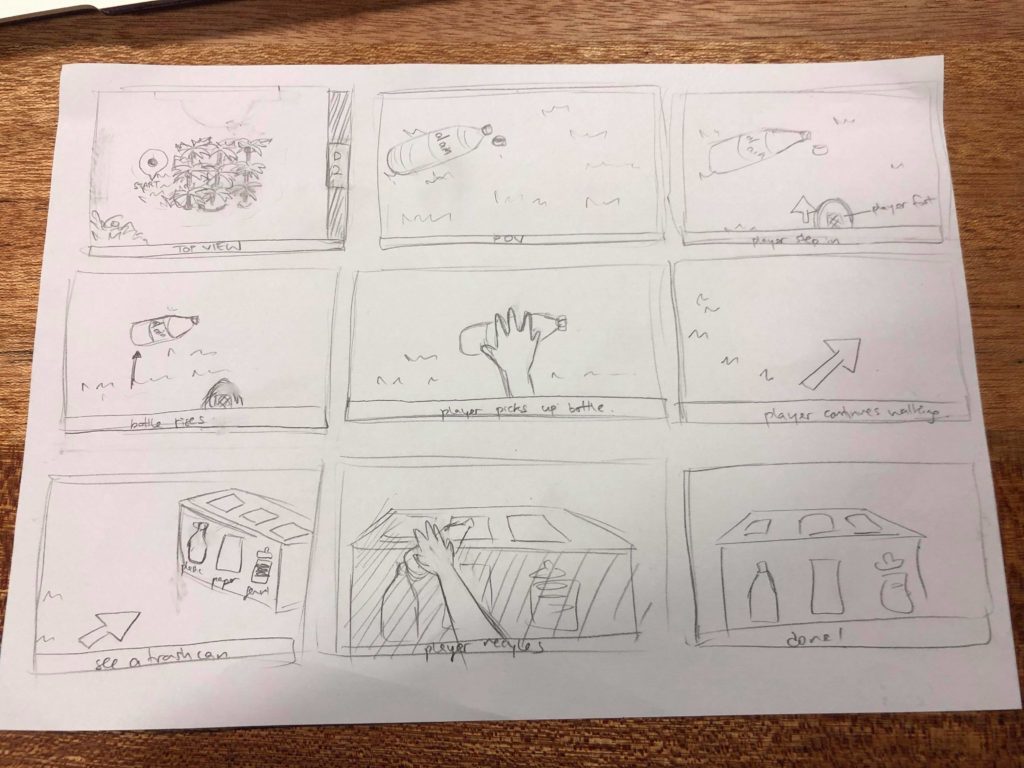
Here is our storyboard, drawn by Lauren:
Some initial thoughts and designs:
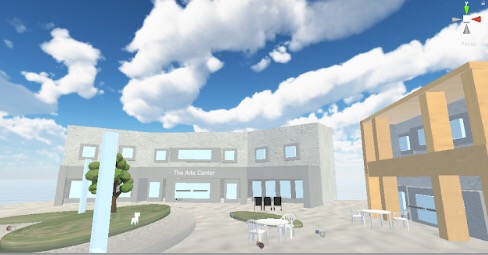
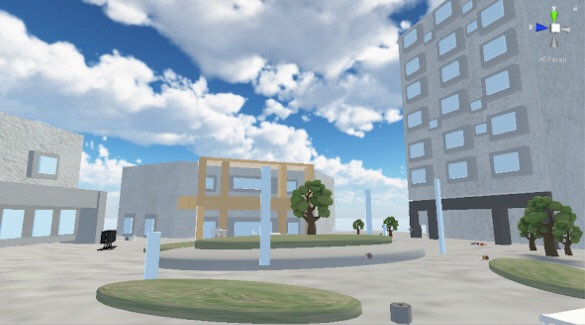
Since the campus is kinda huge, and we only have limited space for interaction, we decided to limit our scene to the area (the small garden/square) between D2, A6 and the Arts Center. We think that this side is more populated, compared with the ERB side, since everyone comes to D2 for meals, and we can actually see Al Ain bottles and other trash lying on the benches.
In terms of feedback, we decided that when users get close enough to the trash, the trash will light up, indicating that users could interact with the object. When users put the trash into the correct trash bin, they will get a rewarding sound feedback. Otherwise, they will get a sound feedback that is negative, and will not be able to drop the trash into the trash bin.
For the ambience sound, we decided to use birds sound, because we actually have speakers attached to the palm trees on campus that play birds sound. This is not only a recreation of the campus environment, but also a sarcasm of how they try to make an illusion of something that does not exist on campus.
We split the work so that Ju Hee and I will be in charge of making the environment, while Lauren and Simran will be in charge of making the interactions.
During the class where we presented our initial ideas, Sarah suggested that the main focus of this project should be on the interaction. After discussing a bit on the environment, we decided that the scene does not have to be set on campus. I experimented with the environment and found a skybox of a block in Tokyo. Japanese society put a great amount of emphasis on recycling and eco-friendly lifestyle, so I think it make sense to place our interaction in Japan. But when we met again in class, we decided that we should still use the campus as our environment, and Lauren became passionate about making the environment, so she switched her task with mine.
Ju Hee and Lauren have built the environment, and our scene looks like this:
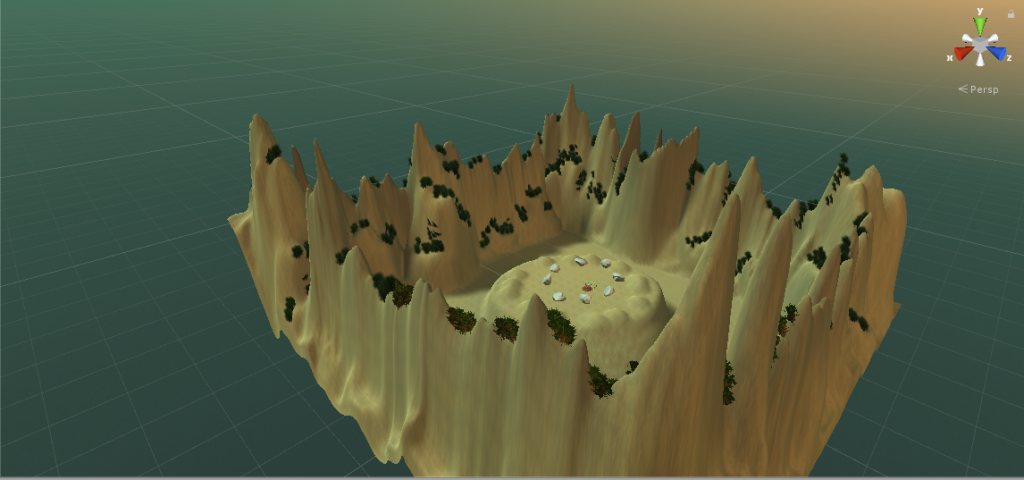
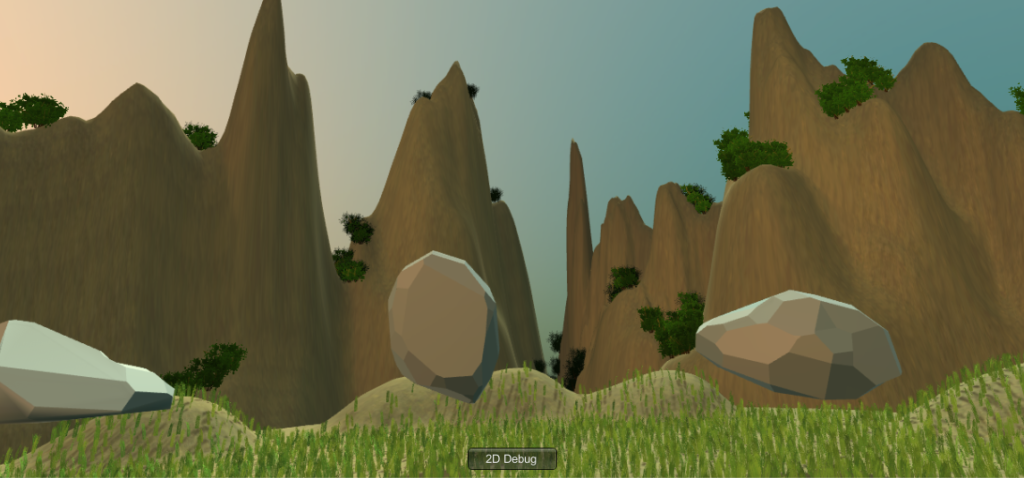
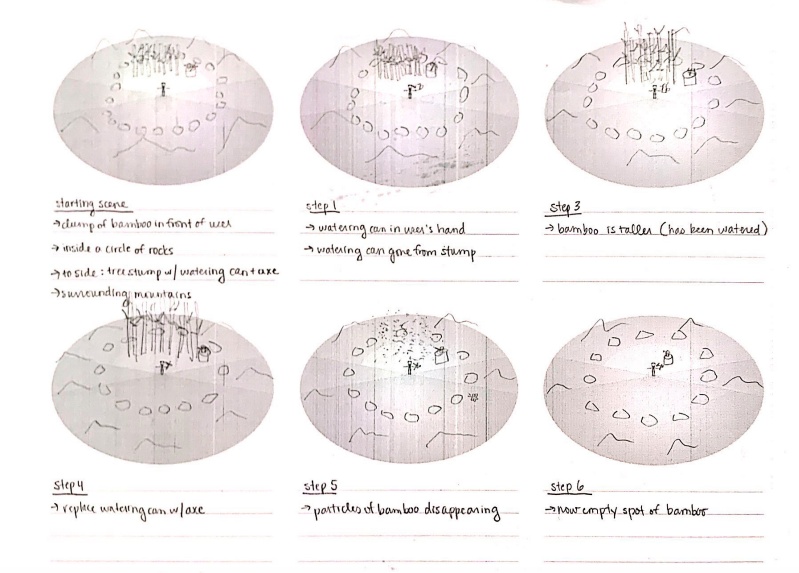
Zenboo is a relaxing space that demonstrates the state of ZEN by giving user relaxing watering&growing&cutting bamboo activities to offer them a chance to interact with mother nature in a fun way. A user will be surrounded by mountains, floating rocks and bamboo clumps, he/she will find tools nearby to give the user hints to initiate some activities with them. In Zenboo, the user is able to water the bamboo using a watering can and watch it grow in a unique way; moreover, he/she can also play with the newly grown bamboo. When picking up the sickle next to the watering can, a user can wave it to the bamboo clump and make the bamboo pieces disappear. If the use water it to much and make bamboo grow too fast, due to the effect of gravity, some piece of bamboo will fall on the ground and disappear after few seconds by themselves as well!
Space viewUser view
2. Process and Implementation:
This is how we started:
How did we build the scene and the the ideation of designing choices:
We want to create a scene/space that makes people feel relax in and doesn’t have a lot of things/movement to distract them from feeling the sense of “Zen”, therefore we came up with the idea of having a giant mountainous background with the sunset mode and put the user in the middle, also in order to amplify the interactions between the user and the growing plants experience, we put rocks around where the user is standing to make sure he/she won’t have to move too much to interact with the environment.
The reason for this inspiration is they are very mystical and calming, which would help contribute to the relaxation aspect of Zenboo.
The design of the circle of rocks was decided through the user feedback that the rocks could be larger and floating around the user rather than the initial plan to have them resting on the ground. This turned out to have a pretty cool effect and create the Zen atmosphere.
Another design decision that has been changed during the project development was the location of the bamboo. Since space is a limitation, having the clump of bamboo in front of the user all spaced out would have been problematic, or perhaps not as intuitive that the user had to go over to it and water it. Instead, we decided to place the bamboo in a semi-circle close to and around the user. This way, the user does not have to walk very much in order to water all of the bamboo.
What would be the “everyday” thing in this world?
The simple actions/interactions like pick up/drop/throw/watering and cut that everybody already knows what to do the first time they see the scene. And according to out existing knowledge we have the perception that when you water the plant it will grow, when you wave the sickle it will cut the plant. Therefore there’s not a lot of education of how this project works is needed and it’s easy for any user to take it up.
Steps to implement the interactions:(highlight some key interactions I worked on)
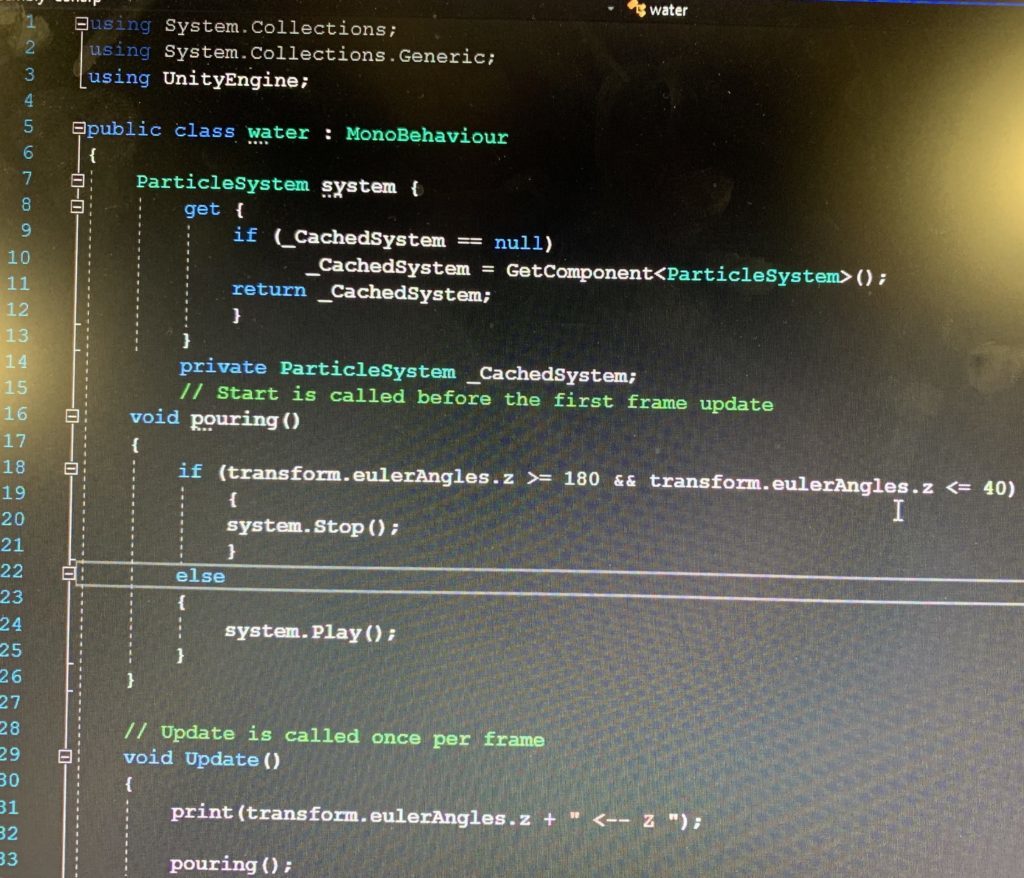
1: Particle system – water:
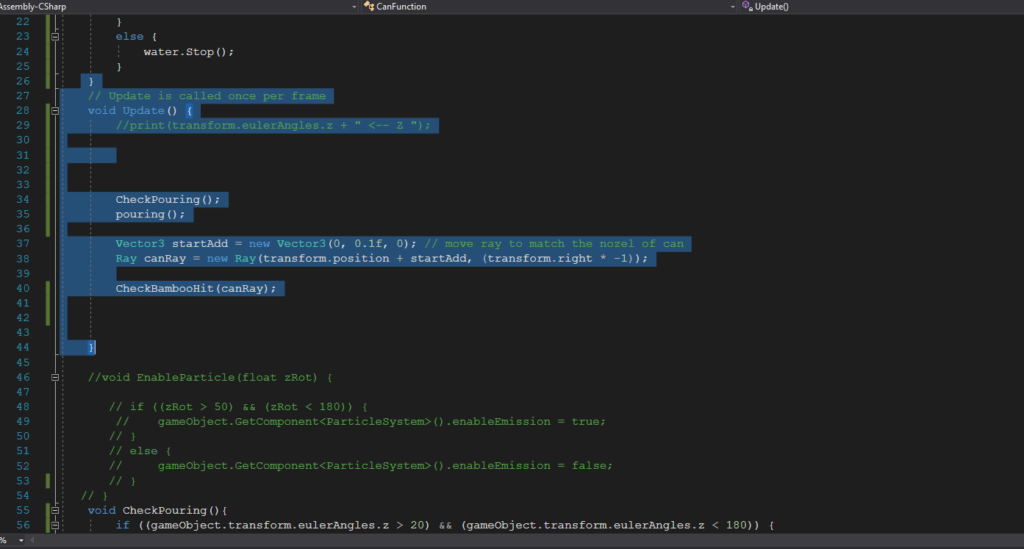
I worked on the particle system to make it on/off when an object is rotated at the certain angle – when the watering can face downwards the water particle system will be on and when it’s at the normal position the article system is off and the water effect won’t be shown.
I reached the goal by using the transform.enulerAngles and catching the Z angle input of the water can object. We have a boolean function called “IsPouring”, so I grabbed the particle system under it and I added the code if the angles are beyond the range then the the system stop, else the system play. And we call the function “Is pouring” under the “void update” to make sure it is running all the time.
There was a small problem when I practice the code – the particle system is alway on when it’s playing. So I assumed it was disconnected from its parent object, then I added the code “Print” on the IsPouring function to check if it’s connected to the watering can when the codes are running. It turned out to be that there’s nothing printed out in the console log, so I dragged the the particle system to the water can to make sure it’s under the component section (although the particle system is already a child of the watering can), and then it worked.
2: Particle system – mist:
Another particle system I worked on is the the mist effect and it will only be triggered when the sickle is cutting/colliding with the bamboo.
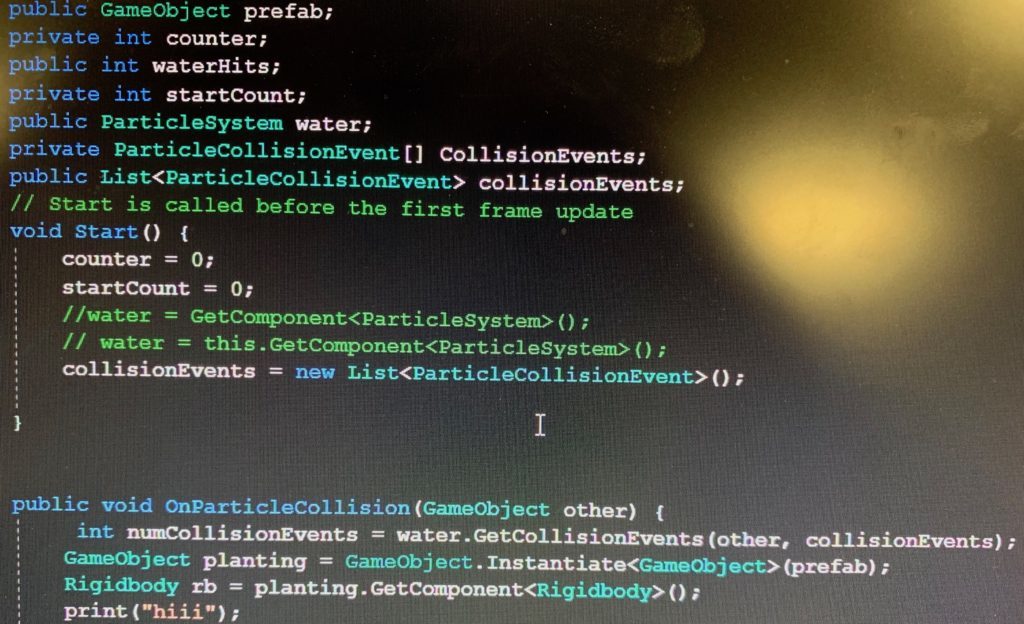
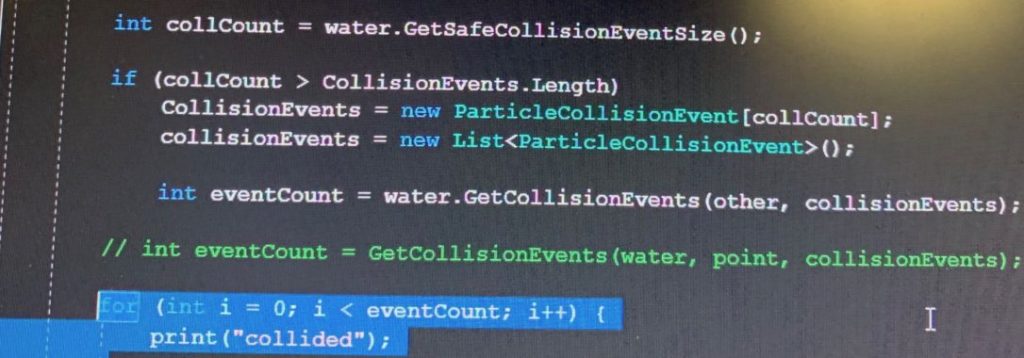
At first I was thinking about attaching the particle system (the mist) to the bamboo script, so whenever it is detected that the bamboo is colliding with the sickle (the sickle is hitting the bamboo ), the result of which is to destroy a GameObject (a piece of bamboo), the mist particle system will be triggered to play. However, this design has two significant difficulties: one is that OnParticleCollision is really hard to be repositioned in the “instantiate” to make the mist effect only be shown on the specific piece of bamboo that is hit by the sickle (since there will be a lot of bamboo grow out of the OG bamboo); another difficulty is that since at the same time the game object will be destroyed will the child function on it has been trigger, they effect will not be shown at all because the moment it’s triggered, its parent also dies so the mist has nothing to show on.
Taking these conditions into consideration, I tried to created a new mist script just for the sickle and it’s separated from the bamboo function so we don’t have to reposition the particle system for each specific bamboo. At first I tried to detect the dillion of the particle system by “OnParticleCollision”, however it turns out to be super hard to be detected accurately since there are millions of small particles and it almost collide with everything. Therefore I switched to detect the collusion of the sickle – once the collision of the sickle hits a game object, the particle system (mist) that is attached to be sickled will be triggered.
3:Bamboo Grow when been pointed by particle system
We finished this part by using OnParticleCollision to detect the collision between the bamboo and the particle system that has been attached to the watering can. In the beginning we decided to add the particle system collision detect in the Bamboo OG script, because the growing function is in the same script so it’ll be easier to call, however, even been put into different layers and been set as “only collide with bamboo”, the particle system will literally collide with everything. Then we tried to only write the particle collision detection code in the canfunction and call the bamboo grow function from a different script to make sure the two parts are not messed up with each other. So basically in the particle system we say once it’s collide with bamboo, then it triggers the grow function from the BambooOG script, and then it worked. The codes we uses are shown below:
4: Floating effect of rocks:
In order to improve the user experience and create the sense of ZEN, I added the floating effect:
3. Reflection/Evaluation: This should discuss your expectations and goals in the context of the what you felt was achieved with the finished piece.
I think we as a team successfully achieved our initial goals and expectations of this project – that we have a beautiful Zen environment, we built the growing and cutting bamboo interactions, and surprisingly during the process of coding bamboo functions we found a cool way to let the bamboo has the same X and Z position, so even if the user play around the bamboo/lift it up/touch it, the bamboos will come back to the same position. We also achieved our initial thought of limiting the user’s movement – by putting the semi-circle bamboos in front of the users. For the coding part I was involved in particularly, I reached the initial expectation to make the particle systems, trigger the bamboo grow function when it is collides with the water particle system, create the floating rocks effect and create the mist effect when the sickle collides with other game objects.
However, there are something that needs to be reconsidered/improved in this project. In out initial thought, we design the circle of rocks to limit the user’s movement, but it turns out to be in the real VR scene those rocks just become a part of the distant backgrounds that didn’t really work to limit the user’s movement. What’s more, I think there should be an ending of our project – because what we have now is just to endlessly water and cut the bamboos, it should stop or have something else to show at some point. The parts that I could potentially work more on includes making the collision detection more discreet – for example, the mist particle system will only be triggered when specifically collides with bamboo, not with any game objects.