Here is a link to my Documentation.

This project was created together with Mai Lootah and Shenuka Corea. Since they were working more on the environment and textures and animation, I was working on the scripts and mostly will dicuss them.
Description:
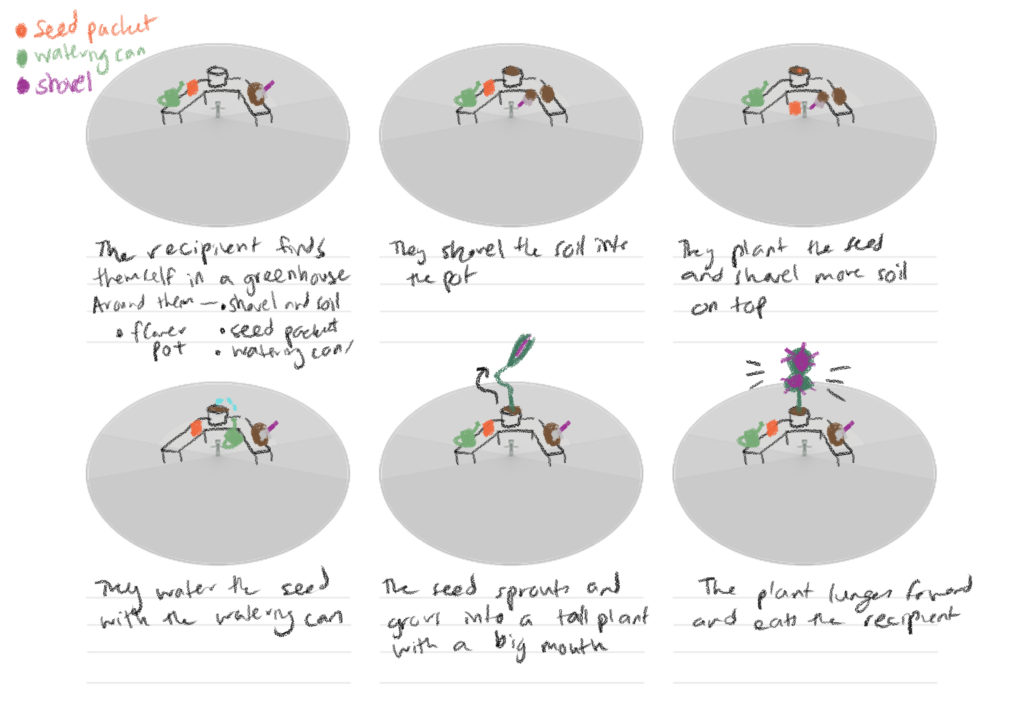
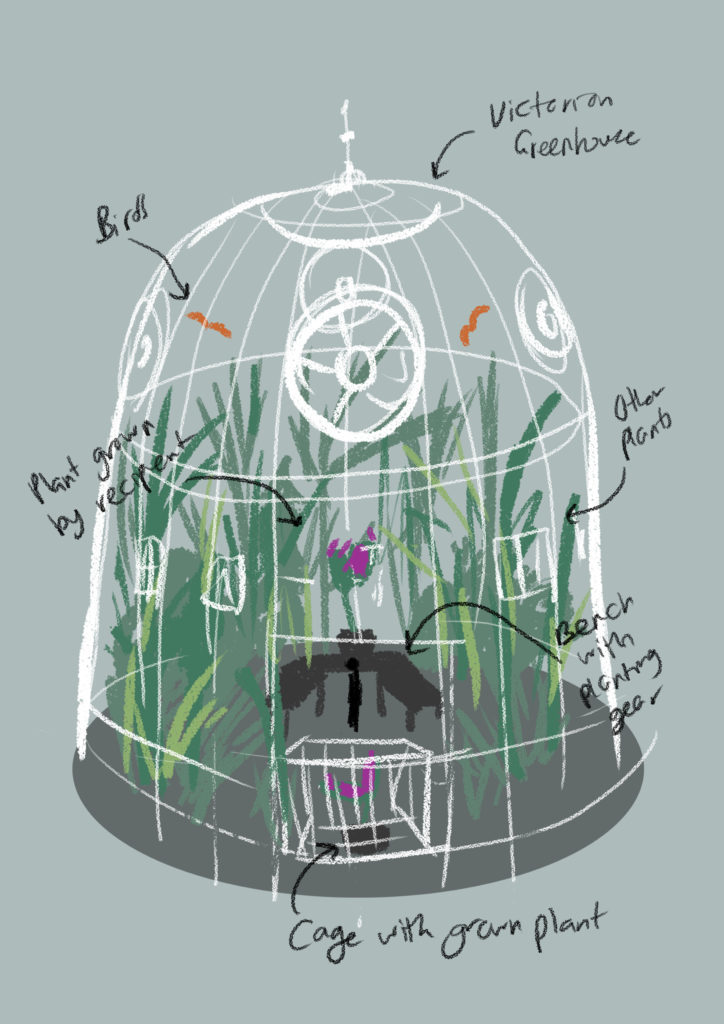
This project is a greenhouse on an alien planet where you can see all sorts of alien plants. And when you place a seed in the pot and water it, something weird grows. Some plants make sound, like the one that is behind you and placed in a cage.
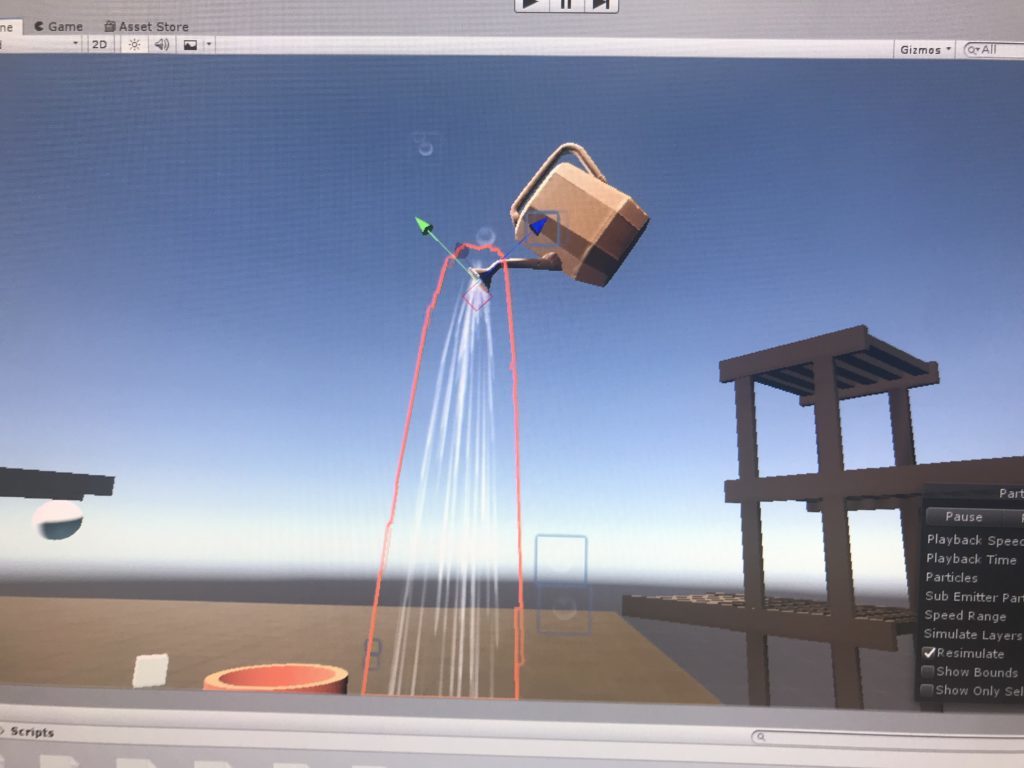
There were a total of two main interaction and some secondary interactions. The main interaction was tied to the seed. You can pick it up, its throwable, but the goal is to put it into the pot. Once the seed is in the pot, you can water it to make it grow. That is the second interaction which is tilting the watering jug so it could pour water. This script was a disaster since it was the first script I have ever written. The secondary interactions are the gardening instruments that can be picked up and thrown.
Implementation:
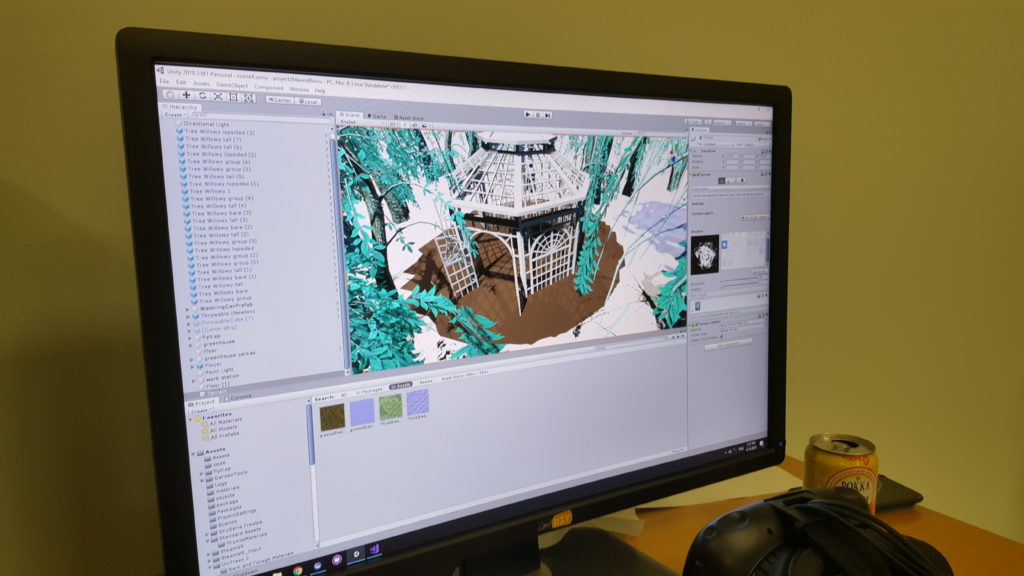
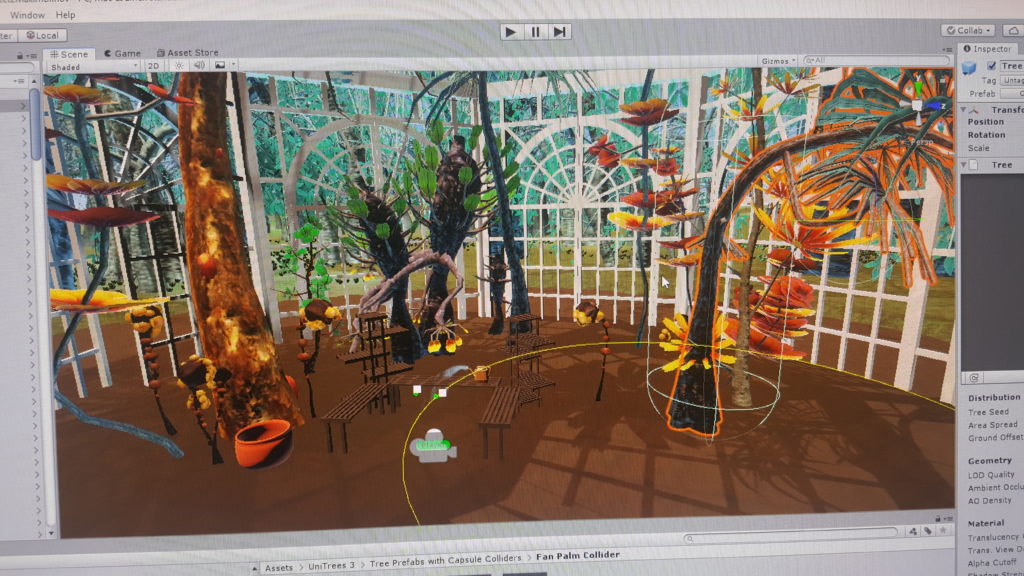
It started off with an empty terrain where we put an imported from the asset store greenhouse (costed is 1$) and made the outside tree meshes and grass. After the we have created a work station which included some benches from that same greenhouse asset and pots. Right after that we have added mesh colliders to every part of the work station and added a new asset which was the gardening tools. The main camera was set in front of the work station and it consisted of the “player” from the steamVR interaction example scene. After the environment was set by Shenuka and Mai, I have started working on the scripts. The first script was to make the particle system, which was attached to the water canister, play when tilted. This script used the transform.euler angle (took me a while to figure out) and when it is in the desired range, just run it. The next script was the collision detection of the seed and pot. That one was not hard: when the seed is on the soil of the pot, pass a “true” boolean value. The next script was to detect collision from the particle system to the seed. Not hard as well, same thing as with the seed and pot. Next is making a counter for the seed which will count the particles of the water only when the seed is in the pot. That is where we need the seed with pot collision script, and once there is enough water for the seed, it shrinks and the plant grows. This was another script named “growth”. If growth was true, the seed began to shrink and plant to grow. Those are all the scripts that were created to make our project 2.
Reflection:
Our goal was to make a greenhouse with a man-eater plant. You can find a clue about it if you look behind you (same plant in cage) and that it is dangerous. As it is seen on the pictures of the blog which was dedicated to expectations before the project was started, we have reached our expectations. The environment was really well made to understand that we are actually on an alien planet.

This project was made to show the environment that could be possibly perfect. The environment set as a goal was a sunset valley.
Description:
I have created a mountain area with trees. The main camera was set at the top of the mountain, not the highest, but then the ground level. From that point of you you could see a lovely sunset and some trees that are below you.
Process and implementation:
Using a terrain tool I have raised the terrain in some areas to make it look like mountains and using the brush tool I have added tree meshes and grass meshes. After that I have added some filters on the main camera to make the sunset look even better and move the camera using the “smooth mouse look” script. This made a wonderful representation of the sunset valley.
Reflection:
This places is build to make a person be immersed into a nice place where you can clear your thoughts and just relax. I have never seen a place with such sunset before personally, but now I have a goal to find something in real life that will look very similar.
Project 1 Development Blog Link: http://alternaterealities.nyuad.im/2019/02/11/project-1-development-blog-5/
In this project, the goal I set out to accomplish was to create a peaceful environment. Even though the implementation of such differed in many aspects with my initial idea for the project, the overarching goal of creating a peaceful environment was definitely accomplished. As such, I will use this piece to talk about the similarities and differences between my project’s ideation and its actual implementation, as well as the process that I went through to go from the former to the later.
Differences
If you look at my first entry in the development blog (link above), my initial idea had the user in the middle of the tent. Even though I could have accomplished this in my project, I decided that locating the user outside of the tent created a more meaningful impact given that the user can enjoy more of the scenery thanks to the 360 degree look of the natural landscape I created.
I also didn’t add the snack assets into my project. I could not find any of the assets I wanted and instead I placed camping tools and wood logs all over my scene. Cutting wood logs was also something I used to do quite often in my camping trips, so this resulted in a really good alternative.
Similarities
All in all, I can say that the tent part of my idea was accomplished effectively. However, I didn’t expect to get so invested in designing the natural landscape. I spent more than 70% of my time placing trees and playing around with the mountain assets. I really liked this portion of my project, and it made me retrospectively analyze the importance I placed in nature. Whenever I went camping, I thought that the most enjoyable part of the experience was to spend time with my friends and that the landscape/scenery came in as an added bonus. After doing this project, I now know that the refreshing look of nature was more important than how I initially perceived it to be, and I hope that I value more this importance as I go on more camping trips.
Implementation:
As stated in the development blog, the design of the scenery was not the most strenuous part of the process. The most time-consuming part was making the executable file. However, looking my project in a Google cardboard Kit was worth it as it gave me a newfound appreciation of the scene view I created. Also, the terrain object proved to be really difficult to alter in the version of Unity I had installed in my computer. As such, I had to use a cube for my floor and then use a mountain asset to fill the user’s distant view with mountain tops.
What I have learned from this project
I have learned to build bigger environments more effectively. Before it was hard for me to plan out the environment and build it, but this time it was possible for me to see the environment three-dimensionally. It was definitely easier to build the environment
Limitations and Reflection
The project can be improved with these elements in the future
Moreover, we should have had more conversations about interactions and the environment. We faced some hardships when it came to adding interactions because we built the environment separately from interactions.
What I want to work on my next project
I would like to work with the interaction part and while working with it, I would like to work with the environment to make sure it is scaled properly. I want the user to feel like they are actually part of the environment. We want them to feel like they are in the right height, and right scale.
Here is the link to my presentation
Initial Post: http://alternaterealities.nyuad.im/2019/03/04/project-2-storyboard-claire-junior-atoka/
Development Blog: http://alternaterealities.nyuad.im/2019/03/20/development-blog-project-2-interactions/
In retrospect, creating and implementing the interactions for this project was definitely a worthwhile experience. Learning to teach yourself a new software is definitely a realistic expectation of someone’s professional career and this project provided an excellent testing ground for such expectation. However, there where several unexpected mishaps that intervened with the project’s complete fruition as well as major moments of success and I will explain such in the following paragraphs.
SteamVR repertoire of scripts and prefabs allowed me to implement the grabbing of the glasses really easily. However, my initial approach to create the change of camera blurr was to modify the scripts that came with SteamVR. However, this scripts are overly complicated and not easily readable which resulted in me just messing up this interaction in my efforts of implementing additional functionalities to the game.
Another problem that occured whenever I was working on my project was that Steamvr stopped working unexpectedly. This was an unexpected bug that forced me to create an entirely new project file, export all files (expect the SteamVR plugin) from my original project to the new project file, and then install and import a new SteamVR plugin into my new project file.
Given the issue with Steam VR and its closed system that doesn’t allow for a modification of its scripts, I decided to create four new scenes with different colors(Atoka’s idea) and glasses. This resulted in a modification of our projects initial idea, as well as a different functionality. The user now has to look for the glasses, and once they find them, they will be transported into an entirely new scene with misplaced glasses located in an entirely new place. The user must now find the glasses in each scene, and then at the end, the will end up in a new scene with corrected vision. In order to change scenes,I used Unity Scene Manager library. I created four sceneswaps scripts and I attached one to each pair of glasses.
using System.Collections;
using System.Collections.Generic;
using UnityEngine;
using UnityEngine.SceneManagement;
public class sceneswap : MonoBehaviour
{
// Start is called before the first frame update
public bool changed;
public string[] scenes = { “Bathroom7Blue”, “scene1”, “Bathroom7Green”, “Bathroom7Red” };
public float initz;
public float currentz;
public Scene currentscene;
void Start()
{
currentscene = SceneManager.GetActiveScene();
initz = GameObject.Find(“Glasses1”).transform.position.z;
changed = true;
}
// Update is called once per frame
void Update()
{
currentz= GameObject.Find(“Glasses1”).transform.position.z;
print(“currentz: “+currentz);
print(“initz:”+ initz);
if (changed==true)
{
if (initz != currentz)
{
Destroy(gameObject);
SceneManager.LoadSceneAsync(scenes[3]);
SceneManager.UnloadSceneAsync(currentscene);
//Application.LoadLevel(2);
changed = false;
}
}
}
}
Note: There are four scripts like the one above implemented in my project, each one for each pair of glasses that is linked to a particular scene.
At first, I wanted to modify the Interactable script so that the scene is swapped whenever the game object is attached to the hand. However, even though the change of scene was achieved through this approach, the flow of the code was interfered with which resulted in interfering with the Interactable Hover Events Script (the glasses wouldn’t stop glowing). The approach I implemented in the above mentioned script was to base the scene swap in the position of the glasses. Once the glasses were moved from their original position, the scene will change. I used the Game Objects Z value, but the x or y value would work as well.
Further Improvement
Even though both interactions were achieved, some things could been added in order to fully culminate tha narrative we wanted to achieve. Some sound could have been added by my partners. Also, maybe changing the camera blurr back to normal once the user goes to the last scene would have been excellent as well. All in all, I am really proud of the results of this project and what it came to be.
Initial Post: http://alternaterealities.nyuad.im/2019/03/04/project-2-storyboard-claire-junior-atoka/
March 5, 2018
For our project, we plan on implementing two interactions that makes the user fully delve into our virtual reality world . The first one is the ability to grab the glasses. The second one is to make the camera view blurry. We plan on intertwining both experiences by changing the camera view as the user grabs the glasses. Given the explorative and exciting nature of the project, I volunteered to work on the interactions as I believe this will be an opportunity to learn more about c# scripting for Unity while my partners are interested more in the design of the scene.
March 13, 2018
Now that the scene is completed, it is my job to implement the interactions necessary for our project. As I started researching and exploring more about Unity, I concluded that there are two approaches that can be taken to achieve the interactions. The first one is to use the scripts that come with SteamVR’s “Interactions” scene and then build upon them. The second one is to write the scripts from scratch by following tutorials online. I decided that the former is more feasible than the later given the timeframe imposed on us. Therefore, I deleted the camera Object that comes with Unity and I pasted the Player prefab that comes with steamvR into our hierarchy given that SteamVR’s scripts are fully compatible with the SteamVR’s player prefab. I then grabbed the following scripts from Steam VR and included them into my glasses:

These scripts gave the glasses a lot of capabilities. First off, they light up whenever they are touched by the controllers. And after they are grabbed, the scripts allow the users to throw the glasses and they are affected by gravity which means that they fall accordingly and interact with floor once they land.
March 15, 2018
After talking with professor Sarah Fay Krom, I am now able to use the post-processing stack that comes with Unity. This will allow me to change the camera view and make it blurry. The post-processing stack generates a script that can then integrated into the camera. This script can be modified through an easy-to-use panel that appears in the hierarchy which allows you to change things like: depth of field, blur, motion blur, color grading, etc.

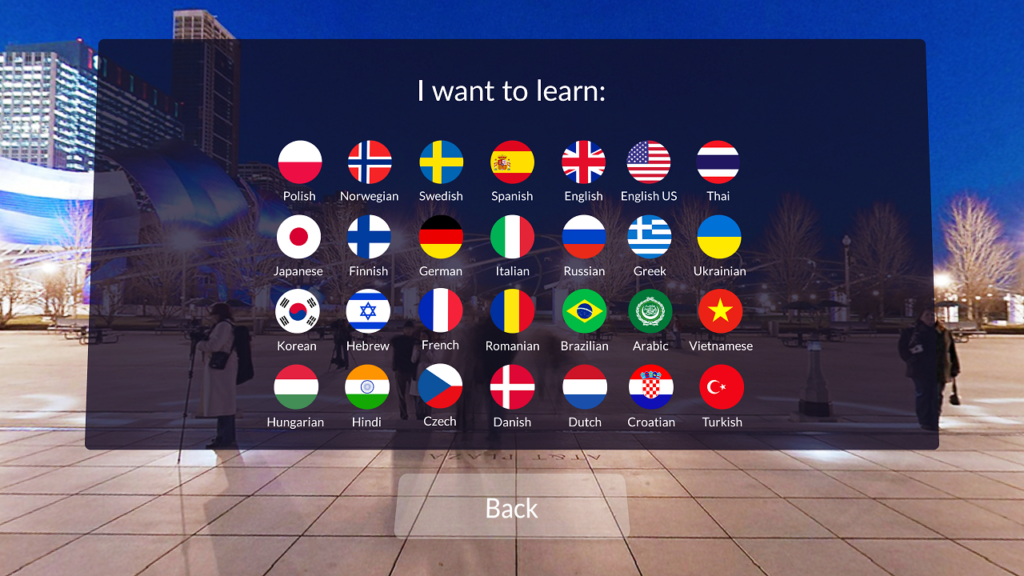
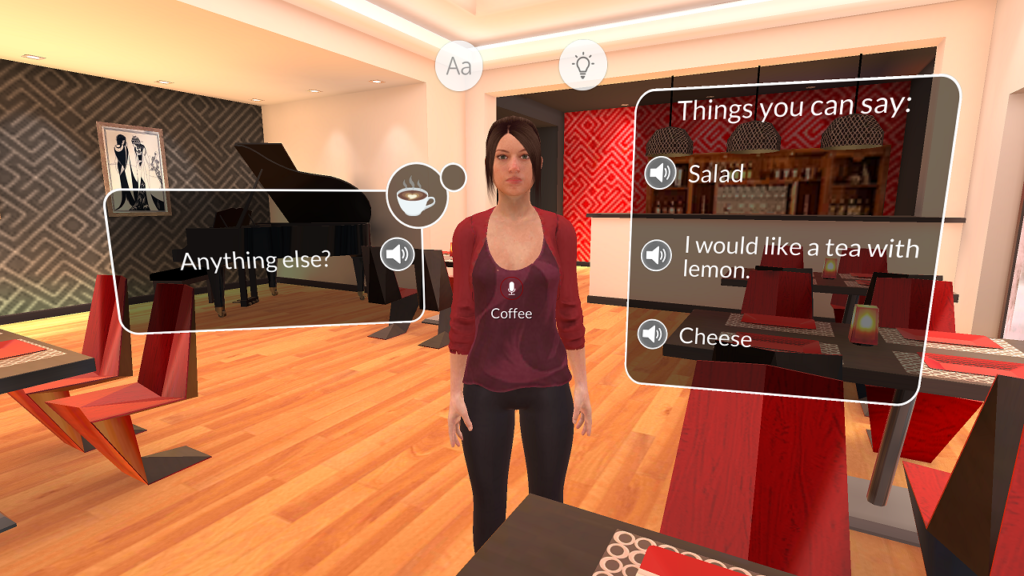
One of the most effective representation in VR is letting interaction that is not possible in real life happen. Learning a language can be difficult. We find it hard to practice it, especially due to the fact we usually don’t have a person around us speaking the language we are trying to learn. However, one of the most effective ways to learn language is to talk to other people.
There is a VR application that lets you learn languages through VR experience. This will let people have the interaction that we lack when we learn new languages through books. Because lots of people find learning a new language difficult, I believe that representation of VR in this area would be very helpful.
Project Description
For project #2, our group decided to build an experience that tackles the problem of sustainability on campus. We wanted to base our scene on campus, and there are trash on the ground. In the real world, if someone passes by trash, and ignores it, there are no consequences. Besides, people all have the mind set that someone else will act on that. We wanted to raise people’s awareness of the NYUAD community by creating an alternate reality where if people walks by a piece of trash without picking it up, they will receive negative feedback indicating that they are not acting in a proper way.
Besides, because of the diversity of the community, there isn’t a shared standard for recycling which everyone agrees upon. Always having been such an ignorant person about the environment, I really get confused when I throw an empty Leban bottle: should I put it in general waste or plastics? The bottle is definitely recyclable, but only after I clean the bottle. Recycling can be extremely complicated: I still remember that I was extremely shocked when the RA told us that we should recycle the lid for Starbucks cups but throw the paper cup into general waste. By creating an educational environment which mimics what actually happens on campus, we hope to teach people how to recycle in an entertaining way. Through the repeated interaction within our scene, users might be able to perceive recycling as less burdensome as they get more familiar with it.
Process and Implementation
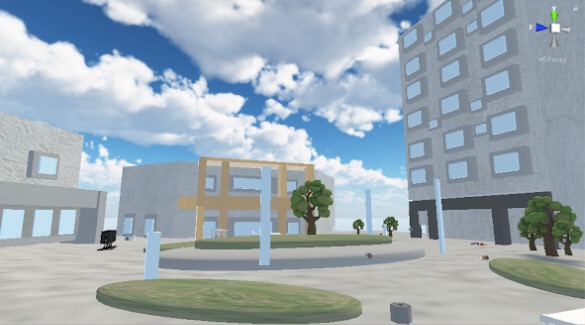
The tasks were divided up: Ju Hee and Lauren were in charge of the environment, while Simran and I were in charge of the interaction. After the environment was created, our scene looked like this:

When Simran and I started to work on the interaction with trash in our environment, we found a lot of problems with the environment. First, because we failed to set up our VR station when we first started the project, we didn’t have a sense of the size of our VR space and how it is reflected in Unity. If I were to figure out we need to set up the VR station beforehand before Lauren and Ju Hee started to build the environment, we could have saved a lot of time and energy from rescaling the space. The environment is too large, so that the movement of users are not significant: users can’t really tell that they are moving inside the environment. So we decided to do a teleporting. We divided our tasks: I will be mainly in charge of the teleporting, and Simran will focus on the interactions, but we are helping each other out throughout the process.
I went through several tutorials to understand how teleport in steamVR works in Unity. Here are the links to the tutorials: https://unity3d.college/2016/04/29/getting-started-steamvr/
https://vincentkok.net/2018/03/20/unity-steamvr-basics-setting-up/
At first, I decided to place teleport points next to each piece of trash, so that users can easily access the piece of trash by aiming at the right teleport point. Then I realized that since we have such a huge space, users would never be able to go to the areas where there is no trash, so I think it would be nice to have the whole space to be teleportable: users should be free to move in our space, and they also have the choice of going directly to the trash and complete the training if they are not interested in experiencing our VR campus.
Adding the teleporting object to the scene, setting up the teleport points in the environment, and attaching the TeleportArea script to the ground are easy. However, it becomes frustrating when we have to figure out the scale and the position of our camera. The environment was build in a way that the ground is not set at position (0, 0, 0), and the objects were not tightly attached to the ground. And when we do the teleport, we get teleported beneath the buildings
At first I tried to change the y-position of the camera, so that we actually view everything, but then after raising the camera, we are not able to see our controllers because they are so far away. Then I tried to raise the y-position of the player, but we are still teleported to a place below the ground. Then I figured, instead of making the ground teleportable, I can create a plane that is teleportable, and raise the plane a little bit. By doing that, I fixed the problem.
I also doubled the scale of everything so that the scale looks fine. Then we found several problems when we view the environment via the headset. First, the buildings, or some part of them, disappear when we looking at it.
Then I figured out that the nearest and farthest viewing distance should be adjusted according to the scale of our environment.
Another problem we encountered was how to get close to the trash. Because our scene is in such a huge scale, we cannot even touch the trash lying on the ground because they are so far away, so we decided to have the trash floating in the air, at approximately the same level of the teleport plane, so that users are able to grab them with the controllers. However, if we simply disable the gravity of the trash, they will fly away.
But then if we enable the gravity and kinematics at the same time, the trash won’t be throwable: it couldn’t be dropped into the trash bin. Then I searched online for the correct settings for the Throwable script in steamVR and also asked Vivian how her group did that. In order to make it work properly, we have to set in Regidbody “Use Gravity” to be true, and “Is Kinematic” to be false. Then for the Throwable scripts, we need to select “DetachFromOtherHand”, “ParentToHand” and “TurnOffGravity” for the attachment flags.
I also added the ambience sound to the scene, created the sound objects for positive and negative sound feedbacks, set up the sound script, and attached them properly to each sound object.
Reflection/Evaluation
One of the take-aways from this project is that for VR experience, the scene and the interaction cannot and should not be separated. After dividing the tasks up, Simran and I did not really communicate with Lauren and Ju Hee. Then we took over the already-made environment that was extremely large, and the objects in the scene were kind of off scale. We spent a lot of time fixing the scale of everything, and I felt really bad about not communicating with them beforehand. We could have saved a lot of time.
Another thing I should bear in mind for future projects is that we should never ignore that fact that the hardware might went done. We almost ran out of time when creating the interactions because the sensors kept disconnecting with each other and the controllers kept disappearing from the scene. We should have planned everything ahead rather than leaving everything to the last minute.
Overall, I enjoyed the process of learning from peers and from obstacles, and our project turned out to be nice: we didn’t expect users to be really engaged in our game and to have fun throwing trash.
1.Project Description: describe the space you created and the modes of interaction.
Junior, Claire, and I decided to create a realistic bathroom space in which the user could walk around in. We did have limited space as we used the front part of our classroom, but in a sense, the space limitation worked to our advantage. A regular bathroom is not that big, and so recreating the bathroom space within the limited space replicated the real life situation. While there is a bathtub in the corner, it is relatively the normal size, neither too small nor too big. We also decided to put a tower rack and some towels to show that it is a bathroom that is being used frequently, and not a sample bathroom in a showcase. The big shelf was added to place one of the glasses that would be used for the interaction. And of course, the toilet is placed in the corner to emphasize the fact that the user is in a bathroom. There is also the wide sink with the mirror on top of it which we intentionally chose to match the overall atmosphere of the bathroom.
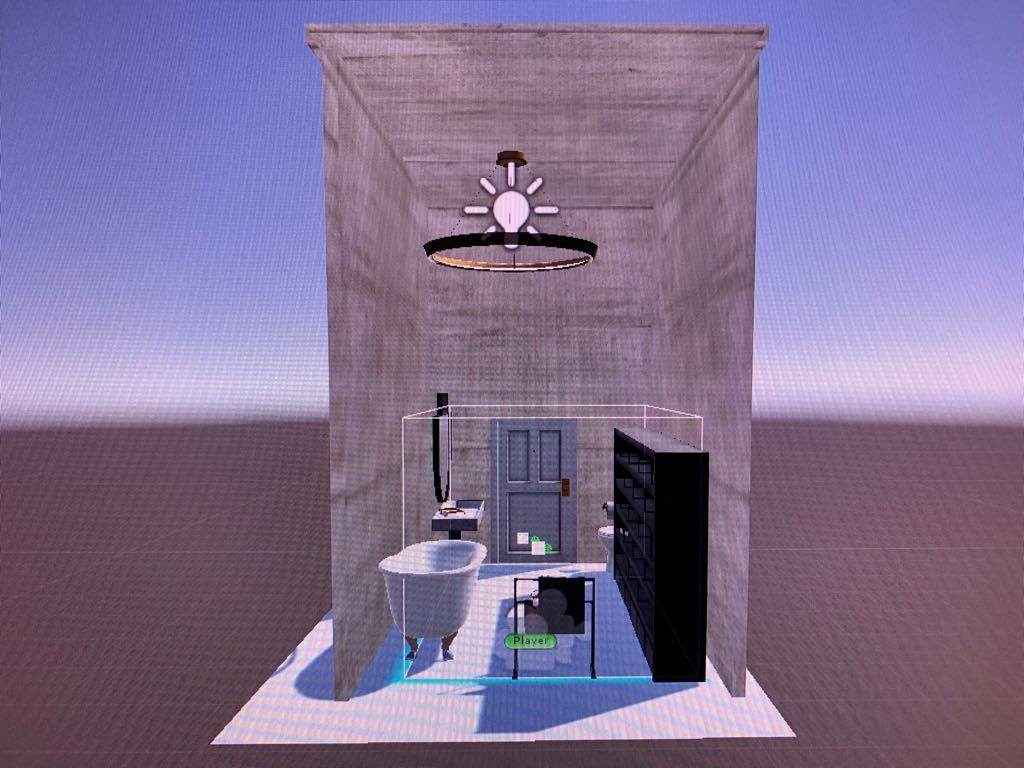
Overview of the Scene
We used the grab and select tool using the Vive controller’s trigger button as the mode of interaction. By hovering the controllers over the glasses, the user can click on it using the controller’s trigger, which allows them to “take a look” through that specific glass. This means, when the user choses a glass that has the function to make everything look red, the user will see everything in red after selecting those glasses. Another interaction would be walking in the virtual bathroom setting. By calibrating the Vive headset, the user can walk freely inside the bathroom, and look closely at the various objects.
2. Process and Implementation: discuss how you built the scene within the development environment and design choices your group made What did the brainstorming process involve? How did you go about defining what would be everyday in this world? What were the steps to implementing the interaction? Share images or sketches of visual inspiration or reference, including the storyboard/layout.
As for the brainstorming process, Junior, Claire, and I met and discussed what kinds of daily life situations can be replicated in an interesting way. As much as we knew that we had to replicate some kind of daily life situation, we wanted to use the full potential of virtual reality. We talked about how “sight” is an essential part of life and that having bad eyesight can sometimes be a barrier when wanting to examine everything carefully. We thought that experimenting with “sight” would be our main theme. We then discussed how the user can be given a task to find and try on the different glasses in a space. That way, the user can interact with the objects in the space (glasses) and go through the different experiences. We also discussed where we wanted the setting to be. The different ideas were the living room (common room) of a share house, the user’s own room, and the bathroom. We thought that the common bathroom would be the most realistic since people can leave their glasses behind in the common bathroom and forget and have to come back to find their glasses.
We used various assets from Unity’s asset store and created the bathroom setting. While there are a variety of assets in the Unity’s asset store, the ones that looked the most sophisticated and appealing were not free. Therefore, we had to scavenge through the free assets in order to create the bathroom. We gathered different assets packages and played around by placing the objects that were related to the bathroom. For example, we tried different iterations of the sink to see what actually fit the space, mood and interior design. The first sink that we originally put seemed to be too bland, and after some experimentation, we decided to settle down with the current sink.
3. Reflection/Evaluation: This should discuss your expectations and goals in the context of the what you felt was achieved with the finished piece.
Originally, we wanted to add more components to the current piece. However, none of us had experience with using Unity before this class and so there were many components that we had to learn. Our expectation was that we would have each glasses have its own filter, and we would place different scripts on each of the glasses to possess different effects. Our original idea was to have one glasses to zoom in, another one to zoom out, another one to have double-layer vision, and the real one that would give the corrected vision. However, figuring out how to create all of these different kinds of vision took so much of our time, that we needed to come up with a plan B in case we could not debug the scripts that we had written.
In the end, we settled with the idea of having each glasses possess the power of switching scenes. We switched our main theme to “experiencing the colors” and so we decided to blur the vision a little and have the user focus more on the color change. When one glasses was selected, the user will “put on” those glasses, and see the objects in red. Then, if the user “put on” another glasses, the user will see the objects in green.
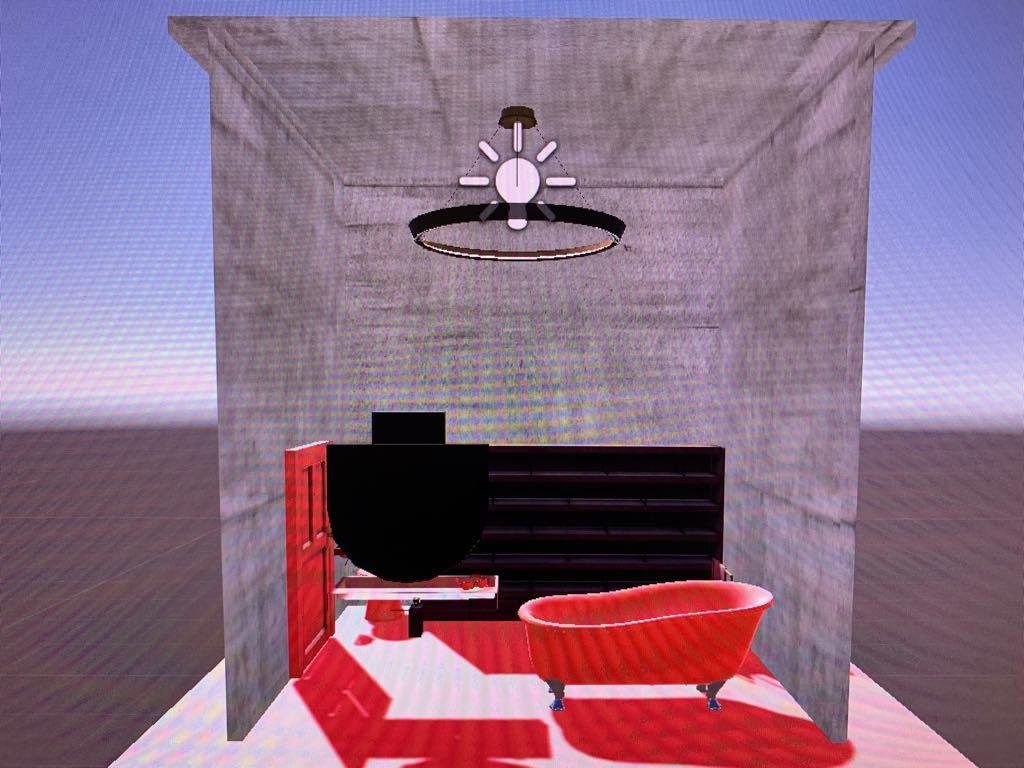
Red Scene
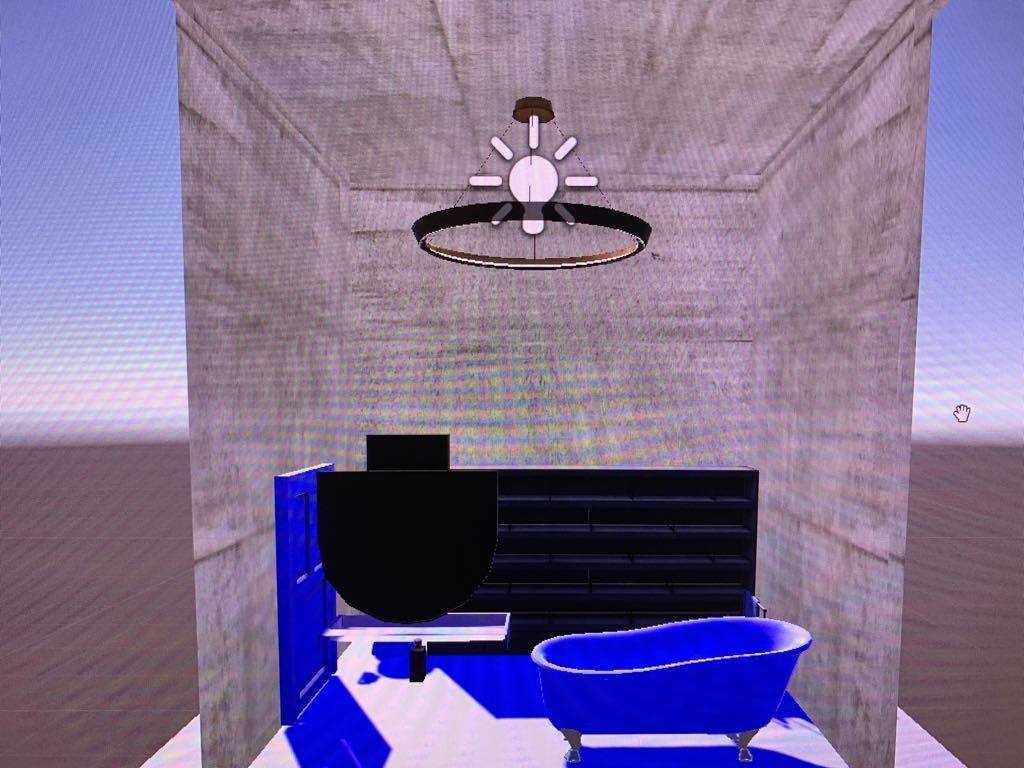
Blue Scene
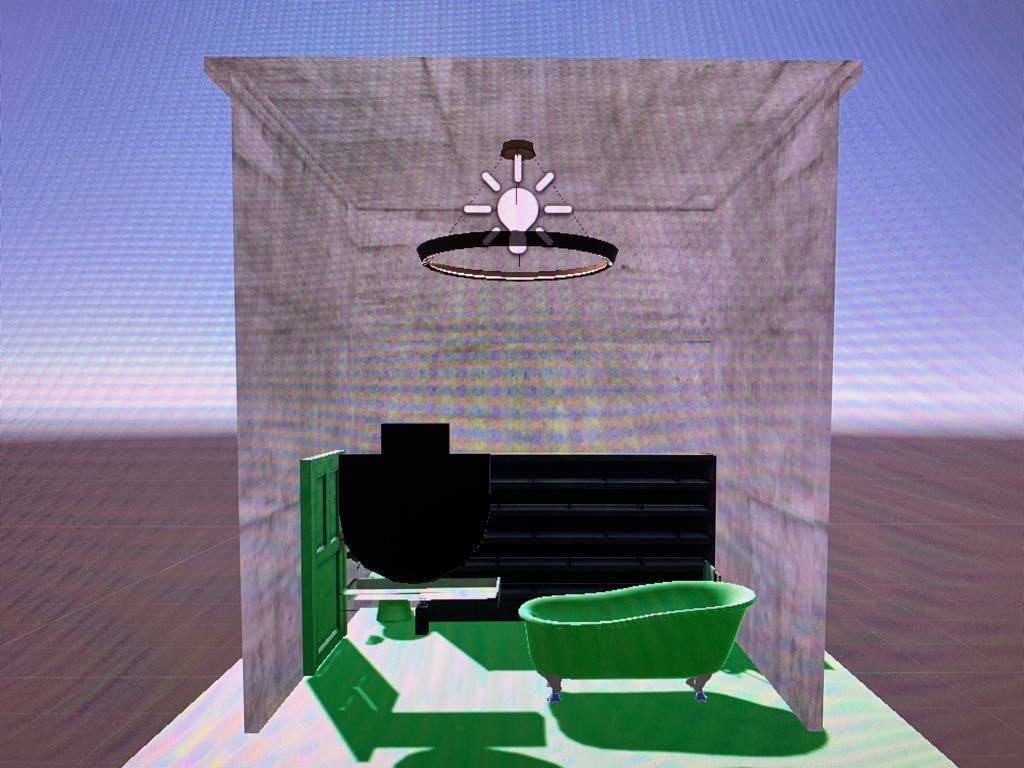
Green Scene
We were able to achieve the basic of what we wanted to achieve, in the sense that we wanted to provide the user of being in a bathroom setting, trying on the different glasses, and allowing the user to experience the different vision with the different glasses. Although the different visions were a little different from the original idea, the way we dealt with trying to recreate the effect in a different manner was a result of our good teamwork.
I would say that the most difficult task in this project was selecting the glasses and placing the script in the object that would jump to different scenes. Because we had the idea of each glasses having its own filter, we needed to create different iterations of the same setting in order to augment that effect. Moreover, our group only had three (two) members, and so we struggled in regards to knowledge and implementation compared to other groups who had four members.